Showing posts with label Rinea Inspires. Show all posts

Friday, 2 April 2021

Butterfly Fun with Rinea Foiled Pape

Hello friends!

Wow! It's been a hot minute since I've been blogging....but I'm back!  I hope you are ready for some crafty goodness!


It's time for another  Rinea Project .

Today I'm sharing some easy ideas for using tools you already have in your craft space to with your foiled papers!

Here are the products you will need for this project:
Butterfly Punch
Butterfly Thin Cut Dies
Butterfly Bigz Die
Butterfly Embosslit
Butterfly Embossing Folder
Sizzix Big Shot


I created a short YouTube Video to show you how I used all these tools. Check it out here:


Thanks for taking the time to stop by my blog!  I love to read your comments -
they are such an encouragement.
Remember, you can save 10% on your Rinea order when you shop HERE.  I hope you are inspired to use your Rinea Foiled Paper to create something fun.

Have a great day!
Jess

Wednesday, 16 September 2020

Happy Haunting with Rinea

Hello friends!


It's time for another  Rinea Project .

Today I'm sharing a fun and easy Halloween Card idea.
Here are the products you will need for this project:
Arctic/Arctic Starstruck Foiled Paper
Adhesive
Cardstock
Halloween Sentiment Die (I used Happy Haunting by Tonic Studios)
Web Embossing Folder
Nuvo Drops in Black & White

I created a short YouTube Video to show you how to make them! Check it out here:


Love how this project came together! Here is another look:
 

Thanks for taking the time to stop by my blog!  I love to read your comments -
they are always an encouragement. I would love to see your projects if you create them too! Remember, you can save 10% on your Rinea order when you shop HERE.  I hope you are inspired to use your Rinea Foiled Paper to create something fun.

Have a great day!
Jess

Wednesday, 2 September 2020

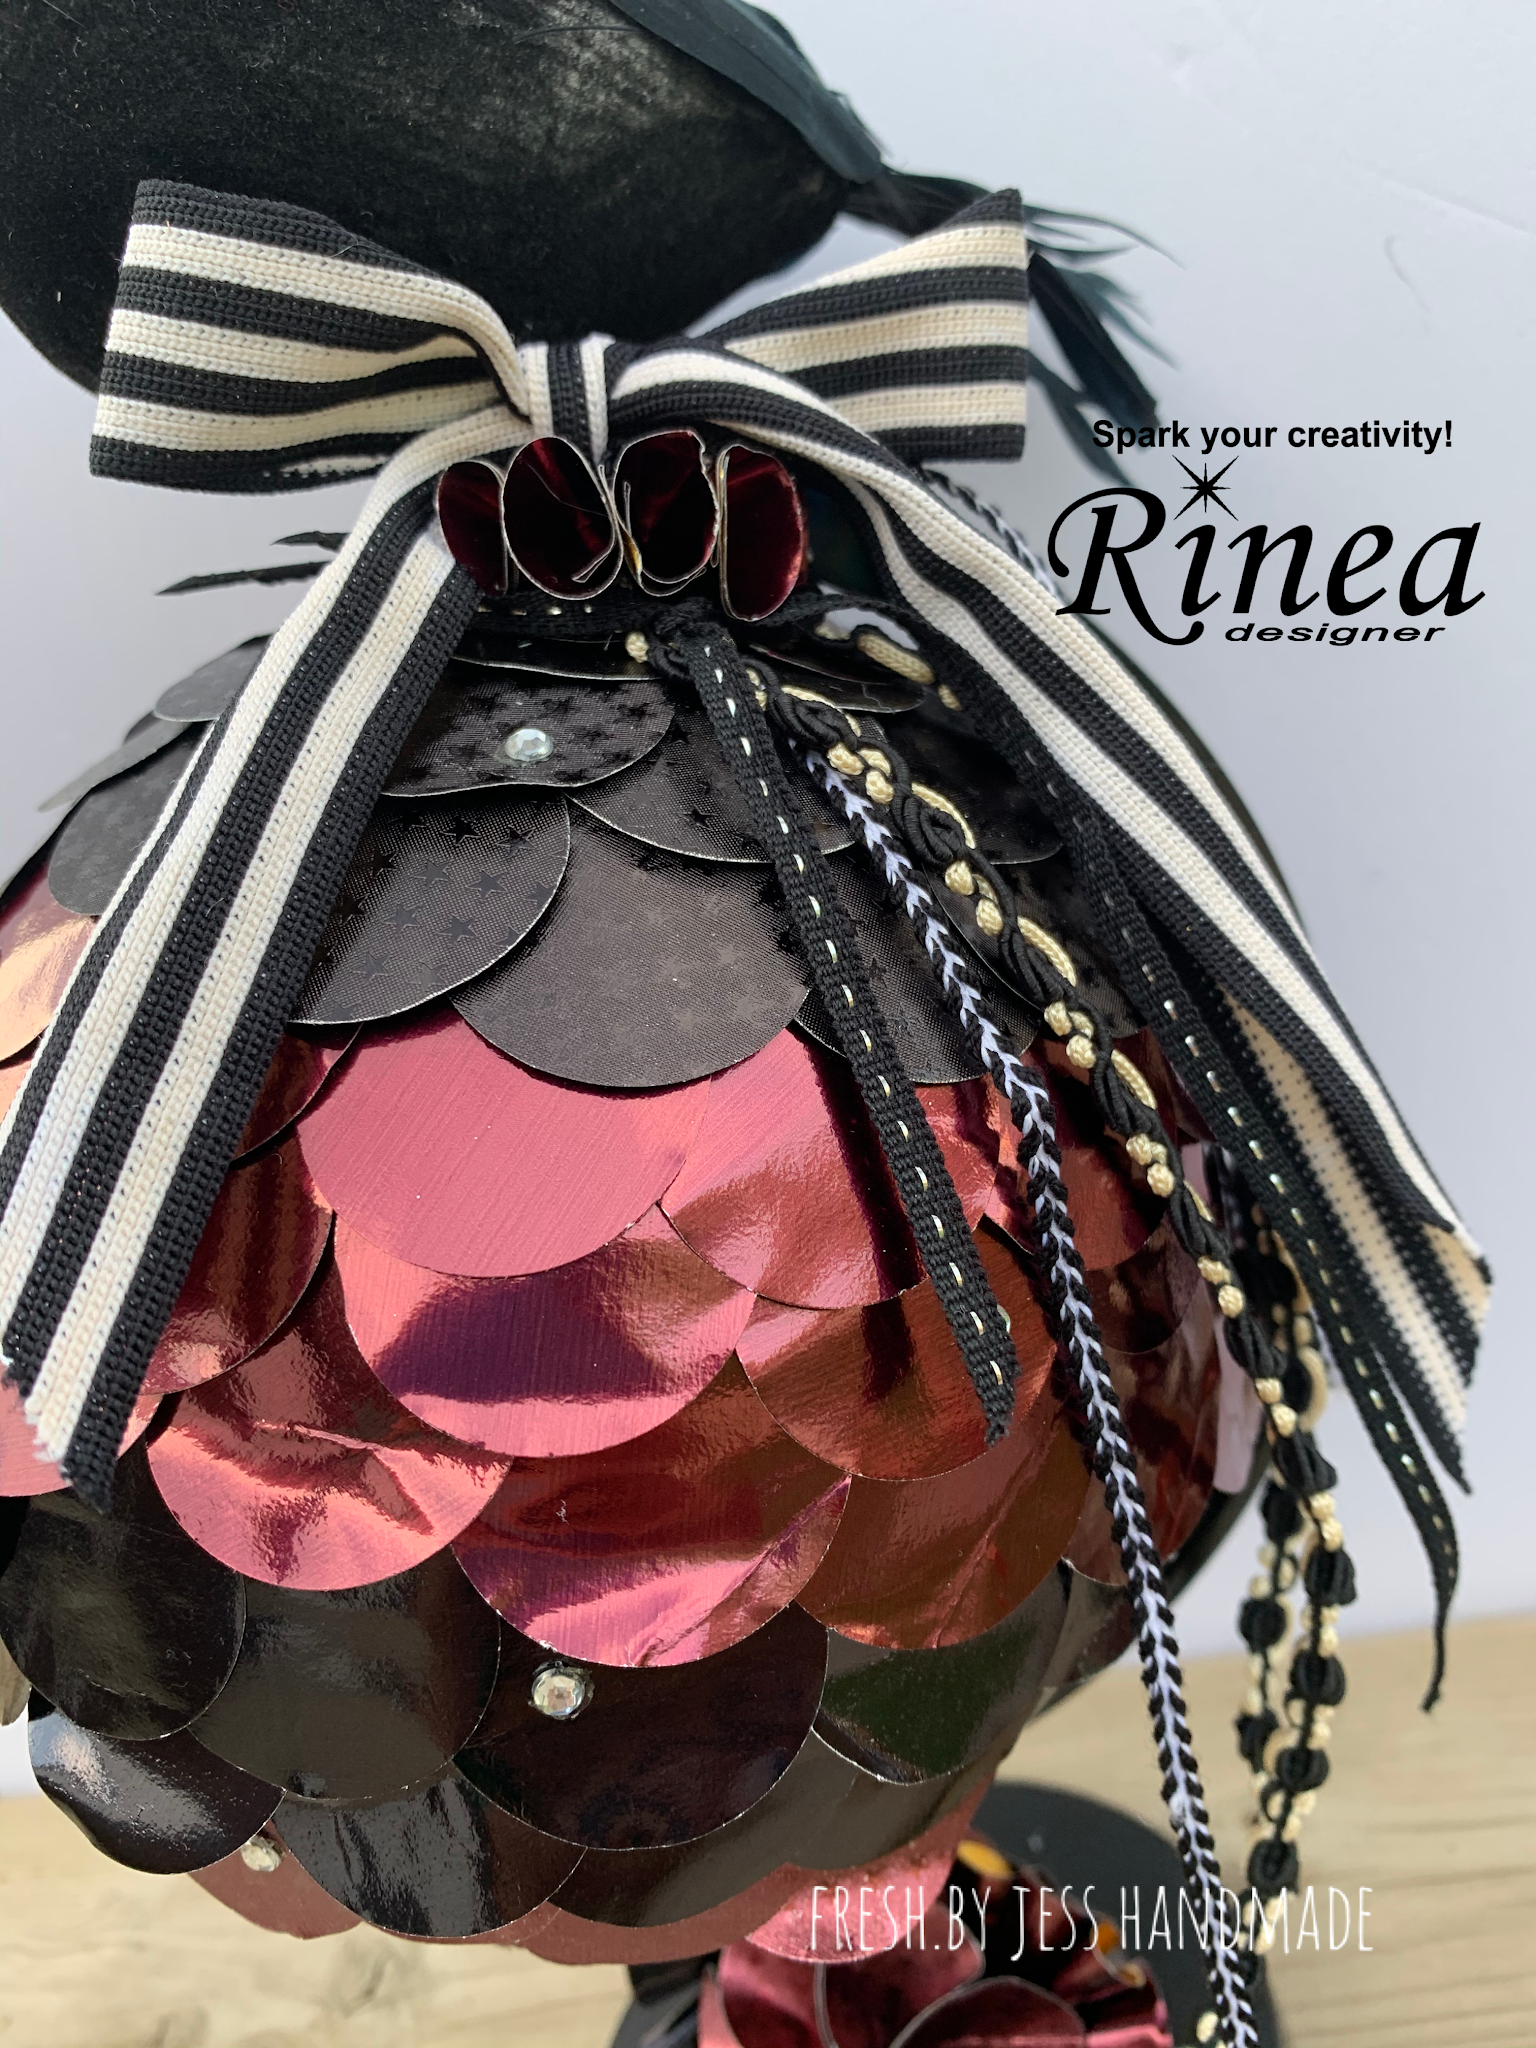
Altered Globe with Rinea Foiled Paper

Hello friends!


I have a really fun project to share with you today featuring Rinea Foiled Paper! 

I've had this idea in my head since seeing some papercraft version floating around on Pinterest, so I really wanted to create my own!  It turned out perfectly - just as I had envisioned it!  So grab a cheap dollar store globe, your Rinea Foiled Papers and let's get crafty!


I used the following supplies:

- Small Plastic Globe (I picked mine up at our local dollar store)
- 1.25" Circle Punch
- Adhesive of choice
- Ribbon/trims
- Small faux Crow
- Hot Glue Gun

First you are going to pop the globe part off it's stand (mine came off super easily!). Next, you are going to punch a ton of small circles of each of the four colors -  Merlot/Merlot Starstruck Foiled PaperMerlot/Gold Glossy Foiled Paper, Ebony/Gold Glossy Foiled Paper and Ebony/Ebony Starstruck Foiled Paper. I forgot to count how many I used! You are going to add a row of adhesive around the top of the globe and start adding your circles. I overlapped them slightly and continued down the globe, switching the colors as a I went. I did add a row of adhesive every time so the whole globe wasn't sticky at the same time.


Once the globe was completely covered in my Foiled Paper Circles, I set it back into it's base and started decorating. I used hot glue to add a small crow figurine  (again, a dollar store find!), some black and white ribbons & trims (from my stash!) and of course some rhinestones!


I had a few extra circles punched, so I just created some random flower shapes and glued them on.


There you have it!  A fabulous Halloween Home Decor piece to display. Thanks for stopping by today. 

Remember, you can save 10% on your Rinea order when you shop HERE.  I hope you are inspired to use your Rinea Foiled Paper to create something fun.

See you again next time!

Jess


Sunday, 16 August 2020

Christmas Card Stashbuster with Rinea Foiled Paper

Hello crafty friends!


I have a really fun video that shows you how to use up your Embellishment Stash along with your Rinea Foiled Paper to create beautiful Christmas Cards! (Yes, it's never to early to start building up that holiday stash!).

For this project, I used the following supplies:


Stash of miscellaneous Christmas Embellishments
Embossing Folders
Adhesive of choice
Cardstock

Check out how I used all of these papers:


Here are a few more pics of all the cards:


Thanks for stopping by today!  I hope you enjoyed all of my Holiday Cards and are inspired to created now.

Remember, you can save 10% on your Rinea order when you shop HERE. Thanks so much for stopping by today. I hope you are inspired to use your Rinea Foiled Paper to create something fun.

Jess

Sunday, 2 August 2020

Heat Embossing with Rinea Foiled Paper

Hello friends!


I'm so excited to show you today how to Heat Emboss with your Rinea Foiled Paper!

I'm using our BRAND NEW color - Merlot/Gold Glossy - to show you this exciting technique!  Check out the video below:


Thanks for stopping by!  

Remember, you can save 10% on your Rinea order when you shop HERE. Thanks so much for stopping by today. I hope you are inspired to use your Rinea Foiled Paper to create something fun.

Jess

Friday, 22 May 2020

5 Techniques with Rinea Foiled Paper

Good morning crafty friends!


I hope you are doing wonderful today - I sure am! Today I have 5 quick and easy techniques to share with you featuring  Rinea products. I know you will love them!

Supplies you will need:

Misfits Foiled Paper Pack

Ghost Ink 2.0

Embossing Folders

Sandpaper

Paper Towel

Assorted Punches

I did create a YouTube video to show you how I used these materials to create some beautiful backgrounds.  Check out the tutorial below:


Remember, you can save 10% on your Rinea order when you shop HERE. Thanks so much for stopping by today. I hope you are inspired to use your Rinea Foiled Paper to create something beautiful.

See you again soon!

xoxo
Jess


Thursday, 16 April 2020

Greenhouse Fun with Rinea Foiled Paper & Poppystamps

Good morning crafty friends!


I hope you are all doing fantastic today. I am very excited to share a new card with you today featuring  Rinea products along with Poppystamps!  I am once again using the Greenhouse Potted Plants die and we will be doing a bit of paper piecing today.  First up, supplies! 


Supply List:

Tombow Glue

Big Shot or other die cutting machine

Let's have some fun! You will start by diecutting all of your pieces. I used the Mocha/Gold Glossy Foiled Paper for the base frame and also cut it out a second time using Copper/Gold Glossy Foiled Paper. For the leaves, I used Jade/Gold Glossy Foiled Paper, the birds came from Ebony/Gold Glossy Foiled Paper.


I used the Copper/Gold Glossy foiled paper as my base and added a layer of our BRAND NEW Arctic Starstruck Foiled Paper. You are going to LOVE it - it's so pretty.

Next, I used the Tombow Glue to add my base frame to the Arctic Starstruck layer. Once that dried, I trimmed out some of copper pots to layer over some of the Mocha pots and glued them down.

The rest of the bits and pieces were just glued down as I built my scene. It was a fun project!


Finally, I stamped my sentiment with Ghost Ink onto a piece of Copper/Gold Foiled Paper that was trimmed to fit inside the frame. Once it dried for about 30 seconds, I simply wiped off the ink and like magic, my sentiment appeared! Ghost Ink is just so neat! You definitely need to pick some up if you haven't already.

You can really see the Arctic Starstruck Foiled Paper here!!

Remember, you can save 10% on your Rinea order when you shop HERE. Thanks so much for stopping by today. I hope you are inspired to use your Rinea Foiled Paper and poppystamps dies.

See you again soon!

xoxo
Jess


Thursday, 2 April 2020

Hello Birdie Tag with Rinea & Poppystamps

Hello crafty friends!


I have a brand new project to share with you today using Rinea products along with poppystamps! I fell in love with the Greenhouse Potted Plants die as soon as I saw it and knew I could create some fun things with it. 

Supply List:

Tombow Glue

Scissors

Big Shot or other die cutting machine

Ribbon

I had a ton of fun creating a YouTube Tutorial for you this week. You can check it out below:


Remember, you can save 10% on your Rinea order when you shop HERE.

See you soon!

xoxo
Jess

Monday, 16 March 2020

Happy Birthday Dude with Rinea

Hello crafty friends!


I have a fun new card to share with you today using Rinea products - this one is more on the masculine side! We are still working with our Creative Embellishment products, and I'm using some Brick Pieces Chipboard & 80's Slang Words on this card.


Supply List:


Sandpaper

Cardstock

Stamps

Thick Embossing Powder

Versamark Ink

This card will come together quickly for you!  I promise :)

Start with a piece of Ebony Starstruck Foiled Paper that is appox 4" by 5.25" as your background. Adhere the Brick Chipboard to the background in the location you want. I sprinkled some super thick embossing powder on the pieces and heat set for some extra dimension.


My Ruby/Gold Glossy piece came next. It's cut approx 1/4" smaller than the Ebony Starstruck. I carefully noted the position where the chipboard elements were added and made a slit in the Foiled Paper before adhering around the edges. Once it was adhered, I simply started tearing, sanding and distressing the Foiled Paper until the chipboard was exposed and I had the desired effect.


Next up was the DUDE Chipboard! I covered the piece with Versamark Ink and sprinkled on my Super Thick Embossing Powder - then heat set! Pretty quick and simple technique here.


I stamped the Happy Birthday sentiment onto the Mocha/Gold Glossy Foiled Paper using Ghost Ink, let it dry for a few seconds, then wiped off the ink. Voila! Sentiment exposed perfectly. (If you want to learn more about the Ghost Ink, please check out my post HERE).


Finally, I glued down the DUDE, adhered my sentient with foam squares and mounted the entire panel onto my cardbase.


Thanks for stopping by! I had a ton of fun making this card - and I know you will too!

Remember, you can save 10% on your Rinea order when you shop HERE.

See you soon!

xoxo
Jess

Monday, 2 March 2020

Hello Strawberry Embroidery Hoop DIY with Rinea

Hello friends!
I'm working with Rinea Foiled Paper today and have a fun cool home DIY project to share with you!  The video is a bit longer than normal, but I share a few cool techniques for working with chipboard!  I was super excited to work with the Creative Embellishments chipboard items - in this project, you will see me use the Strawberries.
For this project, you will need the following products along with the chipboard:
- Embroidery Hoop
- Embossing Powder
- Versamark Ink
- Liquid Adhesive & Foam Squares
- Scissors
- Lace

Now lets check out how I created it here:
Here are a few more close ups:


Thanks for stopping by! Did you know you can save 10% on your order if you use my code JESSICAKAISER HERE.

See you again soon,
xoxo
Jess

Sunday, 16 February 2020

Rinea Ghost Ink Hap-bee Birthday Card

Hello crafty friends!


I have a fun new card to share with you for Rinea this week.  If you recall, in my last Rinea post, I created various backgrounds using the new Ghost Ink 2.0 (see post here!).  This week, I'm sharing a card I created with one of those backgrounds! 

Here are the supplies I used:

I followed up on the bee theme and did a little free painting with the Ghost Ink Re-Inker. Simply dip your paintbrush (as show in the video) and paint where you want the color of the Foiled Paper to be removed! Let it sit for about 10-12 seconds and wipe with a cloth. Voila!  The color is magically removed.  


You an also do some freehand writing with the paintbrush and Ghost Ink 2.0 Re-Inker! Here is an example:


You are just going to love the new ink. Guess what? I used the Misfits Foiled Paper Variety Pack for all of these projects! The Misfits are just perfect for trying new techniques. 

Thanks for stopping by today.  Want to save 10% off your next Rinea purchase? Use code "JESSICAKAISER" and shop HERE.

I hope you will go out and make your own cool backgrounds. See ya soon!

Jess


Thursday, 16 January 2020

Rinea Valentine's Tags

Hello!
I'm here today with a fun, quick Rinea project, featuring a YouTube video showing you how to create some adorable Valentine's Tags!  You can use them as your "exchange cards" too.  I used some fun, "snarky" sentiments, but you could always go super traditional too!  I used the Love Variety Pack along with your fave Valentine stamp set, heart dies, ink, tags and ribbon.  The stamp set I used came from Joy Clair Stamps.  It's such a fun set!  It's called #single in case you are looking for it.
 Here is the video: 


 Thanks for stopping by!  I hope you enjoyed!
 See you again soon!
 Jess

Thursday, 2 January 2020

Rinea Valentine's Card

Hello friends!
Today's project is a fun (and SNARKY!) Valentine's Card for you! I'm featuring the Rinea Foiled Paper Products and I used the Love Variety Pack to create it.
Other supplies you will need:
- cardstock
- scissors
-heart shaped dies
- stamps & ink
- adhesive of choice
- embossing folder with hearts

To start with, die cut an assortment of hearts in various sizes. I tried to use all the colors and textures in the variety pack.

Next, I layered the largest heart with two other hearts and "fringed" them with scissors. I simply added adhesive to the top part only of each layer.  I also cut a piece of Glossy Fuchsia/Gold and  used that as an accent. The background is Starstruck Fuchsia.
  
The sentiment was stamped out and a piece of the Starstruck Ruby was used to mat it. All the layers were adhered with ATG Adhesive and some smaller hearts were popped up with foam squares!


Voila!


Those of you who want to know, I used the #single Stamp Set from Joy Clair.
Thanks for stopping by!  See you again soon!

Jess