Saturday 31 October 2015

SparkleNSprinkle November Reveal!

Welcome to Sparkle N Sprinkle's
 Nov 1 New Reveal Blog Hop!


We have FIVE new stamp sets to share with you today.  These new sets are 20% off until Nov 3.  So once you finish the blog hop, head on over to the store and start shopping.  All of the new sets are available on cling mounted rubber or as a digital image. 

The sets are:

Woofie's Birthday 758   (digi version DIGI758)
 Birthday Queen 759   (digi version DIGI759)
Puddles 760   (digi version DIGI760)
Chicken Run 761   (digi version DIGI761)
Splish Splash 762   (digi version DIGI762)


On Nov 3rd, ONE GRAND PRIZE WINNER will be selected from the comments left on the Designers' blogs listed below. Please leave a comment with each Designer in order to be eligible for the Grand Prize.  You never know who the Mystery Designer will be that has the winning comment.

The Grand Prize Winner, which will be announced on the SNS Facebook page and on the SNS Blog, will receive ALL of the new stamp sets released this month (or the digi versions, if preferred).


The Blog Hop order this month is:

Irit
Jess
Belinda
Anne
Shona
Marie
Eret

(*Tip: if you have difficulty with a particular link, try clicking on the Designer's blog title to send you to their Home page.)


We hope you enjoy the New Reveal Blog Hop as much as we do.  Thanks for joining us and remember to comment on each of the Designers' blogs to be eligible for the Grand Prize.  
 Wonder who the Mystery Host will be this month????

The Sparkle N Sprinkle Creative Challenge also begins today.  There are lots of prizes and recognition badges.  Come check out how you can become a SNS Featured Artist as well.  The theme is always Anything Goes using Loose Glitter, Embossing Powder, and/or Flock.

Have you checked out the SNS YouTube Channel featuring Demo Donna?  If not, then you are in for a real treat.  Subscribe today to get all the latest Demo Donna tips and techniques!


I chose to work with "Woofie's Birthday".  Isn't it cute?  I started off by making my background using the NEW Enamels Embossing Powder in Polka Dot (EP464).  I inked up a piece of white cardstock with VersaMark Ink (VM001) then sprinkled the Polka Dot Embossing Powder (EP464) over the entire piece.  Then, I heat set it from underneath the paper until it was all melted and gorgeous! I then attached it to a piece of black cardstock using Tear-ific Tape (SAT04)

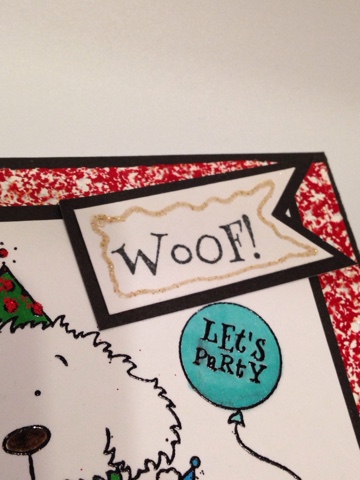
Next, I stamped the cute image with Memento Black Ink (ME900) and colored some accents with some markers. I added some Fire Engine Red Glitter (G1007) using the 
Sakura Glue Pen (quicky)  around the balloon, party hat & party bandanna for added effect.  I free-hand drew around the "woof" sentiment with the Sakura Glue Pen and added Hit the Beach Embossing Powder (EP394).

To finish the card, I added some Grassy Green Flocking (FL103) to the grass and Canary Flocking (FL108) to the tennis ball using the Glue Pen. I layered it on black cardstock with Tear-ific Tape (SAT04) and mounted it to the background using Foam Squares.


The next stop on our blog hop is Belinda and you can find her blog here.


Thanks for stopping by and I can't wait to see you again next time!


Jess

Monday 26 October 2015

Stick It Down Challenge Entry!


Hello!


This week is going to be busy!  I have lots of posts to make and projects to submit to various publications before the November 1 deadline!  PHEW!


Up first, Stick It Down!

I've been eyeing up their sketches for a long time and FINALLY had time to sneak in a entry for their card sketch challenge!


Here is the sketch:

Here is what I created:


I used mostly SparkleNSprinkle products to create this fun, sparkly card!

Supply List (all SparkleNSprinkle products unless indicated):
From The Herd Stamp Set (Stampin' Up!)
Cranberry Ink (Close to My Heart)
Chipboard Star (Close to My Heart)
White Embroidery Thread (from my stash)

Thanks for looking!  I hope you come back soon :)

Jess


Friday 16 October 2015

Sleigh Ride - SparkleNSprinkle New Release!


Hello friends!

I'm back again over at the SparkleNSprinkle blog with a fun new card featuring the new release stamp set, Sleigh Ride!


Here is the list of supplies I used to make this card (links to all SparkleNSprinkle products used are included):

Stamp Credit: Sleigh Ride {00-744P7}
Navy Cardstock 
White Cardstock
Sizzix Embossing Folder
Brads
Blue Ink
Brown Ink


First I started by stamping the horse image with Versamark Ink.  Then, I sprinkled on the new Fleur de Lis Embossing Powder and heat set from underneath.  I trimmed the image to desired size.  Then I took the Peacock Feathers Distress Ink and sponge all around the image to give it a little more color. I used a corner rounder to snip the edges and matted on a piece of navy colored cardstock using Tearific Tape.  I used my corner rounder once more to trim the edges.  Next, I took my Dimensional Glue and created some "snow" underneath the sleigh and horse.  I sprinkled on the Sparkling Snow Glitter and set the piece aside to dry.

I cut my background papers to 4"x5.25" an 3.75"x5" (to fit a standard A2 card).  I took a piece of the 2" Tearific Tape and applied to the top of the navy cardstock.  I sprinkled Snow White Flocking over the adhesive (after I removed the protective backing of course!) and burnished well with my finger tool.  Next, I took the paper and ran it through my Big Shot using a circle patterned embossing folder to give some extra dimension!  Once that was complete, I attached it to the white piece of cardstock with Tearific Tape.  I added the image to the background with foam squares and attached to the card base with more Tearific Tape

Next, I made the sentiment.  I stamped it with a dark blue ink and punched out.  I used another punch to give it some background and attached everything together with Tearific Tape.  To make the brads red, I used our new Super Thick Red Embossing Powder!  I carefully held each brad with tweezers and heated.  Then, I dipped the brad into the embossing powder and head set. I quickly dunked the brad back into the embossing powder and heat set one more time to make is super red.  Don't touch the brad right away, it's super hot!  Once they cooled, I added them to my sentiment and attached to the card with foam squares.


To enhance the inside of the card, I simply stamped a few trees with brown ink, stamping twice to make some darker and lighter.  Then, I stamped with Versamark Ink, sprinkled with Brown Fizz Embossing Powder and heat set.  They turned out nice and sparkly!  I added a "Merry Christmas" sentiment from another stamp set called "Toyland Bear".  Then, I attached it to the inside of the card and voila!  A cute, snow-ready Christmas card!


Thanks for stopping by and now you can go shop for all the supplies to make this card at SparkleNSprinkle!
Cheers!

Jess

Creative Corner Challenges - Must Have 3 Embellishments!

Hello again!  

Welcome to another fun challenge from Creative Corner Challenges!


This week, we were sponsored by the amazing 
A Day for Daisies!  I just love their whimsical digis!

I chose to work with a digi that had a wedding theme - perfect for embellishing!

Here is my card:


I watercolored the image with an Aquapainter brush using Pearlescent Watercolor paints form SparkleNSprinkle. I added some rosette ribbon at the bottom, some silver embellishments to enhance her veil and a big, sparkly gem for some bling. I had some shimmery aqua paper from Envelopments on hand and used it to mat my image.  The base of the card is gray.  On the inside, I stamped a sentiment with aqua ink.  I used the stampset "For the New Two" from Stampin' Up!.


I do hope you will come out and play along! 
 You could win an amazing prize from A Day for Daisies!

Until next time,

Jess


Wednesday 14 October 2015

Atlantic Hearts Sketch Challenge #129

Hello again!

Sorry I'm a tad late with my post - Thanksgiving weekend made me lose track of a day! 

 So, without further ado, here is this week's sketch from Atlantic Hearts Sketch Challenge:


Here is my card:


Supplies: (all Close to My Heart unless indicated)
Paper: Kaleidoscope paper pack
White card base
Stamp: C1616 Treats of Friendship
Shinhan Markers: Leaf Green, Tender Pink, Clay
Archival Black Ink

Supplies from SparkleNSprinkle:
Versa mark Ink
Black Detail Embossing Powder
Luau Green Glitter
Small Foam Squares


I do hope you will come and play along this week!

Until next time,
Jess

Tuesday 6 October 2015

Cackle On!

Hi there! 

I am so excited to be a Guest Designer over at the SparkleNSprinkle Blog for the next 3 months.  Thanks for stopping by to check out what I created using all the amazing SparkleNSprinkle products.

I am sure having fun playing with the "Cackle On" stampset this month! It's so darn cute!

IMG_6603

Here is the list of SparkleNSprinkle supplies I used to make this card:

Artwork by: Jess Kaiser
Stamp Credit:
SparkleNSprinkle Supplies:

Here is how I made the card. First, I stamped the witch randomly with Versamark Ink on a 4x5.25" piece of black cardstock.  Next, I took my Pumpkin Orange PearlEX Powder, lightly sprinkled it over the stamped witches using a soft brush and gently rubbed into the ink to give it a shiny orange background.

Artwork by: Jess Kaiser

I cut a small strip (roughly 1x5") of my October Afternoon patterned paper (it's from their Witch Hazel line!).  I wanted to jazz up the pumpkins that were already their and I had a small bag of Paprika Flocking sitting on my desk - PERFECT! I grabbed my Sakura Quickie Glue pen, colored in the pumpkins where I wanted the flock to adhere and pressed in the Paprika Flocking!  Aren't they cute and fuzzy?  I adhered the paper strip to my witch background with Tear-ific Tape.

Artwork by: Jess Kaiser

Artwork by: Jess Kaiser

Now, I continued on to the rest of my stamping!  I stamped both the sentiment & the witch image  from Cackle On onto my white cardstock using Versamark Ink, sprinkled Black Detail Embossing Powder over the images and heat set with my heat tool.  I fussy cut out the witch and used a circle punch to cut out the sentiment.  I adhered these to my card using Foam Squares. Finally, I cut my card base from Hyacinth Cardstock (standard A2 Card with a side fold) and used Tear-ific Tape to attach my card front.

Artwork by: Jess Kaiser

Artwork by: Jess Kaiser

I think it turned out super cute, don't you?  Thanks for stopping by and remember to check out the store for all these amazing supplies and more!  Until next time, happy crafting!

** Jess **

Friday 2 October 2015

Creative Corner Challenges - BOOOOOO!


Hello everyone!


This week at Creative Corner Challenges, we chose the theme of BOOOOO!  With Halloween this month, I thought it would be fun to share some Halloween creations.  We did not have a sponsor, so we were free to create as we pleased!

I actually came up with multiple projects for this week.  I am working on Halloween Decor for my house, so it was perfect timing!

Here are my creations:


I actually found a really cool way to use my Cricut too!  I needed some glitter embellishments, but was out of black glitter paper.  I grabbed my Super Adhesive Sheets from SparkleNSprinkle and cut some shapes from my Cricut Artiste cartridge - then I added my glitter flocking (SparkleNSoft).  It worked PERFECTLY!  I was so excited to find this out! Now I can make custom die cuts with all my glitters and embossing powders - yippee!


I created this page completely with paper & die cuts from October Afternoon's Witch Hazel line!  Isn't is adorable?


Here is a pic of some creations I made using the Close to My Heart Cricut Artiste and Artbooking cartridges:


I do hope you will come along and play with us this week.  I want to see all your Halloween & Spooky creations.   I sure enjoyed all my Halloween creating this week!

Enjoy and have a great week!

Jess