Sunday 31 July 2016

SparkleNSprinkle - August Reveal!

Welcome to Sparkle N Sprinkle's
 August 1 New Reveal Blog Hop!


We have five new stamp sets to share with you today.  These new sets are 20% off until the 3rd of the month.  So once you finish the blog hop, head on over to the store and start shopping.  All of the new sets are available on cling mounted rubber or as a digital image.  


The sets are:


Eskimo Kisses 788 (digi version DIGI788)
Pool Friends 792 (digi version DIGI792)
Get Your Craft On 794  (digi version DIGI794)
Stella-Happy Meds 796  (digi version DIGI796)
Flower Cart 798  (digi version DIGI798)


On August 3rd, ONE GRAND PRIZE WINNER will be selected from the comments left on the Designers' blogs listed below. Please leave a comment with each Designer in order to be eligible for the Grand Prize.  You never know who the Mystery Designer will be that has the winning comment.

The Grand Prize Winner, which will be announced on the SNS Facebook page and on the SNS Blog, will receive ALL of the new stamp sets released this month (or the digi versions, if preferred).


The Blog Hop order this month is:


Anne
Shona
Jess - You are here! 
Eret
Diane
Chris
Belinda

(*Tip: if you have difficulty with a particular link, try clicking on the Designer's blog title to send you to their Home page.)


We hope you enjoy the New Reveal Blog Hop as much as we do.  Thanks for joining us and remember to comment on each of the Designers' blogs to be eligible for the Grand Prize.  
 Wonder who the Mystery Host will be this month????


The Sparkle N Sprinkle Creative Challenge also begins today.  There are lots of prizes and recognition badges.  Come check out how you can become a SNS Featured Artist as well.  The theme is always Anything Goes using Loose Glitter, Embossing Powder, and/or Flock.


Have you checked out the SNS YouTube Channel featuring Demo Donna?  If not, then you are in for a real treat.  Subscribe today to get all the latest Demo Donna tips and techniques!


Hello! 
Well, I have to say that this reveal card came together VERY quickly, all thanks to the gorgeous pre-colored DIGITAL STAMP!  Yes, they can make us "non-colorers" very happy!  I am still experimenting with markers and coloring, so when I can get a digi that's already colored, it makes me sigh relief!

First, let's start with the full supply list from SparkleNSprinkle:
Stella-Happy Meds 796  (digi version DIGI796)

So, as I said, this card is a quick one!  Sometimes we just NEED a card to come together quickly because we don't have hours to spend on it. Here's how I made it.

First, I printed off the gorgeously colored Stella-Happy Meds DIGI796 image onto white cardstock.   I trimmed it out and then accented various areas.  I used Elephant Gray Flocking on her hair (how fun is that?!) and Fire Engine Red Glitter on some of the "meds".  I used the Quicky Glue Pen to adhere both of the products - seriously, this is a MUST HAVE tool in your glitter tool box!


To make the glittery frame, I took my 1/2" Tear-ific Tape and adhered it around the edge of my cardstock.  I removed the protective backing and sprinkled on the Inference Gold Glitter, burnishing well with my finger tool.


Finally, I adhered my first layers of cardstock using 1/2" Tear-ific Tape and the main image was popped up using Foam Squares for added dimension.


See how fast that came together?  LOVE IT!  Simple and effective.  I hope you enjoy it too! Cardmaking is supposed to be enjoyable!  The next stop on our blog hop is the UBER-talented ERET and you can find her blog HERE.

Until next time friends,

Jess

Monday 25 July 2016

SparkleNSprinkle - For My Husband Featuring Wetlands Stamp

Hello again!

IMG_0015

I'm here today with another quick card for SparkleNSprinkle featuring the  Wetlands 1 Stamp Set.  I just love this set - can't you tell? :)

Here is the complete supply list:
(you can click on each product to find it in the shop!)
Onto the card!  This was a quick, easy but gorgeous design! First I started by stamping the background image (water and trees) using a BLUE Craft Ink.  I quickly sprinkled on the Clear Detail Embossing Powder and heat set, creating the gorgeous blue background.  This is a super easy technique and a great way to have limitless colors of embossing options - simply by using the inks you have on hand!  I love Clear Detail Embossing Powder.  It is a MUST HAVE in your collection.

I stamped the Crane using Versamark and used Black Detail Embossing Powder to make him stand out against the water.  I grabbed my Nuance Turquoise Watercolor Powder and a water color brush to create some water.  I did use my Heat Tool to dry the paper quickly, but you could easily set it aside to dry for a bit.

IMG_9823

To make the "frame", I took the leaf stamps and randomly stamped them around the background using Versamark Ink.  I sprinkled on Moss Star Embossing Powder and heat set, creating the beautiful frame of leaves.  Finally, to finish off, I stamped (with Versamark Ink) a few of the ducks flying overhead and used Black Detail Embossing Powder. I used the same technique to add the sentiment. All of my card layers were adhered using 1/4" Tear-ific Tape and VOILA! :)

IMG_0016

As you can see, this set is SUPER versatile and I just love how quickly a card can come together.  I hope you enjoy it too!

IMG_0017

Until next time,

Jess

Saturday 23 July 2016

MHKDesigns - Christmas In July Special Release - Candy Canes & Crackers

Hello friends!


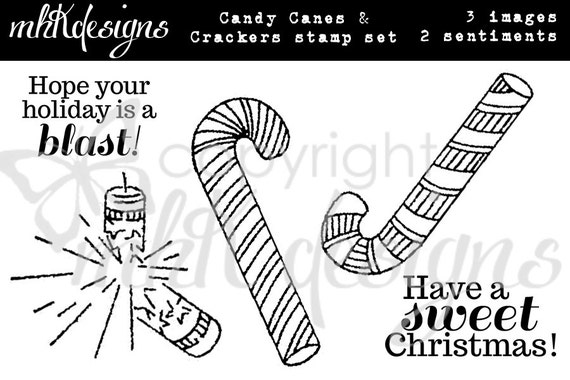
Welcome to a super special MHKDesigns Release - Christmas in July!  I'm here today to feature a BRAND NEW stamp set called "Candy Canes & Crackers".  

Here is the stamp set: 
Candy Canes & Crackers Digital Stamp Set

I loved this stamp so much, I created a second card!


I hope you enjoy this card!  Be sure to check out the other designers creations!

Until next time,


Friday 22 July 2016

SparkleNSprinkle - Christmas Skates in July

Hello friends!

IMG_0020

I'm up on the SparkleNSprinkle Blog with a new card featuring "The Christmas Skate" Stamp Set.  I just adore this set - it's so cute and perfect for the holidays.

Here is my full supply list (you can click on each product to find it in the Shop):
Phew!  Now that the list is out of the way, onto the card itself!

IMG_9919 IMG_9920 IMG_9921

First I started by making my background. I took the sentiment stamp from "The Christmas Skate" stamp set and randomly stamped it across my paper using Versamark Ink.  Then, I sprinkled on the Mojito Marbled Embossing Powder and heat set, making my own patterned paper background!  I set that aside and sent to work on my coloring.  I stamped the skate image using Versamark and used Black Detail Embossing Powder to create my outline.  I took my TwinTouch markers and colored in the image (I like to use the Stamp Card as a guide to help me with my coloring! ;) ). Once I was done, I die cut out the entire image using a large oval.  I added some Reflection Velvet Glitter to the skate blades using my Quicky Glue Pen as my adhesive.  The Glue Pen is always an essential product to have on hand!

IMG_9923 IMG_9922

To make the glitter background piece, I took a piece of Sticker Paper and die cut out a large Label Frame.  I removed the protective backing and sprinkled on the Victorian Christmas Glitter, burnishing well with my finger tool!  I mostly did the edges as I knew the middle would be covered by the skate image and I don't want to waste my beautiful glitter!

IMG_9932 IMG_9933

Once my glitter was well burnish, I took a few strips of 1/4" Tear-ific Tape and attached the colored skate image to the glittered background sticker paper and then again to the background.  I tied 2 pieces of the MonAmiGabby Pull Ribbon around the card panel and made the gorgeous bow. I just love pull ribbon, don't you?

The sentiment was stamped onto a piece of white cardstock using Versamark Ink and embossed with Black Detail Embossing Powder.  I die cut it out using a smaller oval and then gently rolled the edges into my Versamark Pad.  I sprinkled on Moss Star Embossing Powder and heat set. I popped up the sentiment using Foam Squares and then attached the entire card panel to my base using Tear-ific Tape.

IMG_9924

To finish the card, I used my Ruby Slippers Nuvo drops to create "brads" in the corners and I created a holly leaf & berries next to the sentiment using Woodland Green Crystal Drops & Ruby Slippers Glitter Drops.

I hope you are inspired to get a start on your Christmas Cards now - I sure am!

IMG_0021

Until next time,
Jess

Thursday 21 July 2016

MHKDesigns - July/August Challenge!


Hello friends!


I'm back on the blog with my July/August Challenge Creation for MHKDesigns!  Here is this month's Challenge Prompt:


Here is what I created:


The Stamp Set I used is "Open Bloom".

To make the card, I printed out the images and colored the flowers using my TwinTouch Markers.  I fussy cut out the images and I popped up one of the flowers with foam squares to make it look like there are 2 flowers in 3D. I accented the middle of the flower with a cabochon. I was going for a Christmas feel with this card. Some glittery letters and tinsel ribbon finished off the look.

I hope you enjoy this card and are inspired to go and create!

Until next time,


Wednesday 20 July 2016

MHKDesigns - Designer Inspiration for July 2016


Hello friends!


I'm back on the blog with a quick Designer Inspiration for MHKDesigns!  

Here is what I created:


I used a sentiment from "Eat Your CAKE" and the main deer image came from "Holiday Deer".  I love how versatile both of these stamp sets are!

To make the card, I printed out the images and colored the deer using my TwinTouch Markers.  I fussy cut out the image and the sentiment.  I used some MonAmiGabby Pearl Mesh and ribbon from my stash to accent the card.  I popped the image up with foam squares to further accent the image.

I hope you enjoy this card and are inspired to go and create!

Until next time,


Tuesday 19 July 2016

Atlantic Hearts Sketch Challenge #169

Hello friends!

We have a great sketch this week over at Atlantic Hearts Sketch Challenge!  Check it out!  I LOVE sketches - they are a great inspiration when you need a little help getting your crafty mojo going.


Here is what I came up with:


I grabbed all my Calypso supplies from Close to My Heart and FINALLY got to play!  These thin cuts are absolutely adorable and the embellishments are so much fun!  They are only available for a short time, so grab 'em while you can!

I hope you will come out and play along.  We would love to see your creations and take on the sketch!

Until next time,

Jess

Friday 15 July 2016

Creative Corner Challenges - Congratulations!

Hello friends!


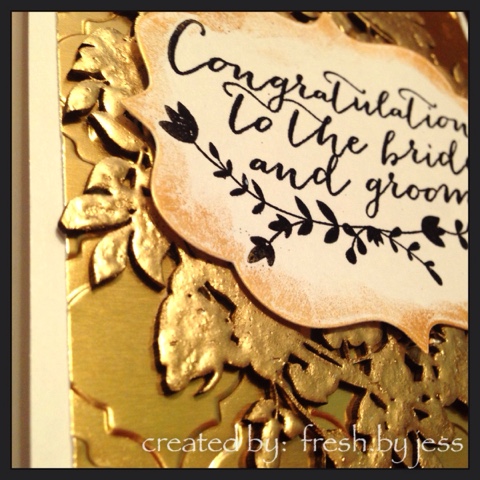
It's another fun challenge week at Creative Corner Challenges!  Our theme this week is "Congratulations" which worked out perfect as we are attending a wedding this weekend!

I went to work and came up with this: 


To make the card, I took a piece of gold metallic cardstock and embossed with an embossing folder.  I rounded the corners using corner rounder.  I had a beautiful wreath chipboard piece from Southern Ridge Trading Company and thought it was perfect for this!  I used Stampendous Embossing Ink and Gold Detail Embossing Powder (both from SparkleNSprinkle).  I used a Sentiment from a Stampin' Up! wedding set and embossed with Black Detail Embossing Powder.  Finally, after die-cutting it out, I used my finger tool to rub on some Nuvo Gold Embossing Mousse and popped up with foam squares. 


I hope you enjoy this card and come out and play along with us!

Until next time, 

Jess