Showing posts with label Tutorial. Show all posts

Friday, 18 May 2018

Aster Garden - Light Version

Hello friends!


Today I'm sharing a May Reveal Card for SparkleNSprinkle!  As you recall, last week I shared my Dark Version of the Aster Garden Stamp Set. Well, this week I have the opposite! I created a "Light Version" as well!

First up (like always!)....my SparkleNSprinkle Supply List:


Onto the card tutorial!


So, this was another "Mixed Media" project for me...and it started with PHOTO PAPER!  Yes, shiny, glossy photo paper. I used a 4.25x11 sheet of paper to start with (I knew I was going to make multiple cards from this background!  I grabbed my brand new Nuvo Shimmer Powder in Atlantis Burst and started to play! First, I misted the photo paper with water and then I sprinkled on my Shimmer Powder!  Look at how it reacts with the water!  You don't need much - it is highly concentrated!  You can grab an Aqua Painter brush and move the powder around too (like watercolor!). 


You can see in these photos how I moved the color around! 


This was the dried effect:


I also sprayed on some Nuvo Mica Mist in Turkish Rose! SOoo pretty!


Next, I used my Nuvo Masking Fluid!  This stuff is pretty cool. You literally drop it wherever you want the color to remain underneath (hence, the MASK!). Set it aside to let it dry, then you can layer whatever you want on top. You will then peel off the mask (it's a latex type product so it will just pull off when dry). Pretty cool!


Dripping the Masking Fluid on! 


This is the dried Masking Fluid - you can see how it turned more clear and rubber looking!

I took my Fresh Pear Mica Mist and sprayed that over top of everything.


Then I simply peeled off the "masks" :) 


PHEW!  That was a lot of photos - but I really wanted to showcase the background!  It was so much fun to make!

The rest of the card came together quite quickly. I embossed the Asters using Versamark Ink and Gold Detail Embossing Powder. I took another piece of white cardstock and embossed the Aster one more time with Versamark Ink and Magic Speckle Embossing Powder! SOO pretty! The sentiment was stamped with Versamark Ink and Gold Detail Embossing Powder.  I randomly sprinkled on more Magic Speckle Embossing Powder and heat from underneath - giving a more random look and feel. A light wash of the Atlantis Burst Shimmer Powder was added on the seniment as well!  I used Black Cardstock to back all the white layers and 1/4" Tear-ific Tape to hold everything together.


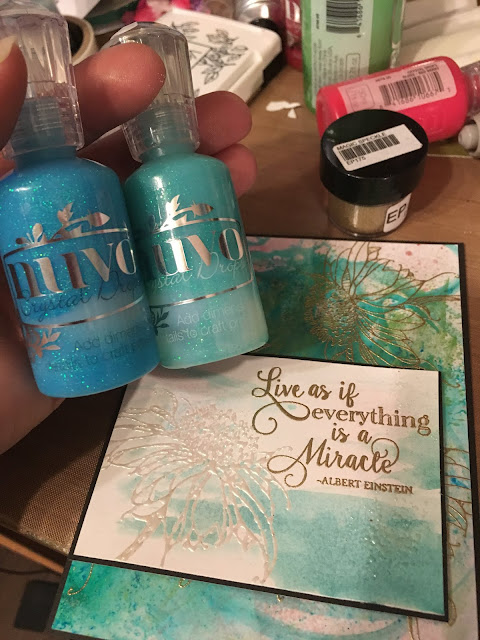
Finally, Nuvo Glitter Drops in Sunlit Meadow and Blue Lagoon were added to accent everything. Prepare yourself for more photos! :)


SOOO - I hope you like this photo loaded tutorial!  Remember to comment both HERE and on the main SNS Blog Post too to be entered in our monthly contest! 

Thanks for stopping by!  I appreciate all of your comments!
See you soon, 

Jess

Friday, 26 August 2016

SparkleNSprinkle - Pool Friends

Hello friends!


I'm back today with a new card for SparkleNSprinkle.  This time, I used the new release stamp set called "Pool Friends" to create a fun shaker card!  Let's go!

SparkleNSprinkle Supply List:


Step 1:
Stamp image onto white cardstock using Memento Ink and color. I used our Pearlescent Watercolors and an aquabrush to paint mine.


Step 2:
Create your "window".  To start, I took a 4x5.25 piece of blue cardstock and used an embossing folder to add some dimension.  I took a second piece of the same sized blue cardstock and cut out the window using an oval die & my Big Shot machine.  I cut a piece of Embossable Acetate to 4X5.25.  The colored image was centered where I wanted it to show through and adhered using 1/4" Tearific Tape to the background piece.  Next, I attached my Embossable Acetate to the underside of the "window" piece using 1/4" Tearific tape.  

I added the Foam roll all around the very outside edge of the base (I cut the roll in half to make it skinnier so it wouldn't "peek" into my window.  I added my sequins and then attached the top panel carefully so the Foam Roll wouldn't show through. So far, so good!


Step 3: Embellish!
I stamped out 5 beach balls using Memento Ink, watercolored and fussy cut them out.  To add more sparkle,  I took my Quicky Glue Pen and added some Margarita Glitter to some of the beach balls.  I stamped out the drinks & sentiment and followed the same procedure (watercolor, Margarita Glitter and trim). I adhered the sentiment and some of the beachballs using Foam Squares (adds dimension!) and the rest was adhered using Tear-ific Tape. I also added a piece of pull ribbon to the sentiment using a mini stapler. I didn't pull it, just cut a small piece and formed a small loop.

Finally, I doodled around the outside edge using my Quicky Glue Pen and sprinkled on Margarita Glitter.  The entire "shaker" was then adhered to a piece of 4.25X5.5 Zeus Gold Carstock using 1/2" Tearific Tape.  


See how simple a shaker card can be?  

I hope you enjoy this card and pick up some of the supplies I used to create it from the shop.

Until next time,

Jess

Friday, 19 August 2016

SparkleNSprinkle - Flower Cart

Hello crafty peeps!


I'm here today to share a new card that I created using the New Release Stamp set from SparkleNSprinkle called "Flower Cart". This stamp set is so versatile & fun!  Let's go!

SparkleNSprinkle Supply List:

Nuvo Embellishment Mousse 

Step 1 - Image & Sentiment
Print out your fully colored digital image and sentiment onto white cardstock.  I love that some of the digital images are colored - saves me some time ;)  To add a little more sparkle and shine, I used the Quicky Glue Pen to add Fairytale Lavender Glitter to some of the flowers and the trim of the umbrella

I die cut the image out using my oval dies & Big Shot Machine, then applied Peony Pink Nuvo Embellishment Mousse around the edges of the image using my finger tool. 

The sentiment was fussy cut out and then all I did was trace the words using my Quicky Glue Pen, sprinkled on Princess Rose Embossing Powder and heat set. 


Step 2 - Background
I cut a piece of 4x5.25" purple cardstock. I then inked up an embossing folder with Versamark Ink and ran the paper through my Big Shot.  What this does is create and embossed AND inked surface!  All I did next was sprinkle on my Princess Rose Embossing Powder to the inked surface and heat set, creating a gorgeous, sparkly, embossed background piece. 

I took a white doily and completely covered it using Spring Green Embellishement Mousse.  I just used my finger tool to burnish it in. I just LOVE how shiny and fun the mousse is to work with!  You've gotta try it!


Step 3 - Let's Put it Together!
I adhered my doily to the background using Brushable Glue, then added my main image using 1/4" Tearific Tape. The sentiment was popped up using Foam Squares.  I took the main flower and added some random smears of Brushable Glue, then sprinkled on Fairytale Lavender Glitter for some sparkle.  I set it aside to dry.

I made some "Candy Dots" using the Crushed Grape Nuvo Crystal drops on the background and also in the middle of another flower.  I also set this aside to dry (I let it sit overnight).

Once everything was good and dry, I adhered the flowers with Foam Squares & Tear-ific Tape.  The entire card front was then mounted using 1/2" Tear-ific Tape onto card base that I made from purple cardstock.


VOILA!  A gorgeous Flower Cart Thank You card!

I hope you enjoyed this card.  See ya next time!
Jess