Thursday 31 December 2015

SparkleNSprinkle - January Reveal!

Welcome to Sparkle N Sprinkle's
 first New Reveal Blog Hop of 2016!


We have FIVE new stamp sets to share with you today.  These new sets are 20% off until Jan 3.  So once you finish the blog hop, head on over to the store and start shopping.  All of the new sets are available on cling mounted rubber or as a digital image.  


The sets are:


Three Tenors 767 (digi version DIGI767)
 Sing On 768 (digi version DIGI768)
  Thinking of You 769 (digi version DIGI769)
 Happily Ever After 770 (digi version DIGI770)
 Poppies 771 (digi version DIGI771)


On Jan 3rd, ONE GRAND PRIZE WINNER will be selected from the comments left on the Designers' blogs listed below. Please leave a comment with each Designer in order to be eligible for the Grand Prize.  You never know who the Mystery Designer will be that has the winning comment. 

The Grand Prize Winner, which will be announced on the SNS Facebook page and on the SNS Blog, will receive ALL of the new stamp sets released this month (or the digi versions, if preferred).


The Blog Hop order this month is:
Jess >>>>>you are here!

(*Tip: if you have difficulty with a particular link, try clicking on the Designer's blog title to send you to their Home page.)


We hope you enjoy the New Reveal Blog Hop as much as we do.  Thanks for joining us and remember to comment on each of the Designers' blogs to be eligible for the Grand Prize.  
 Wonder who the Mystery Host will be this month????


The Sparkle N Sprinkle Creative Challenge also begins today.  There are lots of prizes and recognition badges.  Come check out how you can become a SNS Featured Artist as well.  The theme is always Anything Goes using Loose Glitter, Embossing Powder, and/or Flock.


Have you checked out the SNS YouTube Channel featuring Demo Donna?  If not, then you are in for a real treat.  Subscribe today to get all the latest Demo Donna tips and techniques!


Supply List:  

Aztec Gold Glitter {G1006}
Lemonade Glitter {G1091}
1/2" Tear-ific Tape {SAT04}
2" Tear-ific Tape {SAT12}
Sakura Glue Pen {quicky}
Thinking of You Digi Stamp {DIGI770}
3D Foam Sqaures {01615}

First off, I'm soooo excited to be a Permanent Design Team Member! I can't wait to share with you all year long!


To make this simple, yet gorgeous card, I started by taking the beautiful Thinking of You Flower Bouquet Digi and enlarging it in my Word program.  Next, I added the Happy Birthday sentiment and positioned it where I wanted.  So easy!  I love that the flowers come pre-colored and black&white!  My coloring skills are a work in progress, so I love that I can print it out already gorgeously colored!  How cool is that?  I them printed off my card front and trimmed down to my desired size. 

I then ran my cardstock through my die cutter to make the solid butterfly cutout.  After, I took a piece of 2" Tear-ific Tape and added it behind the cardfront (so the adhesive was facing the front through the cutout.  I took my Lemonade Glitter and sprinkled it over the cutout, burnishing into the exposed adhesive.  To make the super pretty Glitter Ribbon, I followed Demo Donna's technique and used Lemonade Glitter on one side, Aztec Gold on the other!  I tied a loose knot and adhered across the front panel, using a small piece of Tear-ific Tape on the back to secure.


Next, I added a few more strips of 1/2" Tearific Tape and adhered my cardfront to the back cardstock. I took my Quicky Glue Pen and added some sparkle to the bouquet of flowers using Aztec Gold on the centers and Lemonade Glitter on the petals.  I love using the Glue Pen for quick glitter accents!  To add some real pizzazz, I die cut a butterfly and used the Quicky Glue Pen one more time to add Aztec Gold highlights on her wings. I adhered it just over the glittery open butterfly inlaid diecut area using a Foam Square.

To finish off the card, I added a border of 1/2" Tear-ific Tape to my edges of my cardbase and added Aztec Gold Glitter.  Then I added the entire cardfront using Tear-ific Tape!


Digital Stamps are such a great, easy way to make a gorgeous card!


The next stop on our blog hop is Eret and you can find her blog here.

Until next time, 

Jess

Friday 25 December 2015

SparkleNSprinkle - More Cherry Blossoms!

Hello friends and MERRY CHRISTMAS!!!!


I have a fun new creation this week for SparkleNSprinkle using some goodies the Glitter Queen Margaret sent us!

I really love this Cherry Blossom Stencil, so I went back to work creating with it.

I also wanted to use some flocking - so I grabbed some of my fave colors of SparkleNSoft to use.

Here is my complete Supply List:

Here is what I created:


First, I rubbed the stencil with the yummy smelling Hawaiian Coconut Soap so it would not stick to the Sticker Paper.  I cut a piece of Sticker Paper to the size I wanted to use, peeled off the backing and attached the stencil.

Next, I took my Sparkling Sea SparkleNSoft and burnished it into the exposed adhesive.  I removed the stencil carefully and sprinkled on Twinkling Clouds SparkleNSoft and burnished in really well.  It makes such a pretty, neutral background and it is sooo soft!!!


To make the border, I simply took some Tear-ific Tape and adhered it around the edges of my cardstock.  I removed the backing and sprinkled on Golden Wheat Microfine Glitter, burnishing well.


I cut out the sentiment using a small tag from the Sizzix Thinlits Fold-a-Long Die Set.  The Happy Birthday sentiment was from "Birthday Queen" stamp set.  Don't you just love the gorgeous MonAmiGabby Pull Ribbon in Mint/Gold!  I am so in love with these ribbons!  I even used the "tie" portion of the ribbon to accent the card (using glue dots to adhere the ends).  All layers of the card were attached using Tear-Ific Tape!


I hope you enjoy this card - I loved making it!  Have a wonderful Christmas Day!!!


Jess

Tuesday 22 December 2015

Atlantic Hearts Sketch Challenge #139

Hello friends!

It's time for another fun Sketch over at Atlantic Hearts Sketch Challenge!  Here is this week's sketch:


Here is what I created:


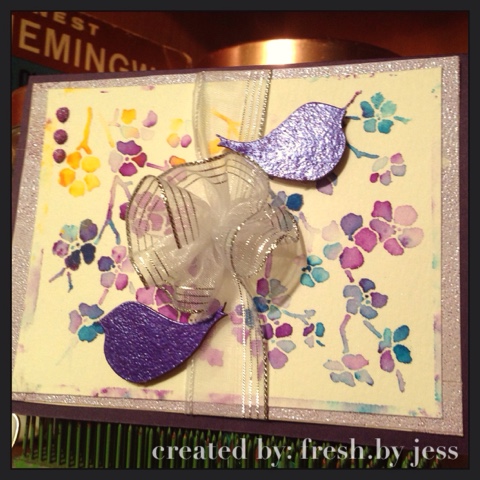
I used the Nuance Watercolor Powders, Watercolor Paper and Cherry Blossom Stencil to make the background. I just love these powders!  They are so vibrant and fun!

Once that dried, I cut to size for my card front.  I adhered Tear-ific Tape around the edges of some cardstock, sprinkled on the Wisteria Embossing Powder and heat set.  I used Versamark ink to add the Amethyst Spray Embossing Powder to the bird diecuts.

Isn't the ribbon & bow fun?  I just LOVE the Pull Ribbon from MonAmiGabby!


I finished the card by adding 3 dots of Dimensional Glue and sprinkling with Fairytale Lavender Glitter. 

All supplies are from SparkleNSprinkle - here is the full list:

Dimensional Glue {#539}
Fairytale Lavender Glitter {G1129}
Wisteria Embossing Powder {EP358}
Nuance Watercolor Powders {MNUN}
Watercolor Paper {98543-15}
Bird Die Cuts (Large Bird Flourish) {816722017178}
Versamark Ink {VM-001}
Hyacinth Cardstock {98122}
Amethyst Spray Embossing Powder {EP319}
Cherry Blossom Stencil {DR-LG644}
Tear-ific Tape {SAT04}
Pull Ribbon - Silver & White {MONR11}


I can't wait to see what you all create this week!


Until next time, 

Jess

Friday 18 December 2015

Creative Corner Challenges - Happy New Year with StitchyBear!


Hello all!


Well, well, well - here we are at our LAST Team Jess Creative Corner Challenge of 2015!  WOW!

This week we chose the theme of "Happy New Year" and we are sponsored by the always fun StitchyBear Digi Stamps!


I chose a super fun party image to work with, called "Happy New Year", which was created by StitchyStamps.

Happy New Year

Now, bear with me as my coloring skills are still a work in progress, but here is what I created:


I hope you will come out and play along with us this week!


Merry Christmas to everyone and a VERY Happy & Prosperous New Year!


Jess


Saturday 12 December 2015

Stick It Down - Guest Designer!


Hello Everyone!


I'm so excited to announce that I am the Guest Card Designer this month over at Stick It Down!

Here is the December Sketch we were given to work with:


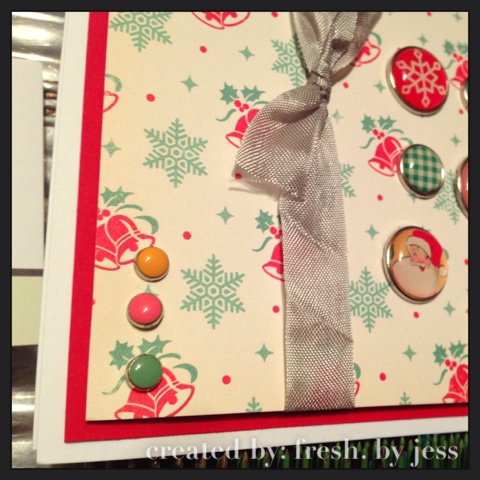
I immediately thought of a stash of Christmas Supplies that I had been hoarding for quite some time - all by Teresa Collins.  Here is what I came up with:


I added a pop of Fire Engine Red Glitter (SparkleNSprinkle) to the stamped images (Close to My Heart). 


I sure had a lot of fun creating this card and was so honored to asked to Guest Design this month!  Thanks for stopping by and be sure to head over to Stick It Down to add your creation to the Challenge! 

Until next time,

Jess

Friday 11 December 2015

SparkleNSprinkle - Christmas Stocking


Hello again!


I'm a Guest Designer again this week over at SparkleNSprinkle!  


We were given a "grab bag" of goodies to design with this month, and I was given a Chipboard Stocking & Super Adhesive Sheets to play with....and off I went!


We were given a "grab bag" of goodies to design with this month, and I was given a Chipboard Stocking & Super Adhesive Sheets to play with....and off I went!
First, I traced the outline of the stocking & stocking topper onto the Super Adhesive Sheet and then cut them out. I removed one side of the adhesive backing and applied it to my diecut pieces.  Next, I took a ruler and an exacto knife and cut through the backing part only to create the "stripes" & the toe/heel.

I removed the backing where I wanted the Terrific Blue Glitter to adhere, sprinkled on the glitter and burnished well with my finger tool. I continued the same process for the Sonic Silver Glitter stripes & I used Sparkling Snow Glitter on the toe/heel portions.  Such a fun and easy technique!
To make the top part of the stocking, I removed the backing to expose the adhesive, sprinkled on the Super Thick White Embossing Powder and heat set. I loved the "cracked" look it created!
I adhered the 2 pieces together to finish the stocking using Tearific Tape.  I used a piece of MonAmiGabby's Pull Ribbon to create the hanger.

Artwork By: Jess Kaiser

I created a quick tag to finish off the piece.  I used a stamp from Toyland Bear to stamp the sentiment in Versamark ink, sprinkled on Black Detail Embossing Powder, and heat set.  I doodled with the Sakura Glue Pen around the sentiment and quickly added some Sonic Silver Glitter for added sparkle!  To finish the tag, I created a "Glitter Twine" using Tear-ific Tape, Sonic Silver Glitter & Demo Donna's latest Video Technique Club, which you can find here.  It's such a cool little technique! I added the tag to the stocking with Tear-ific Tape. I took a Sponge Dauber and some craft white ink to lightly sponge around the edges to finish.

Artwork by: Jess Kaiser

I hope that you enjoyed my project and I can't wait to share my next one!  Here is my complete supply list, including links to all the products!


Supply List:

Until next time,

Jess

Tuesday 8 December 2015

Atlantic Hearts Sketch Challenge #137

Hello friends!

Here is our fabulous sketch for the week over at Atlantic Hearts Sketch Challenge:


Here is what I created:


All supplies came from October Afternoon's "Make it Merry" Collection!  So adorable!

I do hope you will come and play along this week!

Until next time,

Jess

Friday 4 December 2015

Creative Corner Challenges - Sparkle and Shine!


Good morning!


Well, we only have 2 Creative Corner Team Jess Challenges left this year!  WOW!  Time flies! :)  I'm happy to report that my entire Design Team will be staying put (YIPPEE!) and we have a great line up for the new year with lots of fun themes and sponsors coming your way.

This week, our theme is Sparkle and Shine!  Since we did not have a sponsor this time, we were free to work with whatever materials we chose.

I chose to work with a retired set of supplies from Close to My Heart called "Sparkle and Shine!"  Coincidence?  ;)

Here is what I created:


Lots of bling, a whole lot of celebration!


I hope you enjoy and come out to play along this week!


Our last Team Jess challenge of the year is coming up on December 18 and is sponsored by StitchyBear!

Until next time,


Jess


Monday 30 November 2015

SparkleNSprinkle December Reveal!

Hello everyone!


I can't believe it's the last reveal of the year!  Wow - time sure flies!

Welcome to Sparkle N Sprinkle's
 Dec 1 Surprise Blog Hop!

This month the Designers were given a Surprise Package full of products found at the SNS Shoppe and were asked to create projects with these products.  So sit back, enjoy the Hop and get ready to have those creative juices flowing!


On Dec 3rd, ONE GRAND PRIZE WINNER will be selected from the comments left on the Designers' blogs listed below. Please leave a comment with each Designer in order to be eligible for the Grand Prize.  You never know who the Mystery Designer will be that has the winning comment.

The Grand Prize Winner, which will be announced on the SNS Facebook page and on the SNS Blog, will receive a $20 gift certificate to go shopping at the SNS Shoppe.


The Blog Hop order this month is:

Anne
Shona
Jess *you are here!
Belinda
Marie
Eret
Irit

(*Tip: if you have difficulty with a particular link, try clicking on the Designer's blog title to send you to their Home page.)

We would also like to thank all the Guest Designers who joined us this year:DianeAshleyAniChrisIrit, and Jess.  It was a pleasure having each of you on the team as Guest Designers!


We hope you enjoy the Surprise Blog Hop as much as we enjoyed creating projects for it.  Thanks for joining us and remember to comment on each of the Designers' blogs to be eligible for the Grand Prize.  
 Wonder who the Mystery Host will be this month????


The Sparkle N Sprinkle Creative Challenge also begins today.  There are lots of prizes and recognition badges.  Come check out how you can become a SNS Featured Artist as well.  The theme is always Anything Goes using Loose Glitter, Embossing Powder, and/or Flock.


Have you checked out the SNS YouTube Channel featuring Demo Donna?  If not, then you are in for a real treat.  Subscribe today to get all the latest Demo Donna tips and techniques!


While we didn't reveal any NEW stamp sets, we were given a goodie bag FULL of products to play with.  I didn't know where to start - so I grabbed the Nuance Powders & Cherry Blossom stencil and went to work!

 Here is my supply list:

Bleach
Water
Phew!  That's a long list :)


First, I started by laying my Cherry Blossom Stencil overtop of a piece of Watercolor Paper.  Then, I took my Nuance Magenta Powders and tapped randomly over top of the stencil.  Using my MiniMister, I sprayed the paper & stencil to activate the watercolor powders.  Then, I carefully removed the stencil and immediately flipped it over onto another piece of Watercolor Paper to make a print.  This is how I created the background (I used the print piece!).  It's pretty neat how no two are alike when using these amazing powders!


After I let the paper dry, I then took the Butterfly stamp from Brocade Backgrounds, inked it up with Stazon Ink and randomly stamped twice on the background.  Using a fine tip paint brush, I used bleach to remove a bit of the watercolor from inside the butterfly's wings (sort of like reverse painting!).  Once I removed enough color, I once again let the paper dry. While it was drying, I stamped another butterfly onto a scrap piece of watercolor paper and used the Nuance Magenta Powders to watercolor it.  Then, I fussy cut it out.  On all 3 butterflies, I used the Quicky Glue Pen to outline and then added Golden Wheat Mircrofine Glitter for added sparkle!  I also randomly scribbled on the background with the Glue Pen and added the Golden Wheat Glitter to my doodles. 


I added a piece of Tear-ific tape along the bottom of my background and sprinkled on Amethyst Spray Embossing Powder, then heat set it.


My sentiments came from the Friendship Flowers stamp set.  I used Versamark Ink to stamp them, then sprinkled on Black Detail Emobssing powder & heat set.  I once again used the Nuance Magenta Powders to watercolor the "Friendship" sentiment.  They are so cool to work with and have a bit of a sheen to them.  I added Foam Squares to the back of the sentiments & butterfly to attach them to the background.  I mounted them on a piece of Hyacinth Cardstock and then onto the card base, all using Tear-ific Tape.


I hope you liked my creation for this reveal - I sure had fun making it!


Good luck in the Blog Hop!  Up next in the hop is Belinda and you can find her blog here.

Until next time,

Jess