
December 1 New Reveal Blog Hop!


We have six new stamp sets to share with you today. These new sets are 20% off until the 3rd of the month. So once you finish the blog hop, head on over to the store and start shopping. All of the new sets are available on cling mounted rubber or as a digital image.
The sets are:

Build A Flower 811 (digi version DIGI811)
Will Ewe Be Mine 813 (digi version DIGI813)
Light Up My Life 814 (digi version DIGI814)
Rustic Flowers-Snapdragons 816 (digi version DIGI816)
Spring Bunny 819 (digi version DIGI819)
Build A Wreath (Digi Only) DIGI3128B
On Dec 3rd, ONE GRAND PRIZE WINNER will be selected from the comments left on the Designers' blogs listed below. Please leave a comment with each Designer in order to be eligible for the Grand Prize. You never know who the Mystery Designer will be that has the winning comment.
The Grand Prize Winner, which will be announced on the SNS Facebook page and on the SNS Blog, will receive ALL of the new stamp sets released this month (or the digi versions, if preferred).
The Blog Hop order this month is:
Jess (you are here!)
(*Tip: if you have difficulty with a particular link, try clicking on the Designer's blog title to send you to their Home page.)
We hope you enjoy the New Reveal Blog Hop as much as we do. Thanks for joining us and remember to comment on each of the Designers' blogs to be eligible for the Grand Prize.
Wonder who the Mystery Host will be this month????

The Sparkle N Sprinkle Creative Challenge also begins today. There are lots of prizes and recognition badges. Come check out how you can become a SNS Featured Artist as well. The theme is always Anything Goes using Loose Glitter, Embossing Powder, and/or Flock.

Have you checked out the SNS YouTube Channel featuring Demo Donna? If not, then you are in for a real treat. Subscribe today to get all the latest Demo Donna tips and techniques!
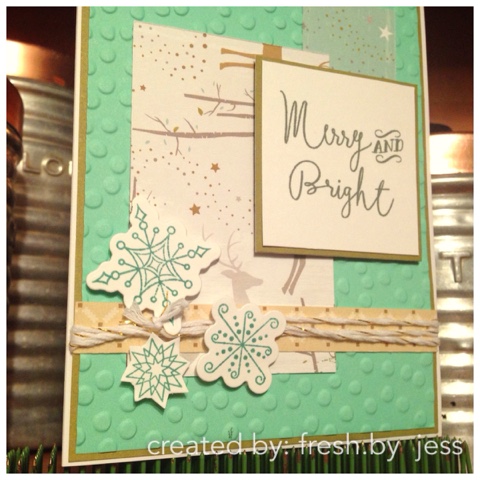
I had so much fun making this project for you this month!
Supply List:
Spring Bunny 819 (digi version DIGI819)
Purple Rain Microfine Glitter - GM2020
Hyacinth Microfine Glitter - GM2028
Ballerina Microfine Glitter - GM2024
Margarita Microfine Glitter - GM2032
Grassy Green Flocking - FL103
Pink Spirit SparkleNSoft - SS108
Embossing Paste - DR-DGWP (I used non-glossy)
Cherry Blossom Stencil - DR-LG644
Small Nuvo Glue Pen - 202N
Nuvo Embellishment Mousse - Peony Pink - 800N
1/4" Tear-ific Tape - SAT04
Foam Squares - 01613
Onyx Black Versafine Ink - TSVF082
To begin this card, I started by using the Cherry Blossom Stencil and Embossing Paste to create a gorgeous textured background. After it dried, I sponged on some of the Peony Pink Embellishment Mousse to add some extra glimmer.


To make my focal image, I started by editing my Digital Stamp image in Microsoft Word. I added the main image, added a colored background and imposed a border of the "eggs" along the bottom. That's the best part of digi stamps - being able to manipulate them! I then printed off the edited Spring Bunny Digital Stamp onto white cardstock. I fussy cut it out and went to work with my glitters!
Using the Small Nuvo Glue Pen, I simply "drew" where I wanted my adhesive to be, sprinkled on the glitter and voila! I used Purple Rain, Ballerina, Margarita and Hyacinth Microfine Glitters.
Of course I used Pink Spirit SparkleNSoft on the bunny - to make him sparkly and fuzzy!


I used the Grassy Green Flocking along the bottom of the eggs to add some extra "grassy" texture. The Sentiment was stamped onto white cardstock using Onyx Black Versafine Ink. I used some pink ink to stamp the small egg image around the sentiment.
To assemble this card, I added a strip of ribbon using 1/4" Tear-ific Tape to adhere. I popped up the focal image using Foam Sqaures. All the layers were attached using the 1/4" Tear-ific Tape. I used a scalloped edge punch to add a bit of pizzaz to the cardfront edges.


The next stop along the hop is the super talented Anne and you can find her blog here. Can't wait to share all my creations with you for this month!!
Until next time,


