Showing posts with label Easter. Show all posts

Wednesday, 11 March 2020

Creative Knockouts Challenge #341

Hello crafty friends!

It's time for a new challenge over at Creative Knockouts Challenge #341. Our theme this week is "Border Time” and our sponsor is the amazing “Fred She Said”. I chose to work with a stamp set called "Sunflowers and Thankfulness ”. I chose this image because the flowers were borders themselves! Perfect for the theme :)


Here is what I created:


With Easter around the corner, I felt that the scripture based cards are a perfect thought. A wash of watercolor was all this image really needed - it’s just so pretty! Nothing fancy on the card this time - I kept it very clean and simple.

I hope to see you at the challenge! :)

Until next time,

Jess

Wednesday, 3 April 2019

Easter Parade with SparkleNSprinkle

Hello crafty peeps!


I have a new card to share with your for SparkleNSprinkle today!  Since Easter is just around the corner, I thought it would be a great time to do some Easter inspiration. Do you send Easter cards?

For this card, I used the Easter Parade stamp set!  It's just too darn cute!

I colored the sweet chick & duck with my ShinHan markers, then fussy cut them out.  To make the little guys extra cute and fuzzy, I added Sun Dazzle Flocking using my Medium Nuvo Glue Pen.  I also heat embossed the rubber boots with a new embossing powder called "Neon" The sentiment was stamped with Versamark Ink right onto the background patterned paper and heat embossed with Black Detail Embossing Powder.  (I just loved this cute sentiment!)


For the eggs, I stamped the outlines in Versafine Clair Nocturne ink, then used a variety of embossing powders to decorate them!  They were simply cut out and arranged on the card front. Tear-ific Tape was used to adhere the whole works together. I love adding faux stitches to things, so I used a journaling pen to add a frame around my scene.  I cut a few hexagons using the tonic die for some background interest and added them behind my feature characters.


Thanks for stopping by today!  See you again really soon!

Jess

Supplies:
Stamps:  

Inks:

Embossing Powders/Glitter/Flocking:

Adhesives:

Dies:


Friday, 22 March 2019

Rinea Easter/Baby Shower Topiaries

Hello crafty friends!

I have some cool new projects to share with you for Rinea today! :)  I wanted to make some sort of Topiary and create two different versions. SO - I created one with larger flowers to be used as a Baby Shower decoration (like a centerpiece) and one as an Easter Decoration (which you will see at the end of the post!).  Want to know how I made it? Read on!
The first Topiary starts with a styrofoam easter egg shape. I used a flower punch to cut the shapes from Silver/Gold Glossy Foiled Paper  and Lavender/Gold Glossy Foiled Paper.  I totally forgot to count how many flowers I used - but it would depend on the size of the flower you are cutting and your styrofoam base.

Once I had all my pretty flowers cut out, I started pinning them into the egg using plastic head pins (you could hot glue if you didn't want a pin showing). I fluffed each petal out as I went.  Once it was completely covered, I inserted a paper straw into the bottom of the egg to hold it up.  
  

I took a small terra cotta pot and added a strip of the Lavender Glossy Paper around the top to decorate. Inside the pot in added a few river stones for weight and topped with some faux moss, then inserted my egg.  Finally, one more flower was added to the front of the pot and a pretty cabochon was added to the center.
   

You could totally change the colors to blues for a boy shower or neutrals for a surprise shower! They would make adorable centerpieces. I used the new Florals Pack to make this one:


For this pot, instead of the moss, I used shreds of Rinea Foiled Paper! :) More "Easter" I felt. I also used dressmaker's pins on this topiary - you can't really see them as much. A totally different option for you!
I hope you enjoyed my quick tutorial!  See you again really soon!
Jess

Friday, 22 February 2019

Easter Basket Fun with Rinea

Hello friends!!! 


I have a fun new post today for Rinea - and I hope it inspires some ideas for your Easter decorations! What's Easter without Easter Baskets, right?  You could use these as place cards, hostess gifts, thank you gifts.... and of course, Easter Eggs!!!  Let's get crafty!!!

Rinea Products:
Woodland Variety Pack (NEW)
 - Jade/Gold Glossy Solid Foiled Paper

Other Supplies:
- Basket Die (I used a Stampin' Up! Sizzix Die)
- Big Shot Machine
 - Tear-ific Tape (double sided tape adhesive)
- Nuvo Deluxe Adhesive
- Easter Stamps (I used Stamps of Life & SparkleNSprinkle Stamps)
- Ink color of choice
- Paper Trimmer
- Scissors

Ok!  Now that we have the supplies out of the way, let's get crafting! I think that the supply list is longer than the instructions! haha
Step 1: Die Cut!
Using your Big Shot & Basket dies, choose your fave Starstruck Foiled Paper and cut all the parts.
    
Once you have it all cut out, you are going to fold on the score lines and get ready to add your Tear-ific Tape strips.
  
Step 2 - Assemble!
You are going to want to remove the protective  backing on your Tear-ific Tape and adhere to the base plus the sides. 
  
Pretty simple so far, right? P.S - that was the hardest part!
Step 3 - Stamp your decorations!
I used a couple of my favorite Easter Stamps. The little chicky is from SparkleNSprinkle - I stamped and watercolored her up, then adhered to the front of my Easter Basket. My "chocolate" easter bunny stamp is from the Stamps of Life. Of course I had to decorate her with a Rinea Fuchsia Starstruck Foiled Paper bow :)  To make the "Easter Grass" that goes in the basket, I cut really thin strips of the Emerald Starstruck Paper and used those as my basket stuffer. 


Here is a second basket I made using the BRAND NEW Woodland Variety Pack in a non-Easter theme:
Don't you just love those beautiful colors? I sure do!

Thanks for stopping by!  I hope this post inspired you to make some wonderful Rinea Foiled Paper baskets!
See you next time!
xoxo
Jess

Friday, 14 April 2017

Kitty Bee Designs - Challenge #92 - Easter


Hello friends!

It's time for a new Challenge #92 at Kitty Bee Designs.  Our theme was Easter and I was blessed to work with an adorable stamp from Paper Nest Dolls called "Egg Coloring Avery".

<= h($product->name) ?>

Here is what I created:


I colored this sweet little doll with ShinHan TwinTouch Markers and added some chipboard elements from my stash.

I hope you will come along a play with us!

Until next time,
Jess

Wednesday, 15 March 2017

Digital Delights - Easter Express

Hello friends!


I have a new creation to share today for Digital Delights by Louby Lou!  

I chose to work with an adorable stamp set called "Easter Express" and a digital paper set called "Blossoming Egg". Here is what I created:


Enjoy!

Have a great day!

Wednesday, 8 March 2017

Kitty Bee Designs - March Designer Spotlight!

Hello friends!

I have a super cute card to share with you today for Kitty Bee Designs!  I chose to work with the "iCarrot Bun" Digi - isn't it adorable?

iCarrot Bun Digital Stamp

This is what I created:


I colored the image using my PrismaColor Pencils.  I love making sunny Easter cards - they are so much fun! :)

Until next time,

Wednesday, 1 March 2017

MHK Designs - March Challenge

Hello friends!


It's time again for another Monthly Challenge over at MHKDesigns!

Here is our Challenge Prompt:


Here is what I created using the Bunny Love Stamp Set:


I watercolored the digital stamp after I printed it out.  I added a cute little bow accent and some Easter paper in the background!  Love this cute little bunny!

I hope you will come out and play along with us this month! :)

Until next time,


Friday, 20 January 2017

Easter Chicky #2

Hello friends!


I have another Easter card to share with you for SparkleNSprinkle!

Supply List:

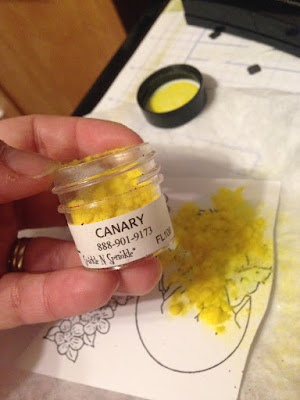
Canary Flocking - FL108
Spring Willow Embossing Powder - EP388
Frosted Juniper Embossing Powder - EP406
Versafine Ink - TSVF082
Fairytale Lavender Glitter - G1129
Foam Squares - 01613


To start making this card, I started by stamping the Floral Image around the outside of my cardstock using Versamark Ink. I sprinkled on the Frosted Juniper Embossing Powder and heat set.  I used an Oval Die to cut out the center of the piece to create my "window".


I stamped the adorable Chicky image onto a piece of white cardstock using Versafine Ink.  Using my Glue Pen, I "colored" the chicky with glue and sprinkled on the Canary Flocking - creating a soft, fuzzy chick!  Adorable, right?


Magic Speckle Embossing Powder was added to the eggshell image (again, I used my Glue Pen to add adhesive where I wanted the embossing powder to go - and let it dry slightly so it becomes "tacky").  I didn't have to "stay in the lines" as I was going to cut out the image aftwerwards.  Doesn't it make it look like an actual eggshell?  After all my Flocking and Embossing Powder were added, I fussy cut the images and set them aside.


Next up - coloring my flowers! I stamped my flower arches with Versafine ink and colored them with my Prismacolor Pencils. They were fussy cut out as well. I added a bit of Fairytale Lavender Glitter to the centers using the Nuvo Small Glue Pen.  The sentiment was stamped using Versamark Ink and embossed with Frosted Juniper Spring Willow EP and heat set for some extra embellishment.

Onto the background!  I added a layer of 1/2" Tear-ific Tape around the outside edge of my green cardstock piece. After peeling off the protective backing, I added the Silver Bullion Gilding Flakes.  They are sure fun to work with - just make sure your furnace doesn't kick in while you are using them (my vent is above my desk - you can image what happened! LOL Flakes flying everywhere!).


All the layers were adhered together using 1/2" Tear-ific Tape and I popped the Chicky, sentiment and flowers up with Foam Squares for some dimension.  Finally, I added 4 drops of the Key Lime Jewel Drops to each corner.


I hope you enjoy this card and set about creating some of your own fun Easter Creations!

Until next time,


 photo MHKDesigns_FreshByJess_Signature.png