Saturday 31 December 2016

SparkleNSprinkle - January 2017 Reveal

Welcome to Sparkle N Sprinkle's January 1, 2017 New Reveal Blog Hop!


We're starting the New Year off with a BANG! We have a huge reveal to share with you - our largest ever!

There are TEN new stamp sets (one is a digi-only set) being released this month! These new sets are 20% off until January 3, 2017. So once you finish the blog hop, head on over to the store and start shopping. 

The sets are:


Right Beside You 812  (digi version DIGI812)
Milton Friendly Giraffe 817  (digi version DIGI817)
Cattleya Orchid Friendship 818  (digi version DIGI818)

Easter Chicky 820  (digi version DIGI820)
Party #1 821  (digi version DIGI821)
Party #2 822  (digi version DIGI822)

Eggs-traordinary Kindness 825  (digi version DIGI825)

Emily Showers of Love 831   (digi version DIGI831)

On Jan 3rd, ONE GRAND PRIZE WINNER will be selected from the comments left on the Designers' blogs listed below. Please leave a comment with each Designer in order to be eligible for the Grand Prize. You never know who the Mystery Designer will be that has the winning comment.


The Grand Prize Winner, which will be announced on the SNS Facebook page and on the SNS Blog, will receive ALL of the new stamp sets released this month (or the digi versions, if preferred).

The Blog Hop order this month is:

Jess (you are here!)

(*Tip: if you have difficulty with a particular link, try clicking on the Designer's blog title to send you to their Home page.)

We hope you enjoy the New Reveal Blog Hop as much as we do. Thanks for joining us and remember to comment on each of the Designers' blogs to be eligible for the Grand Prize. 
Wonder who the Mystery Host will be this month????


The Sparkle N Sprinkle Creative Challenge also begins today. There are lots of prizes and recognition badges. Come check out how you can become a SNS Featured Artist as well. The theme is always Anything Goes using Loose Glitter, Embossing Powder, and/or Flock.


Have you checked out the SNS YouTube Channel featuring Demo Donna? If not, then you are in for a real treat. Subscribe today to get all the latest Demo Donna tips and techniques!


Happy New Year Everyone!


I decided to use the "Right Beside You" Stamp Set for the reveal!  I just love it!


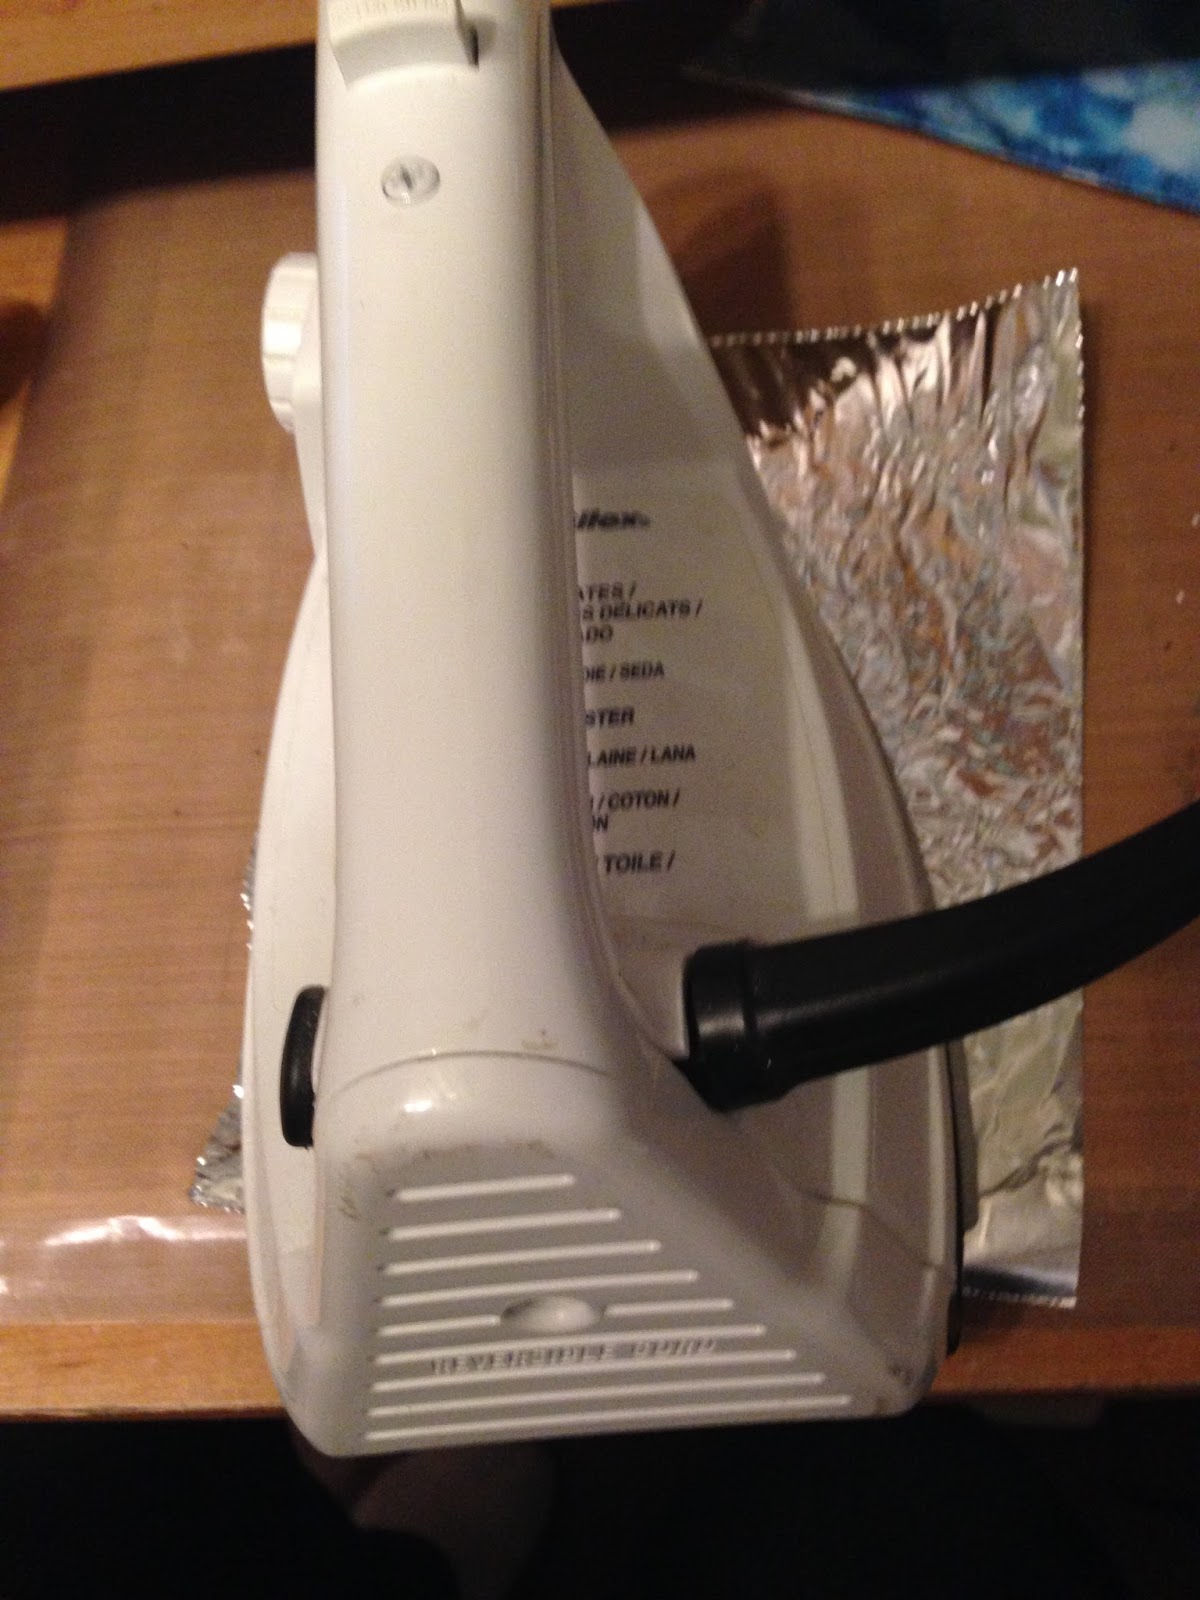
So to start this card, let's talk about how I created the background. I decided to try the Marbled Background technique that Demo Donna used here.  To summarize - you simply sprinkle on your choice of coordinating embossing powders onto your cardstock, cover with non-stick foil and heat with your iron. It creates this cool marble look!


After I finished the background, I simply stamped on my tree and swing images using Versamark Ink and sprinkled on Black Detail Embossing Powder, heat setting carefully.  I used the Clematis Vine Die to add an impression into my background. Originally I was going to use the die to cut a design, but it didn't cut clean through the first pass through my Big Shot and I just LOVED the look of the impression, so I left it!


I added some accents using Nuvo Glitter Drops in Dazzling Blue and let dry.  

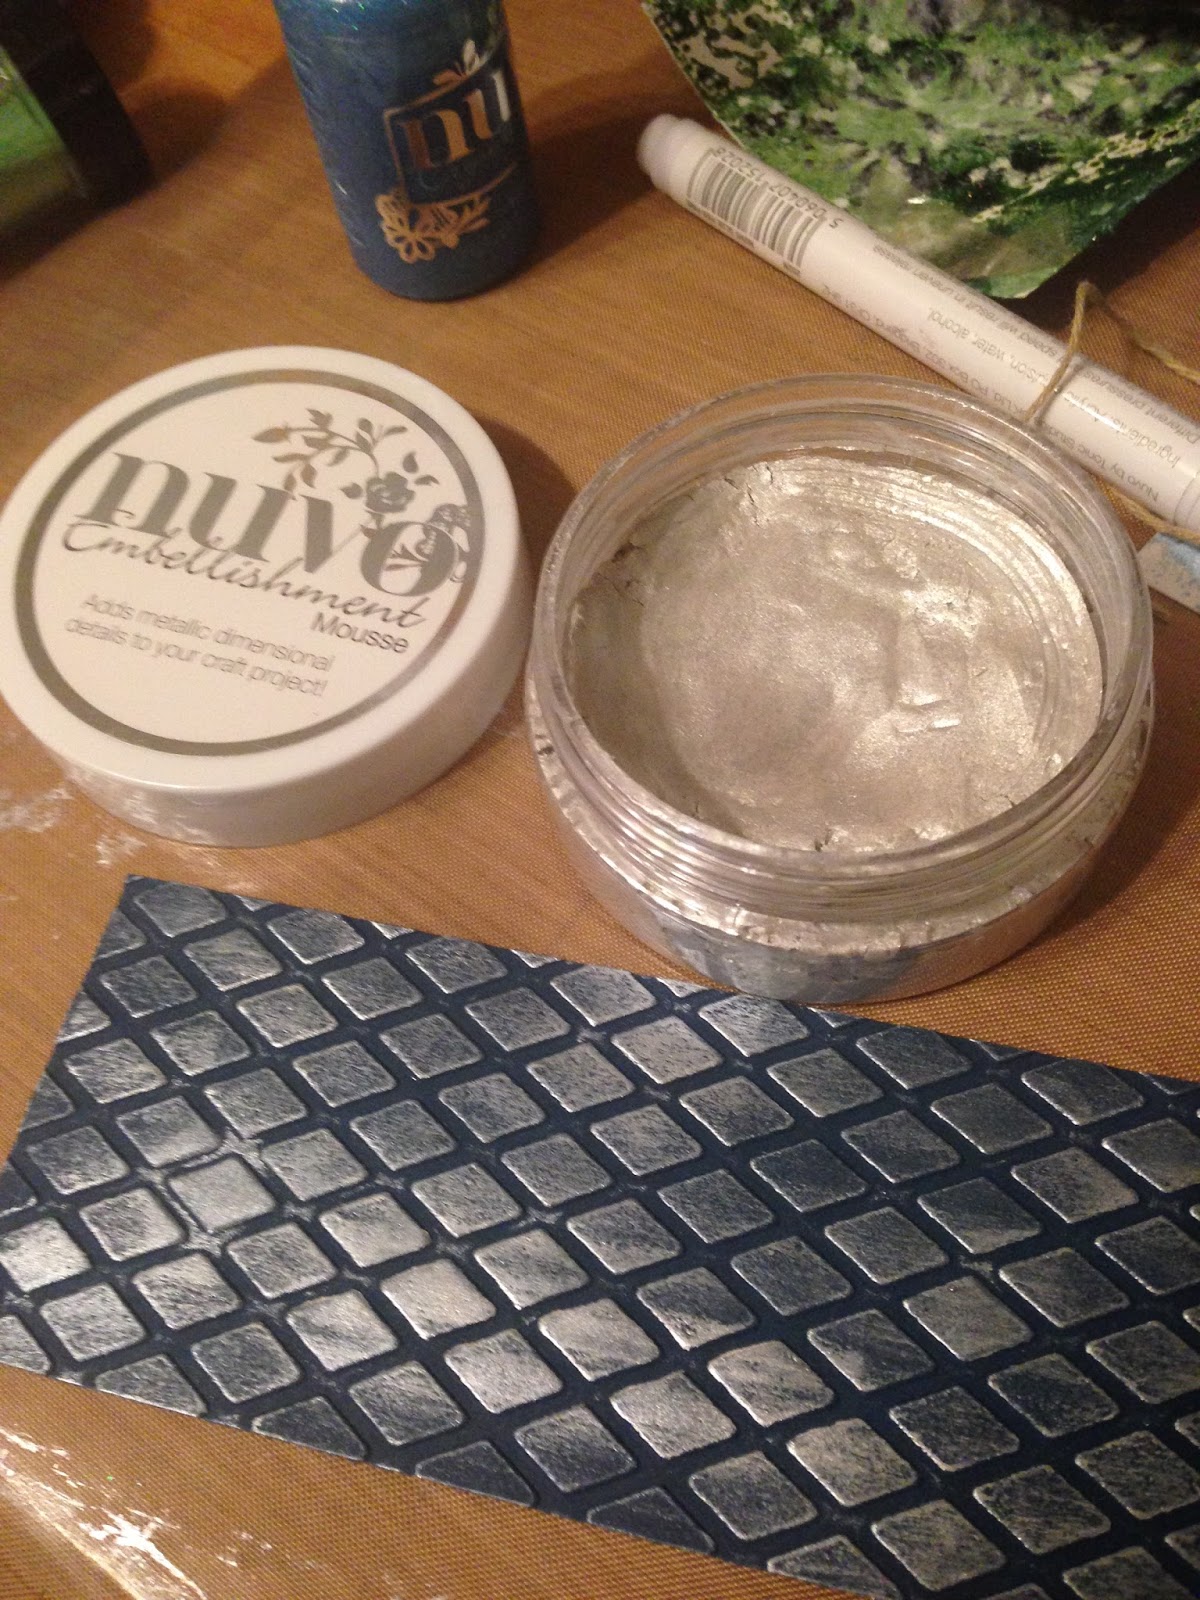
I wanted to add something else to the card, so I used a Diamond Embossing Folder on a dark blue piece of cardstock.  Then, I rubbed on some Nuvo Embellishment Mousse in Pure Platinum.  I just love the look of it!


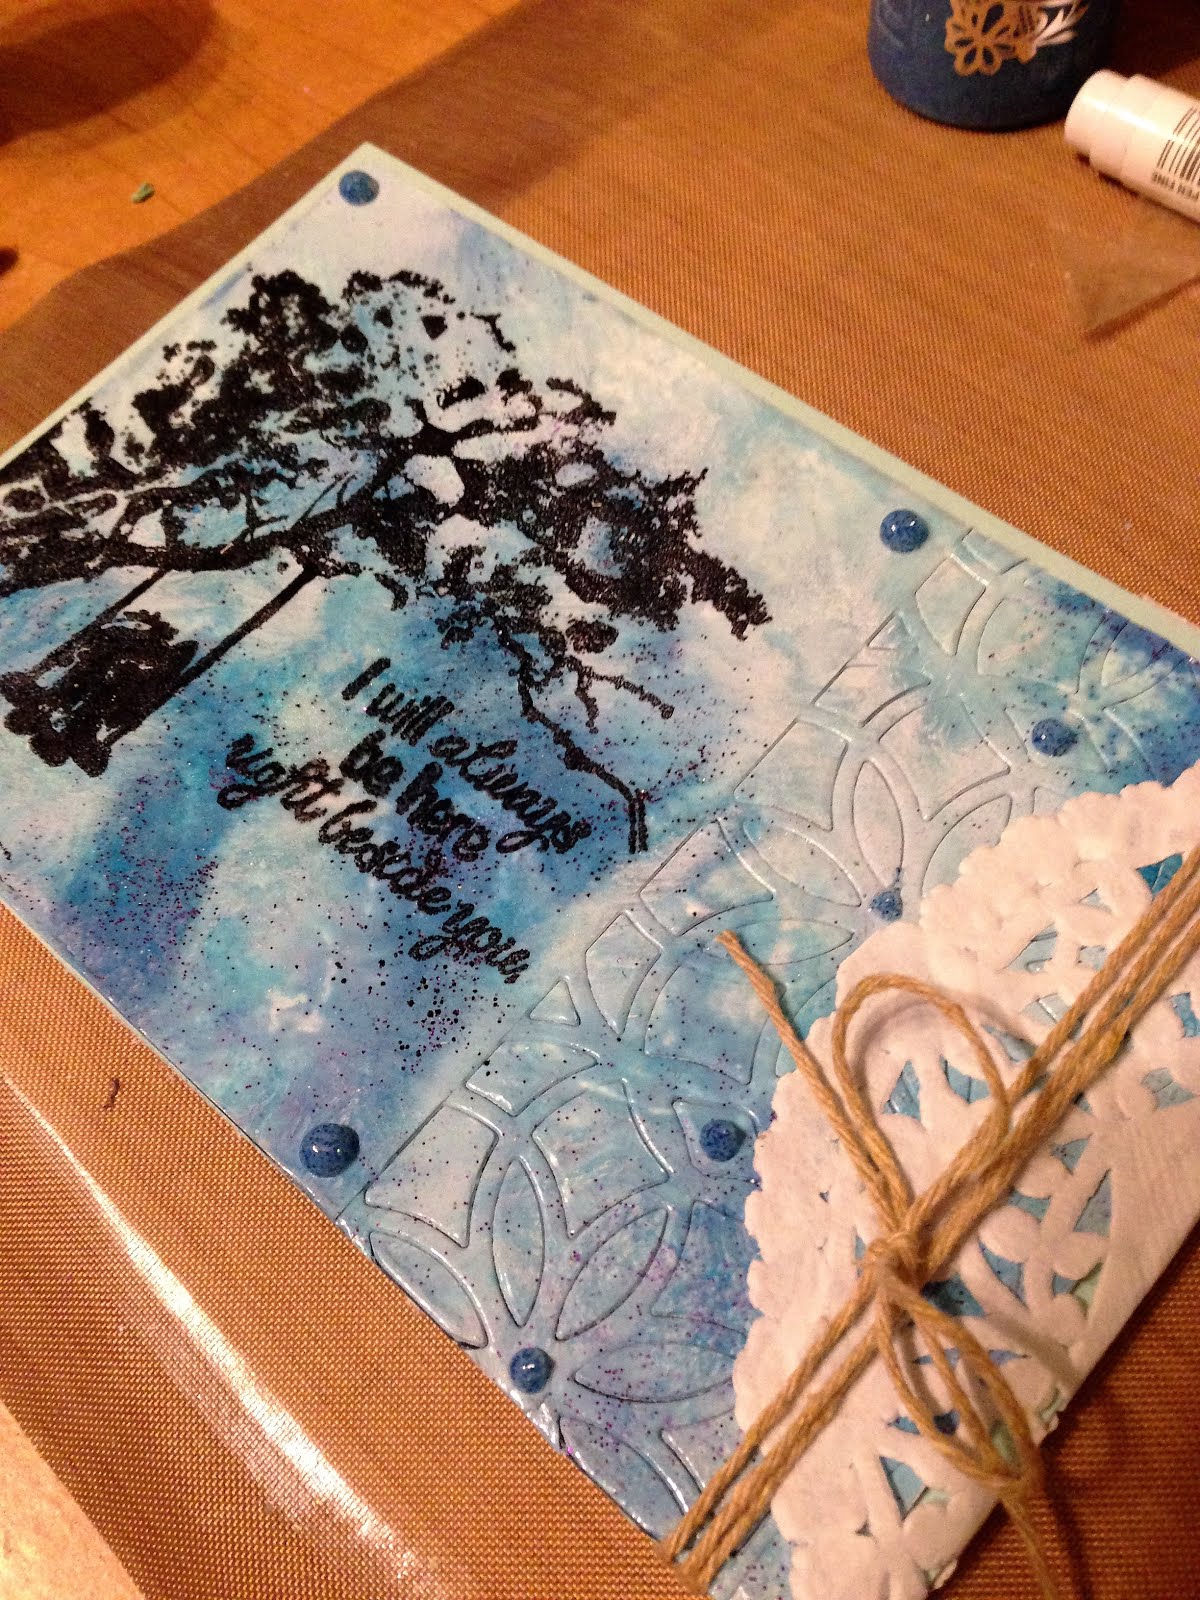
To assemble the card, I just used Tear-ific Tape to adhere the layers.  I added a doily for something extra along with a piece of bakers twine. 


The next stop on our blog hop is the talented Diane and you can find her blog HERE.

Good luck along the blog hop and cheers to a fabulous New Year!

Jess

Friday 30 December 2016

SparkleNSprinkle - Rustic Flowers Snapdragons #2

Hello friends!


I have another gorgeous card to share with you for SparkleNSprinkle, featuring the Rustic Flowers - Snapdragons Stamp Set!

Supply List:


This card came together very easily and has some gorgeous texture.

I started off by printing out the pre-colored Digital Stamp (my fave!).  Using the Nuvo Glue Pen, I simply added adhesive onto the flowers and sprinkled on the color of Embossing Powder I wanted to use.  I used Princess Rose, Pineapple, and Orange Sherbet on the flowers along with Chartreuse for the stems.  I added some dimension to the flower pot by adding Blackened Bronze Embossing Powder, again with the Glue Pen. Everything was heat set of course!


I had a little "oops" as you can see around the pot itself. I forgot to use my Anti-Static Bag before sprinkling on the Blackened Bronze Embossing Powder, so I ended up with a bit of residue on my paper.  I am just using this as as shadow effect ;)

For the background, I used the simple technique of applying 1/2" Tear-ific Tape to the edges of my paper, removing the protective backing and sprinkling on Chameleon Glitter, burnishing well with my finger tool.


All the layers were adhered with 1/2"Tear-ific Tape and I popped the entire front panel to the cardbase with Foam Squares.


TO finish, I added my Nuvo Jewel Drops & Crystal Drops in Strawberry Coulis, Rose Water and Red Berry randomly around the edge of the card and let dry. 


There you have it!


I hope you enjoyed this card and I can't wait to see you tomorrow with our January Reveal!


Cheers!


Jess

Friday 23 December 2016

SparkleNSprinkle - Rustic Flowers - Snapdragons


Hello friends!


I'm up on the SparkleNSprinkle Blog today with a pretty new floral card, featuring the Rustic Flowers - Snapdragons stamp set!


Supply List:
This was such an easy card to put together!  To start, print out the gorgeous pre-colored image onto white cardstock.  Using the Nuvo Small Glue Pen, add your Glitters to the different flowers. I used Dogwood Rose, Ballerina, Tiger Orange and Daisy Glitters on my flowers.  Soooo pretty!

I really wanted to emphasize the copper of the gorgeous can holding the flowers. So, I grabbed my Copper Embossing Powder and added some detail using the Nuvo Small Pen - heat setting of course!  The results were just gorgeous!


Fussy cut out the entire image, then set aside while you go to work on the background.

To make the background, I took a piece of light green cardstock and ran it through my Big Shot with an embossing folder. I just loved the look of the Clematis Vine Tonic Die, so I die cut one out using a darker green cardstock.  I attached the embossed panel to the cardbase with 1/2" Tear-ific Tape, then used the Small Glue Pen once again to adhere my die cut piece of cardstock.  

Foam Squares were used to pop up the focal image to give more dimension. I printed off the sentiment onto white cardstock and used the glue pen one more time to add a pop of Copper Embossing Powder to the word "Cheer".  A bit of ribbon was added and I used the Foam Squares again to adhere the sentiment.

See that nifty brush? It's a set that's now available in the SNS Shop that helps to pop out all the little pieces from intricate die cuts! I LOVE IT! It's called the Sizzix Die Brush & Foam Set!


Finally, I had tons of fun with the NEW Jewel Drops in Key Lime!  I added a bunch of "dots" all over the background, then set aside to dry.  I LOVE the finished look!  Soooo sparkly!  They go on opaque and dry more clear. You HAVE to try them out sometime soon!


Thanks for popping by - and I just want to wish everyone a very Happy Holidays & Merry Christmas (since this is my last post before Christmas!)

Cheers!

Jess

Saturday 17 December 2016

Creative Corner Challenges - Celebrate with Bugaboo!


Hello friends!


Sorry I'm a day and half late - but it's time for a new (and final of 2016!) challenge from Creative Corner Challenges!

This week our theme is "Celebrate" and our sponsor is Bugaboo Stamps (love them!).  I did up two projects for you this week!

Here is what I created:


I hope you will join in with us!

Until next time,

Jess

Wednesday 14 December 2016

Kitty Bee Designs - Designer Spotlight December

Hello everyone!


I have a quick card to share with you featuring an adorable stamp called "Reindeer Christmas Penguin".  It's just a simple design - but perfect for a quick Christmas greeting!


I colored it with Prismacolor pencils.  Still learning, but I am improving! :)
lne
Happy Holidays everyone!


 photo MHKDesigns_FreshByJess_Signature.png

Monday 12 December 2016

Stick It Down - December

Hello friends!

I'm back for another term with the Stick It Down card team!  Here is our sketch for December:


Here is what I created:


I hope you will come out and play along with us this month!

Until next time,

Jess

Saturday 10 December 2016

MHKDesigns - December Release Day 5 - The Write Stuff

Hello friends!

I am SUPER excited to welcome you to the December 2016 MHKDesigns release!  We have some really fun sets for you to check out, as well as chances to win either one of the sets OR all of them!  More about the giveaways a bit later on, but right now, let's check out today's release set...


Here is what I created:


And now, let's talk about how to get this new set OR the entire release for FREE!  Here's what you'll need to do...
  1. Comment on the MHKDesigns blog.
  2. Comment on each DT member's blog.
  3. Join our MHKDesigners and Friends Facebook group and comment there.
Mynn will be choosing comments randomly from all these places after the release is over, and the authors of those comments will be our winners!  So, the best way to win is to comment every day!  We LOVE the feedback you give us! :)  Here's the list of blogs for you to visit today...

Asha | Donna | Katie | Judy | Jerrie | Jessica | Julie | Lilian
Lorie | Mynn | NanaConnie | Rocky | Sathya | Shawna

Thanks for stopping by today!  This was our last release, but don't forget to check out the MHKDesigns Etsy shop for some amazing stamp sets!  Don't forget to get all your commenting in for your chance to WIN!


Friday 9 December 2016

SparkleNSprinkle - Spring Bunny

Hello friends!


I'm here today with another fun Easter card I made for SparkleNSprinkle!

Supply List:


This card was super fun to make and came together quite quickly. There is lots of embossing, so let's get going!

To start with, I did my embossing on the outside edges of both the pink layer, green layer and cardbase. What I did was take the main image stamp and used the bottom portion (the flowers, eggs and grass) and used it to stamp all along the edges of the panels!  I used Versamark Ink and then sprinkled on my Embossing Powders!  I used Rosa on the pink layer and cardbase. Pineapple Embossing Powder was used on the green layer. 

To make the doily, I covered the entire white doily with Versamark Ink and sprinkled on Princess Rose Embossing Powder, heat setting of course! :)


I set all those pieces aside and started on my main image.  I stamped the image onto white cardstock using Versamark Ink, sprinkled on Black Detail Embossing Powder and heat set.  I grabbed my Watercolor Pencils, an aquapainter and went to work coloring!  I am still an amateur with coloring, but I think I'm improving :)


I fussy cut out the image after it was dry (TIP: Use a heat gun to speed up drying time!) Once it was dry, I covered the entire image in Versamark Ink, sprinkled on Clear Detail Embossing Powder and heat set. It created such a gorgeous shine!

The sentiment was stamped onto some white cardstock using Versamark Ink. I embossed with Black Detail Embossing powder. I actually separated the sentiment in half and did a swash of watercolor on the background too.


To start assembly, I used the Large Nuvo Glue Pen to adhere the embossed doily to the pink layer. The pink layer was attached to the green layer using 1/2" Tear-ific Tape.I popped the fussy cut focal image up with some Foam Squares

 I also created a fun "grass" border simply by cutting a 1" strip of green cardstock randomly and bending them a bit. Fun, right?  I realized after that I should have grabbed my Grassy Green Flocking to add to the dimension - next time! The border was also attached using 1/4" Tear-ific Tape. I tied a bit of bakers twine around the panel for added fun.

The entire panel was adhered to the card base using 1/2" Tear-ific Tape.  I used a mini-stapler to attach a bit of frayed bakers twine behind the sentiments and popped them ofn using foam squares. 


I hope you enjoy this card!  Don't forget to grab your fave SNS products from the shop!

Until next time,

Jess