Showing posts with label Christmas Card. Show all posts

Thursday, 16 June 2022

Creative Knockouts Challenge #457


Happy Thursday friends!

I’m super happy to announce that I only have two more chemotherapy appointments left! Horray! There’s still a long road to go, but I’ll be happy to have this part done! Onward and upward!

It's time for a new challenge over at Creative Knockouts. For Challenge #457, our theme is Use Two or More Patterned Papers!

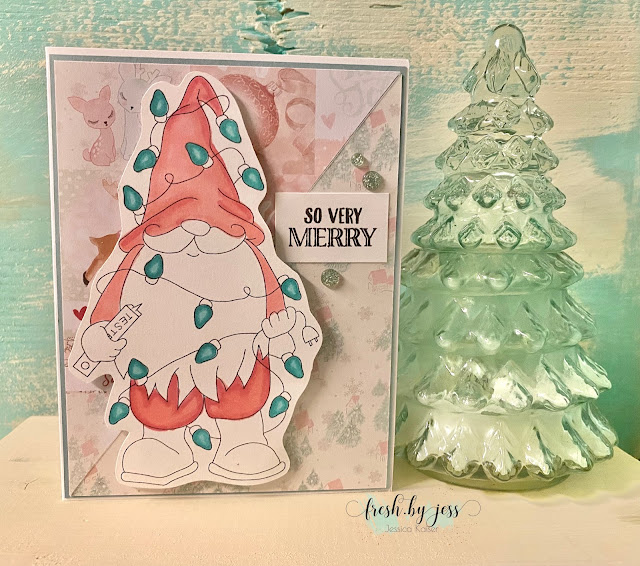
Our wonderful sponsor is KLM Designs. Their stamps are just adorable! I used the Digital Stamp called Christmas Light Gnome.

I printed off the digi and coloured with alcohol markers - still not my fave thing to do but I’m trying! Lol

The pattern papers are from Prima. I figure I could use this challenge to get a head start on Christmas cards! Hehe

Here is what I created in more detail:


Thanks for stopping by! Your comments mean a lot to me :)

Hugs! 

Jess


Saturday, 14 December 2019

Custom Family Christmas Cards with The Hedgehog Hollow

Hello friends!


I'm so excited to be back one more time with a quick video tutorial for The Hedgehog Hollow!  As soon as I saw the stamps I KNEW what kind of card I wanted to make - something clean, simple and QUICK for those last minute holiday cards!  How adorable is this Christmas card?  You are going to love making them - and I will show you how with my newest YouTube Video!

You will need your November Subscription Box, some scissors, black & red ink and a glue pen - that's about it!

Let's get crafting:


Here is one more close up photo of my card:


Thanks for stopping by today! I hope you will go out and create your own adorable "Custom Family" cards for the holiday season!

Thanks once again to The Hedgehog Hollow for inviting me to join the team this month. I had a lot of fun and I hope to do it again soon.

Have a great day!
xoxo

Jess

Sunday, 8 December 2019

Snowman Selfies with The Hedgehog Hollow

Hello friends!


Guess what? I'm so excited to announce that I am a Guest Designer for The Hedgehog Hollow this month! They have such adorable things and I had a lot of fun playing with the November Subscription Box. The stamps were super adorable and I know I will use them time and time again.  

For my first creation, I wanted to created a cute "Polaroid Camera" scene using the Christmas characters. I chose the reindeer and the snowman - they wanted to make a selfie together! So that's what we did! 

I had a cute polaroid style die in my stash that worked perfect! I cut out some white cardstock and used the stencil from the subscription box to add dimension to the outside of the frame. I set it aside to dry and started on my cute images.


I stamped them onto a piece of white cardstock that was die cut from the center of my polaroid die. I wanted them "peeking" in, so I slightly offset them.  I used my Nuvo Marker Pens to color them images, and added a touch of the Sparkle Dust to Rudolph's Nose!  When I looked through the cute patterned papers that were included in the kit, this black and white polka dot paper stood out to me for the background because it kind of looked like a snow storm!  Of course, I had to grab my White & Ivory Seashell to make some texture dots on the "snowflakes" and the frame.


I had so much fun creating this adorable scene card! I hope you liked it too!

If you want to see more of what was included in my box, you can check out my unboxing video:


Thanks for watching and stopping by today!  I hope you enjoyed my card. I will have a video tutorial for you next week, so stay tuned!

Until then,
xoxo

Jess


Monday, 2 December 2019

Christmas Door Card with Rinea

Hello crafty friends!
I have a fun new card to share with you for Rinea.
I can't believe it's December? I wanted to give you another holiday card idea and I think I came up with a good one! The idea of a door with a wreath has been around for years, but I put my own spin on it. I purposely didn't add a sentiment and just chose a random house number. I'll list the supplies I used at the end of this post, so you can make it too!
To start, you are going to cut 2 pieces of Mocha/Gold Glossy foiled paper. You want one to be 4X5.25 and the other to be 3.5x4.75 (approx). I did this for my door layers. You are also going to want to cut some light brown cardstock as bases for these pieces. I roughly give between 1/4 and 1/8 of an inch border (depending on how much you want to show).
I ran each piece of foiled paper through my Big Shot with the wood grain embossing folder. To create the distressed look here, I made sure my "sandwich" was on it's thickest setting. I trimmed the smaller piece into 4 door "panels", and adhered all the pieces to the cardstock backgrounds. Using the  Emerald/Gold GlossyRuby/Ruby Starstruck Foiled papers, I die cut 2 wreaths. As you can see, I cut out the bow from the Ruby to add to my wreath. 

Brads (YES!) were used as the door knob and hinges (I know I have actual hinges in my stash - but do you THINK I could still find them?? haha). I wrapped some twine around the wreath to "hang" on my door - and used a couple glue dots to secure it. Finally, as the last accent, I added a "door number" using some hodgepodge hardware. I wrote the number on white cardstock and fitted it behind, then adhered with brads.  I glued the entire cardfront onto my card base and voila!  I LOVE how it turned out!
See you again soon.
Jess
Supplies:

Woodgrain Embossing Folder
Light Brown & White Cardstock
Wreath Die
Brads & twine
Adhesive & Glue Dots
Optional: Hardware silver piece and black pen along with white cardstock

Saturday, 16 November 2019

Rinea Letterpressed Christmas Card

Hello Rinea Friends!

We are making a beautiful and elegant Christmas Card today using Rinea foiled paper!
I used an older product in my stash to create this card - a letterpress pad for my Big Shot!  So it's not an embossing folder, it's literally the image pressed into the foiled!  Once I had made my impression, I cut the Emerald/Gold Glossy Foiled Paper down to the size I wanted and added a mat of Ruby/Glossy Foiled Paper!  
 

I used a green cardstock base and added a layer of glitter paper for some extra sparkle. The layers were all glued together.  I really wanted to keep the elegant and simple feel of this card, but it needed SOMETHING. AHA! I grabbed some of the cones that were leftover from my previous project (find that HERE) and created a BOW from the Silver Starstruck Cones!  I used some Ruby Starstruck to wrap the center of the bow and hot glued it down.
 
Here is the full supply list:
Jolly Foiled Variety Pack - I used the Emerald/Gold Glossy, Ruby/Gold Glossy, Silver Starstruck and Ruby Starstruck
Glitter Paper
Green Cardstock
Papertrimmer
Adhesive of Choice
Letterpress plate
Big Shot Machine and appropriate plates

Voila! That's all there is to it!
I hope you enjoy my Letterpressed Christmas card! See you again next time!


Jess

Wednesday, 21 November 2018

Merry Branches

Hello crafty people!


Happy Wednesday!  Wednesday is my day to share with you a new Cheapo Dies Handmade Card!


Today I am using the Merry Branch Die - I really love this die - the pine needles cut so perfectly!!
Of course with Christmas around the corner, I had to add a pop of gold to it.

Cheapo Dies - Merry Branch


 Here is Handmade Card I created for you today:


The paper pack I used was from Pebbles. It really fit the feeling of rustic with the branch. I tied a tiny bow of twin at the base of the branch for just something a little extra.

I hope you enjoy this card!  See you again next week!


Jess

Thursday, 15 November 2018

Just For Fun - Christmas

Hello friends!


I hope you are having a fabulous day! Are you on the Christmas Card making front right now? I sure am! I have some card buffets planned for my wonderful clients and I can't wait to share!  In the meantime, here is a quick Christmas Card I created, just for fun!


This was just from my stash collection. Isn't it adorable? What has been your fave holiday paper line to work with this season?

 photo MHKDesigns_FreshByJess_Signature.png

Wednesday, 14 November 2018

Christmas Deer


Hello crafty people!


Happy Wednesday!  Wednesday is my day to share with you a new Cheapo Dies creation! 


I used the Scrolly Deer Die to make this card. It's perfect for holiday cards!!

Cheapo Dies - Scrolly Deer


 Here is what I created for you:


I had made some Nuvo Shimmer Powder backgrounds for a previous project and thought they went perfect with the gold die cut deer!  A simply sentiment to accent and a beautiful ribbon finish off the card. Isn't it beautiful how cleanly the gold cardstock cut with the die?

 If you're not familiar with Cheapo Dies, you are missing out!!!
Here's a listing of their store, blog & FB links to help you get familiar:


Thanks to all of you for stopping by today.  Can't wait to see you again soon!

Jess


 photo MHKDesigns_FreshByJess_Signature.png

Wednesday, 7 November 2018

Scrapy Land Challenge #101

Hello friends!


Welcome to Scrapy Land {Challenge #101}!  I'm very excited to share my project with you.

I used the Cheapo Dies Winter Tree Die to make my cards! (Yes, I said "cards" lol - I made two!).  I chose to make 2 cards - one with the die cut image itself and one with the reverse cut out.


Buffalo Plaid seems to be hot, hot, hot right now - so I paired a simple tree patterned paper with some buffalo plaid paper. 

The theme is always ANYTHING GOES using any brand of die that Scrapy Land sells.  In addition, we have TWO WINNERS for each challenge.  One will be a random winner and the other is chosen by the Design Team.  Each winner will receive a generous $10 gift certificate to Scrapy Land.

Scrapy Land carries over 55 brands of dies, so chances are you have a few of the brands in your stash!  You can see all the brands carried under the Products category.

Please link back to this Scrapy Land Challenge and include the link to this challenge on your blog post.  It would also be extremely helpful if you would list the brands of dies used in your project.  (Sometimes we can't tell if an item is a die cut or chipboard.)

We can't wait to see what you create!  It can be any style you like from CAS to mixed media and everything in between.    Just be sure there's a die cut from a brand that Scrapy Land sells!


Good luck!

See you soon!


 photo MHKDesigns_FreshByJess_Signature.png

Friday, 19 October 2018

Christmas Kitty with SNS

Hello friends!!


I have another cute project to share with you for SparkleNSprinkle! It's that time of year - time to start on your Holiday Cards!  You are going to just love this sweet kitty stamp!!

SNS Supply List:


Let's get creating!  

Step 1 - Create your focal image!

I started by stamping the sweet kitty onto a piece of white cardstock using Versafine Ink. I used my Nuvo Marker Pens to color up the kitty. 

     
Once she was all colored, I used my Nuvo Clear Mark Embossing Pen to add Blue Silver Embossing Powder to the string of lights. It's a pretty neat way to add small details of embossing powder.


I used the SNS Dimensional Glue to add Christmas Lights Glitter and Fire Engine Red Glitter to the lights for sparkle!  Then the kitty was fussy cut out.


Step 2 - Work on your BACKGROUND

I cut some ovals using the Tonic Mixed Edge Ovals die and stamped the string of lights image with Versafine Ink. Once again I colored the lights using Nuvo Marker Pens and added Silver Embossing Powder to the lights using the Clear Mark Embossing Pen. I did add a bit of the glitter to these lights too.


Step 3 - Sentiments

I stamped the Sentiment with Versamark Ink and embossed with Red Apple Embossing Powder.


Step 4 - Put It ALL Together and Embellish!


All the layers were added using the 1/2" Tear-ific Tape.  Drops of Ruby Slippers Glitter Drops were added in the corners for accents.  I used the Christmas Sequins - they are just too cute!


I hope you like this sweet kitty card!  It's just an adorable set - I know you will love it!

Want to save 10% on all your regular SparkleNSprinkle purchases? Use code JessDT10 when you checkout!

See you again really soon!

 photo MHKDesigns_FreshByJess_Signature.png

Sunday, 22 July 2018

Rinea Christmas in July

Hello friends!


I was so excited when I opened my Rinea Designer Package and found this BEAUTIFUL Jade/Gold color of foiled paper!!!!!!  It's just amazing - and one of my favorite colors to boot!  
I am just in LOVE with the Jade/Gold Glossy Foiled Paper! I'm pretty sure that most of my Holiday cards this year are going to incorporate some of this beautiful foiled paper. I used the Crafter's Pack to create this card. I die cut the leaves for the flower using a thin die set (the foiled paper cuts beautifully with dies!). For the background, I cut a piece 4x5.25 inches and ran it through my Big Shot with a cool Tim Holtz embossing folder.  I just love how crisp and clean the foiled paper comes out with this technique - and it will retain the shape perfectly!!!
  

(You may remember seeing this foiled paper on a previous card I created HERE).
For my sentiment, I actually grabbed an Artist's Pack of our brand new MISFITS Variety Pack!  I love these little packs - they have an assortment of colors that are perfect to run through your diecutter - and you don't need to buy a full pack of one color! I layered the "joy" using the "Misfits" Mocha/Mocha Starstruck and the "Misfits" Silver/Silver Startstruck Foiled Paper.
I know you will love working with this amazing product! If you are looking at trying it, the Misfits are a perfect way to start, as it contains an assortment of colors and both glossy and startstruck versions.  I hope you enjoyed this card and I will see you next time!
Jess

 photo MHKDesigns_FreshByJess_Signature.png