Showing posts with label Banner. Show all posts

Monday, 4 February 2019

Mardi Gras Celebrations with Joy Clair Stamps!

Hey crafty friends!

No photo description available.


Today at Joy Clair Stamps we are celebrating Mardi Gras!  The entire design team is featuring different creations using the "Unashamed" Stamp Set (which is one of our newest releases!).  Welcome to our Blog Hop!
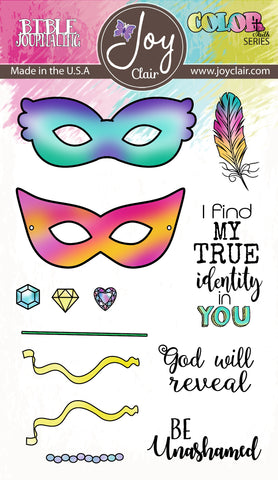
Unashamed | Bible Journaling Clear Stamp

There are so many different creative things you can do with this stamp set! I chose to create a banner.

Here is what I created:


I used traditional Mardi Gras colors to make my banner!  I stamped both of the masks and fussy cut them out. I stamped a whole bunch of the jewel images and covered them with Nuvo Jewel Drops - letting dry and then cutting out.  To make "beads" I simply stamped the image multiple times in the background and covered again with Jewel Drops and Crystal Drops I accented the masks with some Gold Crystal Drops. Such a fun project!!!


Here is the rest of the blog hop list - you are going to want to visit everyone for your chance to win a prize!!


BLOG HOP LIST:
Jessica Kaiser - you are here! :)


Have fun hopping along!

I hope you are inspired to head out and make some really great things with this set!

Have a great day and I will see you again soon!

Jess
49178119_10155823794062854_9104658831555690496_n

Thursday, 22 November 2018

Rinea JOY

Hello crafty friends!


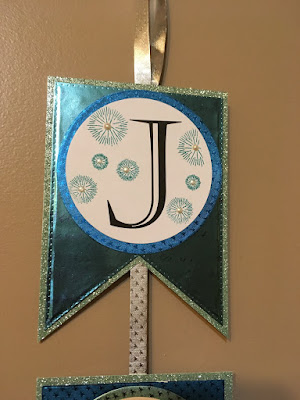
For my second Rinea Project  of the month I created a beautiful vertical JOY Banner! For this project, I used the Frosted Foiled Paper Variety Pack!  It's also an exciting month because we partnered with the amazing Imagine Crafts!!  How fun!  

This is a really cute and simple project - let me show you how to make it!

First, I used the Imagine Gothic Purple Stazon Ink and Oma's Postcard Stamp Set to stamp onto the Glossy Turquoise Light Blue/Gold Foiled Paper. Then, I used a banner die from Tonic Studios to cut out the banner shapes. For the middle banner piece, I used the Starstruck Sapphire Blue. I cut my banner shapes first, then adhered to Glitter Paper and trimmed down.


To make the J-O-Y, I actually just used my Microsoft Word program and used the Castello font at 250pt and printed them off!  Then, I die cut with a circle die from Sizzix. I cut the Glossy Turquoise Light Blue/Gold Foiled Paper and Starstruck Sapphire Blue again, but this time opposite of the banner pieces to contrast.


Using the fantastic Starburst Sentiment Stamp, I inked it up with Emerald City Staz-On Ink and stamped randomly around the letters. I used Nuvo Crystal Drops in Ivory Seashell to accent each starburst.  Foam squares were used to give a bit of dimension to the banner.


I used a skinny strip of Starstruck Silver Foiled Paper to connect the banner pieces and create the hanger.


You could totally swap out the colors with the Jolly Variety Foiled Paper Pack (or any of the other fabulous Variety Packs for that matter) and created any occasion banner with this method!  NOEL, a name for a birthday party, it really could be anything.

I hope you go out and make some banners of your own!  Thanks again to Imagine for the super fun Staz-On Inks!!! I really had fun playing with them. 

Supply List:
Frosted Foiled Paper Variety Pack
- Tim Holtz Stamp Platform
- Sizzix Big Shot & Magnetic Platform
- Rinea Oma's Postcard Stamp Set
- Rinea Starburst Sentiments Stamp Set
- Rinea Clear Acrylic Block
- Tonic Studios Beautiful Bunting Die
- Sizzix Circle Dies
- Glitter Paper
- Foam Squares
- Scissors
- Tear-ific Tape
- Imagine StazOn Inks (Emerald City, Gothic Purple)
- StazOn Ink Remover
- paper trimmer

See you next time!


Jess

 photo MHKDesigns_FreshByJess_Signature.png

Friday, 12 October 2018

Sweet Baby Unicorn Banner

Hello friends!!


I have another cute project to share with you for SparkleNSprinkle!  This cute home decor banner features the Sweet Baby Unicorn Stamp Set and I can't wait to show you how I made it!

SNS Supply List:


Step 1 - Create your focal image!

I started by stamping the sweet little baby unicorn 3 times onto watercolor paper using Versamark Ink and heat embossed it with Black Detail Embossing Powder,  Nuvo Aqua Flow Pens were used to color the 3 unicorns. I fussy cut out all the unicorns and set them aside. You will notice that I don't have the little hearts surrounding the unicorn - that is because I doctored up my rubber! I simply cut the hearts off and left them as stand alone pieces!  Now I have extra hearts to use!!


Step 2 - Work on your BANNER PIECES

I used the Tonic Beautiful Bunting Jubilant Jubilee Die to cut out 3 gray pennants and 3 plaid interior pennants.  You will love how cleanly the dies cut! I also used the Tonic Mixed Edge Ovals die to cut a set of 3 pink scalloped ovals.


Step 3 - Sentiments

I stamped all 3 of the sentiments onto white cardstock using Versamark Ink and embossed with Rosa Embossing Powder. I used some pink cardstock to matte them - all adhered with 1/2" Tear-ific Tape of course!


Step 4 - Put It ALL Together and Embellish!

To embellish, I stamped the large heart image onto pink cardstock 3 times and fussy cut out. Using the Nuvo Deluxe Adhesive,  I added some Unicorn Glitter. I added some of the HAI Supply Silver Clear Flower Sequins using the Nuvo Deluxe adhesive. I added a few dots of Nuvo Crystal Drops in Bubble Gum Blush to each corner of the pennants and finally, a gray twine was added to hang the banner using 1/2 Tear-ific Tape!


There you have it!  A perfect baby shower decor item!  You could simply switch the colors to refllect your party theme!

Want to save 10% on all your regular SparkleNSprinkle purchases? Use code JessDT10 when you checkout!

See you again really soon!

 photo MHKDesigns_FreshByJess_Signature.png