Showing posts with label Technique. Show all posts

Wednesday, 15 August 2018

Scrapy Land Challenge #96

Hello friends!


Welcome to Scrapy Land {Challenge #96}!  I'm very excited to share my project with you.


I used the Tonic Studios Wreath to make my card, but you can also use the Impression Obsession Spring Wreath Die.


I also used the Neat & Tangled Succulent Cover Plate Die.


I used Sticker Paper and did a "Kiss Cut" technique where I didn't cut all the way through using the Succulent Cover Plate. I peeled back the adhesive backing from the sticker paper and used 2 shades of glitter to create the background. I cut out the wreath twice and layered them together with some foam tape. A little bit of bling and a little bit of twine finished off the look.


The theme is always ANYTHING GOES using any brand of die that Scrapy Land sells.  In addition, we have TWO WINNERS for each challenge.  One will be a random winner and the other is chosen by the Design Team.  Each winner will receive a generous $10 gift certificate to Scrapy Land.

Scrapy Land carries over 55 brands of dies, so chances are you have a few of the brands in your stash!  You can see all the brands carried under the Products category.

Please link back to this Scrapy Land Challenge and include the link to this challenge on your blog post.  It would also be extremely helpful if you would list the brands of dies used in your project.  (Sometimes we can't tell if an item is a die cut or chipboard.)

We can't wait to see what you create!  It can be any style you like from CAS to mixed media and everything in between.    Just be sure there's a die cut from a brand that Scrapy Land sells!
 photo MHKDesigns_FreshByJess_Signature.png

Friday, 19 May 2017

SparkleNSprinkle - Happy Flowers #2

Hello friends!


I'm back again with another pretty card for SparkleNSprinkle featuring the "Happy Flowers" Stamp Set.  

Supply List:

To start making this card, I applied a piece of 2.5" Tear-ific Tape across a piece of cardstock, removed the protective backing and applied Cloud Nine Microfine Glitter to the exposed adhesive. I burnished it well with my finger tool! :)


Next, I had a little fun!  I grabbed my Stazon Ink and stamped the sentiment randomly across the glitter!  How fun is that? It created a fun background and my sentiment in one step! Next, I applied 4 rows of 1/8" Tear-ific Tape (2 on the top and 2 across the bottom) and applied Berry Bliss Embossing Powder.  I heated it and created my border.   For the background piece, I simply ran a piece of green cardstock through my Big Shot with an embossing folder. Then I applied Spring Green Embellishment Mousse AND Indian Gold Embellishment Mousse to add dimension and shine.


I stamped the flowers onto white cardstock with Versafine Black Ink and watercolored (my new fave technique it appears - haha!). Once the flowers were dry, I added a touch of Diamond Dust Glitter, adhering with my Medium Glue Pen AND I also added some Indian Gold Embellishment Mousse randomly on the leaves.
The flowers were added to the card using 1/2" Tear-ific Tape and all the layers were also adhered with 1/2" Tear-ific Tape.  I finished off the card with accents of the Bright Gold Crystal Drops.


I hope you enjoy this card!  I'm looking forward to sharing a SUPER cute mermaid card with you next week!
Until next time,
 photo MHKDesigns_FreshByJess_Signature.png

Friday, 12 May 2017

SparkleNSprinkle - Happy Flowers #1

Hello friends!


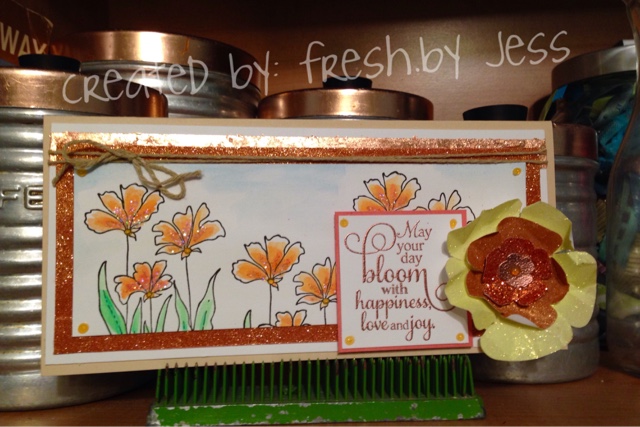
I have a new SparkleNSprinkle card for you today featuring the "Happy Flowers" stamp set!  I just love how versatile this set its!  

Here is the full SNS Supply List!
 (hint: if you click on each item it will take you directly to the shop!):
Orange Surprise Glitter #G1010

To start this card, I stamped the flower image all along the panel using Versafine Ink and then watercolored using oranges and greens.I allowed this to dry and then using the Medium Nuvo Glue Pen, I adhered some Diamond Dust Glitter to the centers of the flowers. 

I stamped the sentiment onto a scrap piece of white cardstock using Versamark Ink and heat embossed with Copper Embossing Powder. I love how all the coppers and oranges work together!  I used 1/2" Tear-ific Tape along the outside edges of my background paper, removed the protective backing and sprinkled on the Tiger Orange Glitter, burnishing it in well with my finger tool. I love making border edges with this technique!

I adhered my focal panel to the backing using the 1/2" Tear-ific Tape. I used one more layer of white cardstock and adhered a strip of the Tear-ific Tape along the top. Once I removed the protective backing, I added the Sunkissed Copper Gilding Flakes (I LOVE THESE!) and burnished in. I just thought it would add a ribbon-like effect. All the panels were attached with 1/2 Tear-ific Tape.

Now, onto my flower! Using one of my many flower Big Shot Dies, I cut out the flower layers with my Sticker Paper!  I peeled the protective backing off each piece and added Daisy Microfine Glitter to the largest, Tiger Orange Microfine Glitter to the second, Orange Surprise Glitter to the third, and to the smallest, middle flower I inked it up with Versamark Ink and embossed with Copper Embossing Powder!

I added small slits to the edges of the petal to curl them in more and scrunched them up a bit. Each layer was adhered using piece of - you guessed it - 1/2" Tear-ific Tape! (I LOVE THIS STUFF TOO!).  I added the flower to the panel to set it off and tied some twine around the top.

Finally, dots of Orange Marmalade Jewel Drops were added to the corners and to the flowers.

I hope you enjoy this card!  I had a lot of fun making it!

Until next time,

 photo MHKDesigns_FreshByJess_Signature.png