Showing posts with label January 2018 Reveal. Show all posts

Friday, 2 February 2018

SparkleNSprinkle - Foxy Missing you

Hello friends!


I have another sweet SparkleNSprinkle Card to share with you today, once again featuring the "Hello Foxy" Stamp Set!  Remember how I used foxes last time? Well, I used another little guy to create this card.

SNS Supply List

Mirror Cardstock - Chrome Silver 9452e
Aqua Flow 2-Pack Water Brush 889n
Checkers Super Thick Embossing Powder EP466
Nuvo Crystal Drops - Ivory Seashell 675N
Tonic Dies - Mixed Edge Ovals 1456e
Tonic Studios Idyllics Die & Embossing Folder Set - Filigree Affections 1516e

Let's get crafting!

I started by watercoloring my stamped image. I stamped the fox with Versamark Ink and heat embossed with Black Detail Embossing Powder. I used the Nuvo Aqua Flow Pens to water color. I love to create my own palette using my clear blocks! I simply color a little bit of the pen onto the block and then use an regular Aqua Flow Water Brush to paint and blend!  I find I get better control and blending of colors this way.


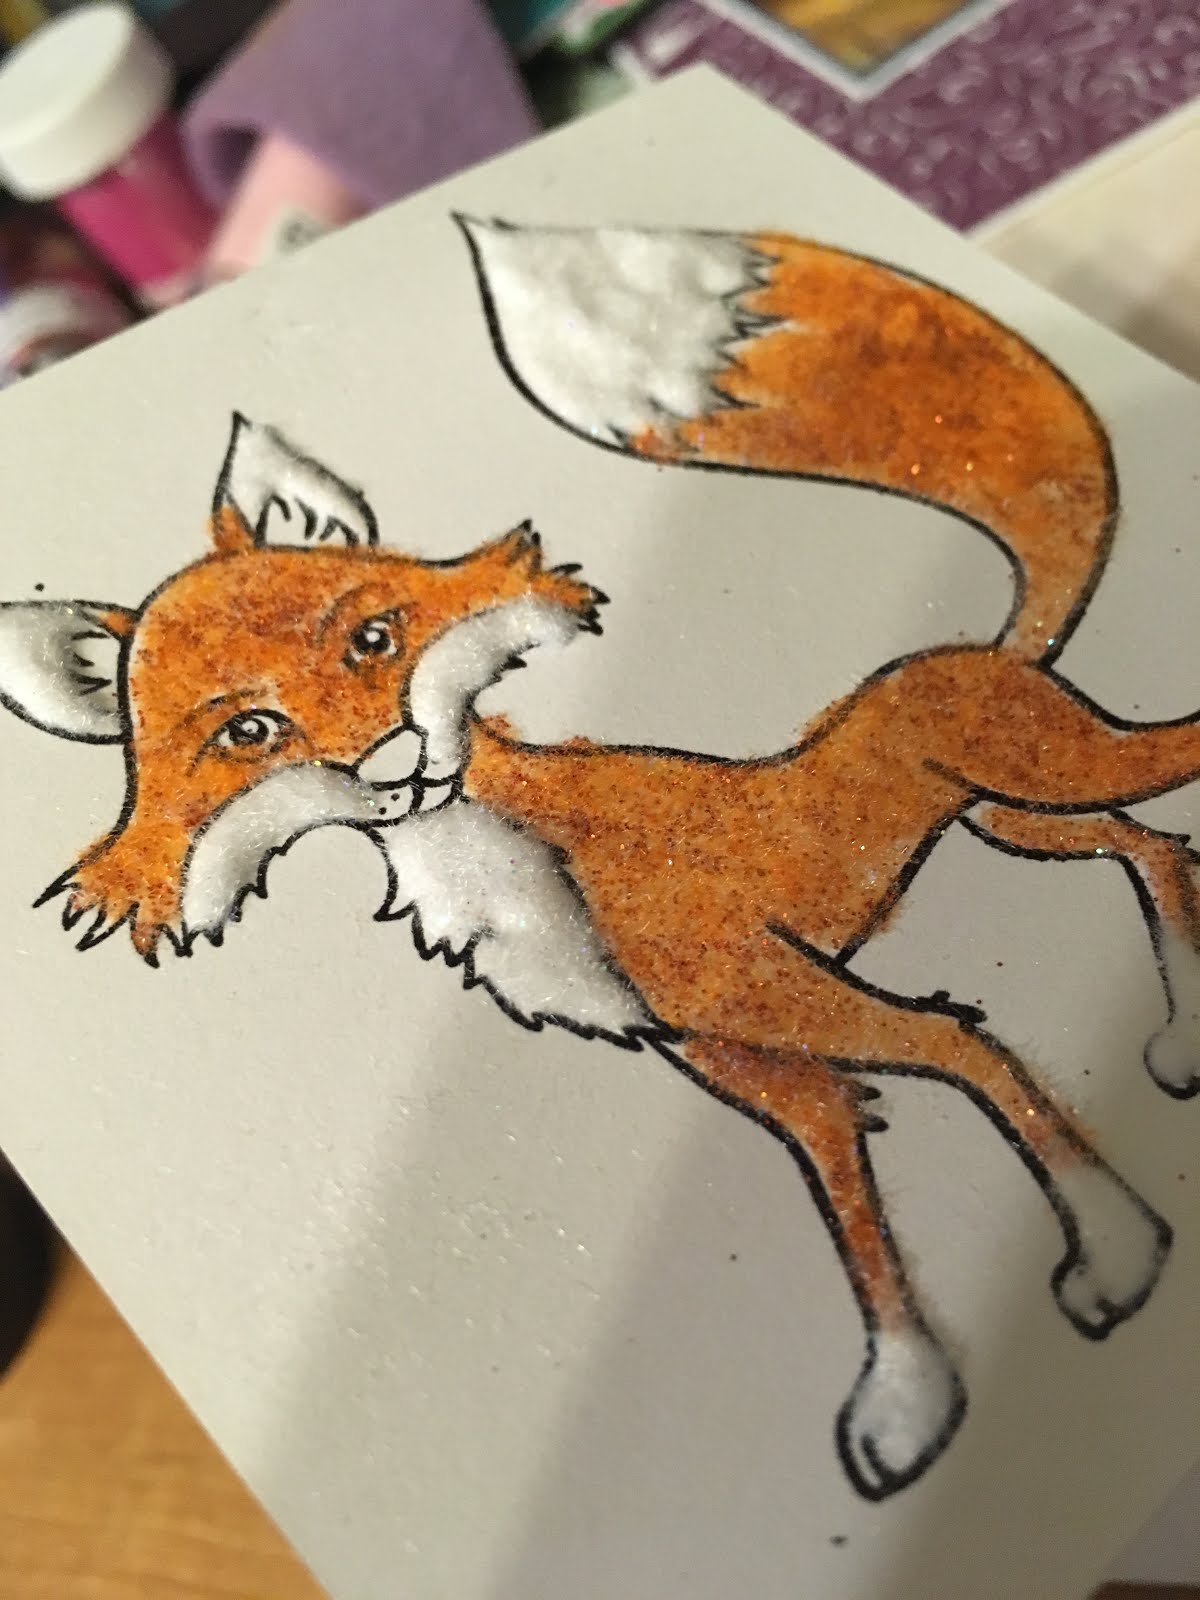
Once my fox was all painted, I added Twinkling Clouds Flocking using Nuvo Deluxe Adhesive to make his white "fur". :)


(here you can see the sparkle on his fur better!)


Let's get talking about that background!  I just fell in love with the English Lace Craft Perfect Paper - it's just sooo pretty! I wanted to show it off , so I just cut a background piece of it and left it pretty much plain!

Next, I decided I wanted to create a sort of "brick wall" for the foxy to be sitting in front of, all forlorn. I used a piece of metallic silver paper I had in my stash, but the Nuvo Chrome Silver Mirror Cardstock would have been perfect for this! I cut a piece and ran it through my Big Shot using a "brick pattern" embossing folder.


Next, I inked the entire surface with Versamark Ink and sprinkled on Checkers Super Thick Embossing Powder (don't mind the old label with the wrong name in the pic ;). I heat set it from beneath while holding it with tweezers. You want to heat set the super thick powders from the bottom to avoid them flying all over the place!  Isn't it pretty?


Next up, I created the oval behind the little fox. I used the same mirror foil paper and die cut one out using the Tonic Studios Mixed Edge Oval Die Set. I also ran it through the Big Shot using the Filigree Affections Embossing Folder.


I adhered it to the background using Tear-ific Tape! :)  All assembly of layers used the always amazing Tear-ific Tape - it's just the BEST!!!

Finally, I stamped my sentiment on a piece of white cardstock and embossed with Copper Peddler Embossing Powder. I really am digging the copper this month!!


This is a standard A2 sized card - so assembly was a snap!  All the layers were adhered with 1/4" Tear-ific Tape. I tied a bit of string around the sentiment and added a metal bow paper clip for some extra wow factor. Finally, Nuvo Crystal Drops in Ivory Seashell were delicately applied to the lace background, corners and "brick" wall.


I sure enjoyed sharing my tutorial with you today and I hope you learned something. I'll be back again soon with more SNS goodness to share!

See you soon!
Jess


Friday, 19 January 2018

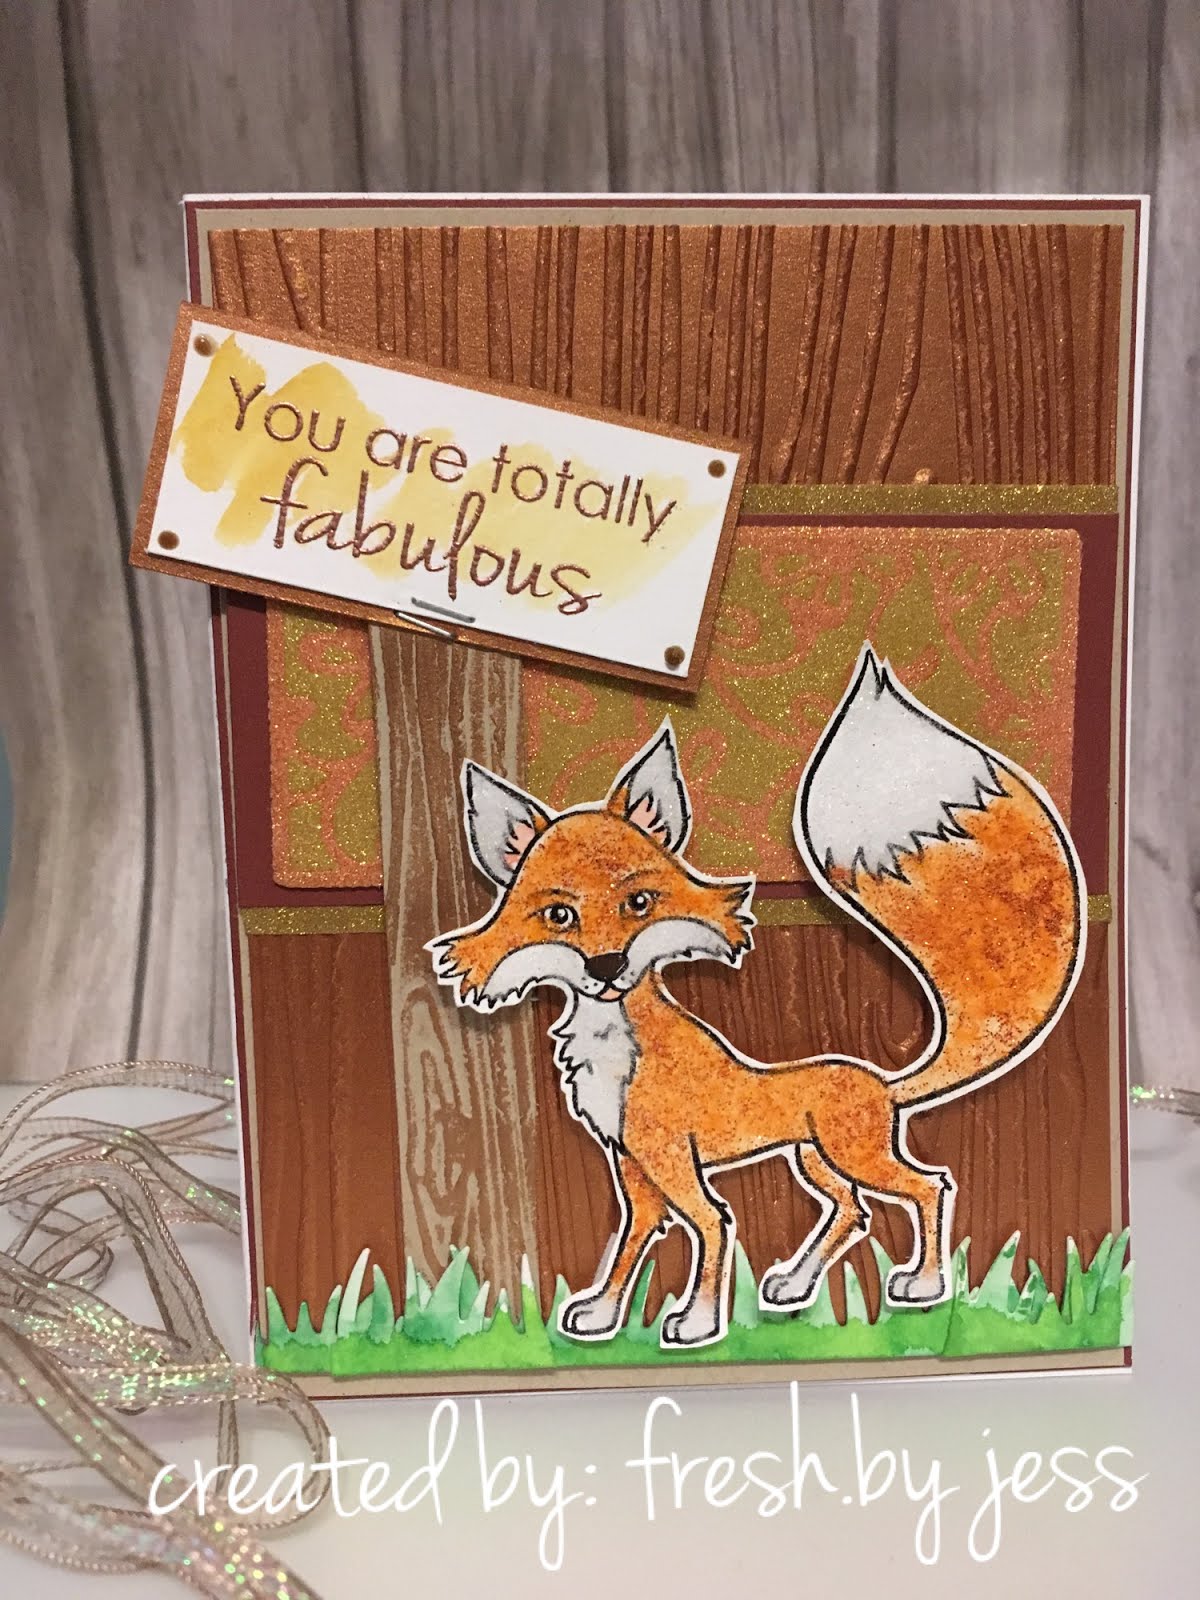
SparkleNSprinkle - Hello Foxy

Hello friends!


I'm here today to share a brand new card featuring a new Stamp Set from SparkleNSprinkle called "Hello Foxy". It's a really adorable set - I hope you love it too!  This is actually a pretty simple card to recreate - I hope you go out and make one for yourself!  I know you have a "foxy" friend who would love to receive this card, don't you?

SNS Supply List


Ok....let's go!

First Steps

Let's create the framed background glitter piece!  I started by attached a piece of 2.5" Tear-ific Tape to a piece of white cardstock. Pretty simple start, huh? Using the Tonic Studios Delicate Daisy Die, I used my Big Shot to cut through the adhesive back portion of the Tear-ific Tape - NOT ALL THE WAY THROUGH!  We want to create a Glitter Inlay Technique!  You may have to play around with your own diecutting machine to find the right "sandwich layers" to only cut through the top portion.


Using a paper piercing tool, I removed the cut backing areas of the Tear-ific Tape gently to expose the adhesive below. It's super sticky stuff!  Once I had it all removed, I sprinkled on the 24kt Gold Microfine Glitter (oh so soft and suede like!) and burnished it into the adhesive well - being careful not to dislodge the remaining protective backing.  After I removed the excess glitter, I repeated the steps with the remaining backing, this time using Autumn Frost Glitter.


Here you can see the gorgeous background this creates. I just love this technique. I added a mat of metallic copper cardstock behind the panel and another mat of 24kt Gold Edged cardstock. This technique is simple - apply 1/4" Tear-ific Tape around the edge of your paper (right up to the edge!) Remove the backing and sprinkle on your Glitter (I used the 24kt Gold!) and burnish well. Super simple - but super effective!


Creating your Fox


I started my fox my stamping with Versamark Ink onto white cardstock (first rubbing the cardstock with my Anti-Static Bag!) then heat embossing with Black Detail Embossing Powder. Next, I applied my Nuvo Medium Glue Pen all over the fox's body and added Autumn Sparkle SparkleNSoft (aka flocking with glitter added!).  He was looking pretty foxy at this point, but I wanted the white parts to stand out even more, so I added a VERY thick layer of Nuvo Deluxe Adhesive onto the "white" areas, then sprinkled on the Twinkling Clouds SparkleNSoft. I set the little guy aside to dry and went to work on my sign.


The sign came to me as I was creating the background! I had used a woodgrain embossing folder to emboss a piece of Metallic Copper Cardstock - then I thought, "hey, a sign is a perfect way to do the sentiment!". So that's what I did. I grabbed a scrap piece of kraft colored cardstock and embossed with the same folder. Using the Nuvo Embellishment Mousse in Cosmic Brown, I slightly "distressed" the wood of the pole.


I stamped the sentiment in Versamark Ink and heat embossed with Copper Peddler Embossing Powder (I think this is my new favorite color right now!).  Once I realize my little guy would be outside, I needed to add grass!  I used a Lawn Fawn die from my stash and cut some white cardstock. Then I watercolored the grass using the Nuvo Aqua Flow Pens in Spring Meadow and Autumn Woodland (I like to mix my colors on an acrylic block first as a paint palette, then paint with an Aquapainter pen!). I gave the little foxy's ears a wash with the pink color from the Spring Meadow collection and the sign a hint of color with the yellow. His nose was colored with the brown Aqua Flow Pen from the Autumn Collection.  I fussy cut out my fox and popped him up with some 3D foam tape.

All the layers were attached using 1/8" Tear-ific Tape.  Nuvo Crystal Drops in Dark Walnut were added to "nail" the sign to the card (haha) and a decorate mini staple attached the sign to it's pole.


As always, I hope you loved this card. I always have fun creating them.

Until next time,

Jess

Sunday, 14 January 2018

SparkleNSprinkle - January 2018 Reveal

Welcome to the January 2018 
Sparkle N Sprinkle New Reveal Blog Hop! 


We are pleased to reveal the following new stamp sets this month.

The sets are:


Cherished Moments - Bride 875
Digital Version: DIGI875B

Roses In My Heart 879
Digital Version: DIGI879FS

Ornate Greetings 880
Digital Version: DIGI880DE

Cara and Mouse Friend 881
Digital Version: DIGI881SG

Hello Foxy 882
Digital Version: Digi882B

You are definitely going to want both the digi version as well as the rubber version because when you purchase the digital versions, there are lots of extras that aren't available otherwise.  These extras can include additional images, additional sentiments, digi papers (in some cases), and a cut file.

The new sets are 20% off until the 20th of the month.  Head on over to the SNS store once you've finished the Blog Hop and start shopping.

SNS is always adding new products and new product lines to the store.  So stop by often to see what's new! 

One GRAND PRIZE WINNER will be announced on the 17th of the month.  One of the Designers is our Mystery Host and the winner will be selected from comments left on her blog.  You must leave acomment on each of the Designers' blogs in order to be selected as the winner, as you never know who the Mystery Host will be.  This is checked for compliance.

The GRAND PRIZE WINNER will be announced on the SNS Facebook page and on the SNS Blog and will receive a $20 Gift Certificate to the shoppe!

The Blog Hop order is:
(Tip: if you have difficulty with a particular link, try clicking on the Designer's blog title to be directed to their Home page.)

  
Belinda
Anne
Chris
Jess ---> you are here!
Donna
Diane
Shona
Eret


We hope you enjoy the New Reveal Blog Hop as much as we enjoy creating new projects for it.  Be sure to visit the SNS Blog for even more inspiration.  Something new is posted most every day.


Did you know that SNS has a You-Tube Channel?  If not, then you are in for a real treat.  Subscribe today to get all the latest tips and techniques!


The Sparkle N Sprinkle Creative Challenge group is on Facebook.  

This is a closed group (just trying to keep out spammers), but we want anyone who to participate to join.  Click on the link and join in on the fun today! 

The Creative Challenges run from the 1st - 25th of each month.  A SNS image (either rubber or digi) is required.  If you don't have any yet, there are freebies located on the Home page of the SNS website.  Just scroll down the page a bit to see them.

The Creative Challenge Winner and Top Three will be posted on the last day of each month.  The winner will receive a $15 Gift Certificate to go shopping at the SNS store.

Please review all the Challenge Rules before submitting your photo.  We can't wait to see what all you create using SNS images.

~~~~~~~~~~~~~~~~~~~~~~~~~~~~~~~~~~~~~~~~


SNS Supply List:

Eggplant Glitter - G1066 - (This has been discontinued.  Use Periwinkle Ultrafine Glitter G1060)

WHEW! Where to start on this card? There's a lot going on - but I will break it down for you.

I started by creating my background. I used a piece of purple cardstock and grabbed the Tonic Studios Essentials Filligree Affections Embossing folder & Die Set. First, I die cut the piece of cardstock, then embossed it!  I love this set - it's soo pretty!  I did a little distressing to the panel with some sand paper. I really wanted the white core of the paper so show through.  I set that aside and went to work on the rest of the card.

I added my Cherished Moments stamps to my Tim Holtz Stamp Platform (I stamped 2 at once for a later project).  I love how easy the platform makes it to perfectly stamp your images (even when you don't ink it up perfect the first time round!). I used Versafine Onyx Black Ink to stamp the images.


Pretty awesome, huh?  I used the Nuvo Aqua Flow Pens from the Spring Meadow & Summer Holiday sets to color up this beautiful bride. The way I love using the Aqua Flow pens is to add some color to a clear block, then use a paint brush (or aqua painter pen) to add color. Kind of like making my own color palette.


I set that aside to dry and moved onto my flowers. I had some paper flowers in my stash that matched the stamped flower image perfectly! So I decided to put an actual flower in her hair. I lightly brushed the flower with adhesive from the Medium Nuvo Glue Pen then dipped the flower directly into my glitter! I had used the Eggplant Glitter, but it has been discontinued (booooo! oops!) - but you can substitute in the Periwinkle Glitter ;)


Next steps.....

Check out this super cool new die from Tonic Studios - the Entwined Leaves Dot & Drop Die!  It cuts your image....and then leaves a trail of dots where you would apply your Nuvo Crystal Drops!!! How cool is that?


I used another purple piece of cardstock.  Once it was cut out, I added a few small pieces of 1/2" Tear-ific Tape behind the cut outs and sprinkled on Impulsive Purple Glitter


Again I distressed the piece slightly to add extra texture. Isn't this a cool die?

I wanted to add a little extra "something" to my background layer pieces, so I applied strips of 1/8" Tear-ific Tape to the edges of my cardstock and applied Lana Pink Embossing Powder (heat setting of course!)  I'm really lovin' this shade right now! So pretty.


The Sentiment....

For the sentiment, I stamped it onto a piece of white cardstock with Versamark Ink and embossed with Amethyst Spray Embossing Powder. I layered everything onto pieces of distressed purple carstock (I really got into the sandpaper for this project! hehe).


We're into the home stretch! Up next, the flowers!  Once again I used the Medium Nuvo Glue Pen to adhere some of the glitter to my paper flowers.  Easy peasy technique!


One last technique I used was from Demo Donna's video on making glitter twine last year!  You can find the full video HERE on how to create it. I used the 1/2" Tear-ific Tape and Luau Green Glitter to created the twine.


All the layers were attached with our ever famous 1/2" Tear-ific Tape! Finally, Nuvo Crystal Drops in Raspberry Pink and Sweet Lilac were added. The cabochon flower, paper flowers and flower in the bride's hair were adhered with Nuvo Deluxe Adhesive.


I also added an extra bit of Impulsive Purple Glitter to the bride's stamped flowers and Nuvo Crystal Drops in Honey Gold on her jewelry.

Whew! That was a lot of information for one card!  I hope you stayed with me there! hehe. One last comment - as you can see the diecut area on the bottom of the background is quite ornate. I adhered the Tear-ific Tape to the top part of the paper and used some of the Nuvo Deluxe Adhesive on the ornate part to hold it down. :)

The next stop on the SNS Blog Hop is the AMAZINGLY talented Donna and you can find her blog HERE!

See ya real soon and if you have any questions on my instructions, please ask away!! I'm happy to answer. 

I'm also entering this card in the following challenges:
Classic Design Team - Challenge #21
World Wide Open Design Team Challenge #01

Jess