Saturday, 21 May 2016

MHKDesigns Monthly Challenge - May


Hello friends!


It's time for a brand new monthly challenge over at MHKDesigns Blog!  I hope you will be inspired by our creations and palette this month!

Here is the Design Seed:


I decided to work with Butterfly Wisdom.  This is what I created:


I used pearlized watercolor paints to color the image, and then used lots of layers to set off the image.  Super sweet and simple :)

I hope to see you all come out and play along! 

Until next time, 

Jess

Friday, 20 May 2016

MHKDesigns - Designer Inspiration May 2016


Hello beautiful friends!


I'm here to share a card on the MHKDesigns Blog that I made using the stampset "Purr-fect".  I actually made it for the release month, but decided to hold off on sharing until now!


I just love this image - it prints off beautifully and all I had to do was watercolor a bit to add effect.  I printed off the Digital Paper - Serene Seaside Papers, Distressed Shells Mint and used that as my background.  I inked up the edges to add dimension and texture.  I simple yellow ribbon tied in a bow finished off the card. 

I hope you enjoy this card and are inspired to go out and create!

Until next time,


Jess

Creative Corner Challenges - Sponsored by Scribbles!

Hello friends!

Welcome to another week at Creative Corner Challenges!

This week, we are sponsored by the super fun 


I chose to work with this ADORABLE Hedgehog Peek-a-boo Stamp!


I printed him out, colored with watercolor pencils and blended with an Aquapainter.  Next, I fussy cut out the image, then covered it with Clear Embossing Powder!  Isn't he cute?


I do hope you will come out and play along with us for a chance to win the Sponsorship Package! :)

Until next time,

Jess


Monday, 16 May 2016

Gone Fishing with Sparkle N Sprinkle!


Hello friends!


I have a new card to share with you today featuring the new stamp from SparkleNSprinkle called "Gone Fishing".

Here is the complete supply list:


First I stared by making the background. I took 2 pieces of 1/4" Tear-ific Tape and adhered them across the bottom of my vanilla panel.  I sprinkled on Military Green Embossing Powder and heat set. I stamped the sentiment from the Gone Fishin Stamp Set on the top of the panel using Versamark Ink, sprinkled on the Military Green Embossing Powder and heat set. 

I cut a piece of vellum the same size as my vanilla panel.  I used the anti-static bag to prevent flyaway embossing powder, then stamped my fishing image using Versamark. I sprinkled on the Military Green Embossing Powder once again, then heat set.  To attach the vellum without adhesive, I simply used brads in each corner. 

I popped up the whole panel with Foam Squares and attached it to a brown layer of cardstock, then adhered to the cardbase using 1/4" Tear-ific Tape


To finish off the card, I added 3 Foam Sqaures, peeled off the backing and sprinkled on some Chameleon Glitter.

I hope you enjoy this card!  I love the silhouettes of the stamp set and the cute sayings!

See you next week with another fun card!

Jess

Friday, 13 May 2016

Just Go Fishing


Hello friends!


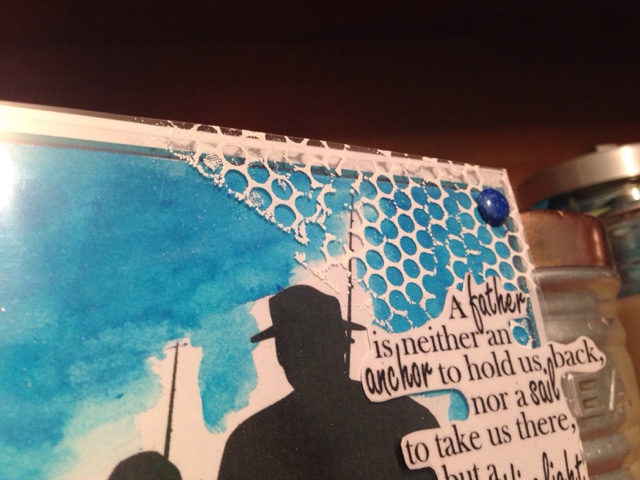
I'm back with another fun creation for SparkleNSprinkle, featuring the new Stamp Set called "Just Go Fishing".

I really love these stamps - so versatile and perfect for Father's Day!

Here is my supply list:


I first started by printing off the Digital Image. I cut it to 3.75X5 inches.  To paint the background, I gently sprinkled on the Ultramarine Blue Watercolor Powder, then took an AquaPainter brush to move the color around.  I think it created such a pretty background!  I adhered all my layers using Tear-ific Tape.


I added 2 more layers of cardstock to add some dimension.  I cut the Embossable Acetate to 5.5X4.25 - to cover the entire card front.  I swiped the entire piece of Acetate with the Anti-Static Bag.  I used Versamark to stamp the hoenycomb image from Journal Mixed Media to the corners.  I think it kind of looks like fishermen's nets!  Then I sprinkled on the White Detail Embossing Powder and heat set carefully (making sure not to melt the acetate!).


To make my brads, I used my Tweezers to hold the brad firmly.  I dipped the top into Versamark Ink, then dipped it into my Ocean Embossing Powder.  I heat set carefully and then quickly (while still warm!) re-dipped it into the embossing powder, heat setting a second time.  I love that you can create any color brad you want using this method!  

I let each brad cool down (be careful - they can get very hot!).  To attach the Acetate layer to my card, I simply punched holes in each corner of my cardfront (including the Acetate) and used the Brad to attach it.  


I fussy cut out my sentiment and then covered the entire piece with Versamark and Clear Detail Embossing Powder.  Once heat set, I attached to my cardfront using Tear-ific Tape.


I hope you enjoyed this card!

Until next time,

Jess