Saturday, 30 June 2018

Canada Day Banner

Hello crafty friends!


I'm here with one last fun June post for SparkleNSprinkle!  It's time to celebrate Canada Day in style with some home decor - a fun Banner! I used the adorable Sophie Pup Stamp set one last time.

Here is my full SNS Supply List:

SNS Supply List


If you remember my previous post HERE where I used Sophie earlier in the month, you will see I used a similar technique to color my Sophie!  I love my Nuvo Marker pens!!!  Once she was colored, I fussy cut out my images.
 

Then, I grabbed my Nuvo Smooth Precision Glue Pen and added some Diamond Dust Glitter.  I just wanted a little extra SPARKLE! Who doesn't love sparkle?


Next, I grabbed my Tonic Beautiful Bunting Grand Gala Dies an cut my banner pieces!  So easy!  I used the Fireworks Embossing Folder again too - but you can use the the STENCIL again to create the same technique!  Simply use a stylus to dry emboss from underneath the paper.


I wanted to really emphasize the fireworks, so I reached for my Nuvo Embellishment Mousse in Pure Platinum and just scraped it across the embossed areas using a palette knife. There was no particular plan with this - just a little extra something something! :)


I started to build my banner decorations!  I stamped an image from the Journal Mixed Media stamp set onto some die cut Sticker Paper using Versmark Ink and heat embossed with Red Apple Embossing Powder!  I thought that would add a fun background and some extra interest to the banner. 

Next, I simple adhered my Sophie and Canada Flags to the sticker papers using 1/2" Tear-ific Tape.  Then I adhered them to the banner!  My sentiments actually were made using the Sophie DIGI Set!  I wanted them enlarged so they would really stand out!  I used some thicker twine as my banner anchor.  Once it was done, I decided that I needed a little extra something on it - so I die cut some Tonic Craft Perfect Papers in Hailstorm and added the little bits to the banner!


There you have it  Some super cute Home Decor ideas for your next party!  You could always swap out Sophie for our Baxter Pup Stamp Set to make some cute Fourth of July Banners!


I hope you had fun and will go and make some banners of your own!!

See ya soon!

Jess
Thursday, 28 June 2018

Royally Purple Roses

Hello friends!


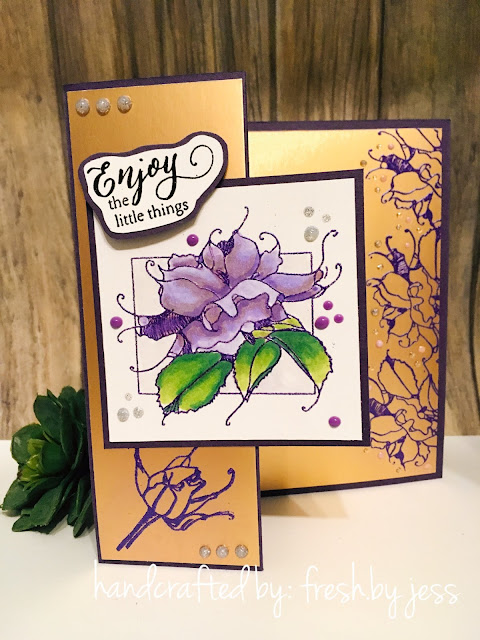
I am SOOO excited to share another fun SparkleNSprinkle June Reveal project with you today!  This handmade card just screams "royal" to me - what is a more classic color combo than purple and gold?

Here is my SNS Supply List:


This card has a fun fold feature (try saying that 10 times fast! LOL). Want to know the trick? Fold your A2 Card base the traditional way (in half). I scored the front of the card in the middle and folded it back over! Simple as that!  So when it opens, you see the entire inside. Really - it is that easy!! 

Let's color!  

I stamped my focal image from the My Wild Rose stamp set (isn't it GORGEOUS?) onto a piece of white Neenah cardstock. using Versamark Ink and heat embossed with Amethyst Spray Embossing Powder. Next, I grabbed my Nuvo Marker Pens from the Palma Violets and Irish Clover collections and set to coloring. I think the blending came out fantastic, don't you? These pens are so much fun to work with!!!  I also use the Colorless Blender Pen. (You can see in the photo I was also playing with coloring using the Nuvo Aqua Flow Pens!!)


I trimmed the image down and use a matching piece of purple cardstock to mat the image for the card front. Next up came embossing on the gorgeous Tonic Mirror Cardstock!!!  Grab your Antic Static bag and let's get embossing.

First up, I rubbed the Anti Stati Bag across the mirror cardstock and then I stamped the rose image multiple times, creating a beautiful border edge (this piece is going to be on the interior of your card - so you want the roses "peeking" off the edge). I used the Amethyst Spray Embossing Powder again and heat set. 


Use your Tear-ific Tape to adhere it to the inside of the card. Isn't that rose image GORGEOUS???

The sentiment was stamped using Versamark Ink and embossed with Black Detail Embossing Powder. Another rose was added on the front panel as well. Finally, Sweet Lilac Crystal Drops
Crushed Grape Crystal Drops and Silver Moondust Glitter Drops were added as accents - look how fine you can make your drops!


I hope you enjoyed this elegant handmade card!  I just love the combo of gold and purple together, don't you?  I hope to see you again really soon!!  I also love reading your comments - they mean a lot to me!!!

See ya next time!

 photo MHKDesigns_FreshByJess_Signature.png

Wednesday, 27 June 2018

Vintage Sewing Room

Hello crafty friends!


If you love sewing AND vintage, then this project is RIGHT UP YOUR ALLEY!!!  I present to you my newest Southern Ridge Trading Company project!  Isn't it just lovely?  I can't wait to tell you all about this gorgeous HANDMADE CARD.

I used the following Southern Ridge Chipboard products on this card:


I really loved this set of chipboard items as there were many items in one that I could use to make a card...and still have leftover pieces!!  Great value! :)

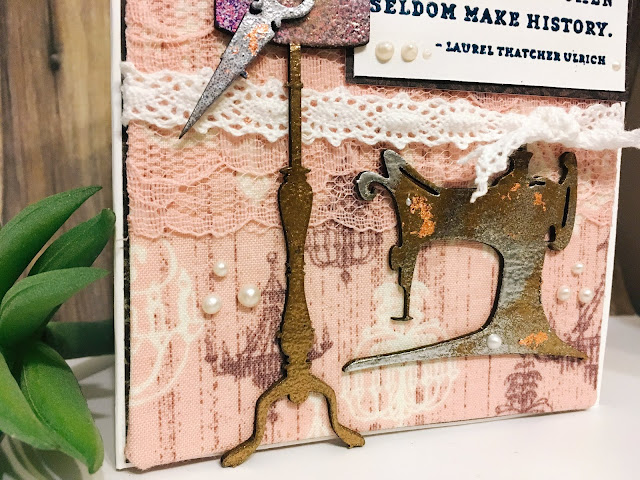
Sew.......hahaha (ok, I'm not really that funn).....your first step is the background. I actually adhered a piece of scrap fabric to a piece of cardstock for my base! Next, it was time to get my chipboard pieces all prettied up!  I used a mix of Embossing Powder and some copper Gilding Flakes to create the vintage feel on the sewing machine!


A key tip to working with gilding flakes - don't keep an overhead fan on with an open container (or the air conditioning/furnace vent). Just take my word for it ;)


Gilding flakes are also a fun way to add texture and dimension!  Simply apply a bid of adhesive, lay on your flakes and then brush off the excess. I used a 2 Way Glue Pen to adhere mine.

Once everything was embossed and distressed with gilding flakes, I added a bit of dusty rose & white lace and adhered everything to my fabric covered card.  I felt it needed a little "extra" so I used my Nuvo Crystal Drops in Pearl to create liquid pearls everywhere!  I just LOVED this sentiment which was stamped and embossed with a dark navy blue embossing powder. 


I thought the pearls on the mannequin were the perfect touch!

Here is the rest of my supply list:

- Cardstock
- Fabric Scraps
- Lace Trim
- Nuvo Gilding Flakes: Sunkissed Copper
- SparkleNSprinkle Embossing Powders: Heliotrope, Cotton Candy, Vintage and Silver
- Nuvo Crystal Drops: Ivory Seashell
- Versamark Ink


I hope you enjoy this project - I loved making it. See you next time!


 photo MHKDesigns_FreshByJess_Signature.png

Tuesday, 26 June 2018

Splitcoast Stampers #703

Hello friends!


It's time for this week's Splitcoast Stampers Card Sketch SC703!

Each week, there is a brand new sketch out to play along with - interpret it however you would like and play along. 

This week's sketch was designed by Alison Cope Israels:


Here is what I created:


I hope you enjoy this card and will head on over to Splitcoast to play along! :)

Have a great day!

Jess

 photo MHKDesigns_FreshByJess_Signature.png

Friday, 22 June 2018

Rinea Foiled Paper Rosettes

Hello crafty friends!
I'm going to show you today how to make these really fun Canada Day Decorations using Rinea Foiled Papers!

I worked with a couple different packs to create this trio of patriotic rosettes!  I primarily used the Magical Foiled Paper Variety Pack along with a few sheets from our brand new Patriotic Foiled Paper Variety Pack (Silver/Silver Startstruck) (Glossy Ruby/Gold, Ruby Starstruck and Glossy Ebony Black/Gold).  You can totally make these rosettes without a die cut too!  I made them both ways. 
You'll also need:
 - Die-cutting Machine (optional)
- Rosette Die (I used one from Stampin'Up/Sizzix)
- Scoring board
- Cardstock scraps
- strong adhesive 
- embossing powder
- Versamark Ink
- patriotic stamps

1. We'll start by making our die-cuts. Rinea Foiled Paper holds it's shape well, because of it's unique properties! I instantly thought of these fun rosettes!  And of course, since I'm Canadian, I had to incorporate a Canada Day theme somewhere!  I picked the Ruby Starstruck Foiled Paper for the largest rosette. For this one I die cut 3 pieces for Foiled Paper. 
2. Using my Scoring board, I scored each line as indicated by the die.  Alternatively, if you don't have the die - you can just score it every 1/2". 
3. Once everything was scored, I accordian folded the paper pieces, then adhered together the ends with some double sided tape. For the large rosette, I needed to use 4 6x12 pieces of Foiled Paper. For the medium and small I was able to use 3 pieces of 3x12 and 2x12 sizes. 
 
4. To help the rosettes keep their shape, I simply used a piece of cardstock in the shape of a circle on the back of the rosette.
5. I wanted to keep my "Canadian" theme, so I die cut a bunch of circles, then used the Ghost Ink to do a few maple leaves. I used the Ebony Black/Gold Foiled Paper for the background of two of the centers. 
6. Embossed Maples leaves and sentiments were added to finish off the designs!  
 
I hope you enjoyed my first project tutorial!  I know you will have a lot of fun making different colored rosettes for your next party!  Experiment with different die-cuts and different shades of Rinea Foiled Paper!  
See you next time!
 Jess

Thursday, 21 June 2018

Creative Knockouts - Unicorn Rainbow

Hello crafty friends!

It's time for a new challenge over at Creative Knockouts Challenge #251!  Our theme this week is "For the Girls" and our sponsor is Scrap'N Dipity.  I chose to work with a stamp set called "Unicorn Rainbow" - too cute!!!


Here is what I created:


I hope to see you at the challenge! :)

Until next time,

Jess

 photo MHKDesigns_FreshByJess_Signature.png