Showing posts with label Foiled Paper. Show all posts

Saturday, 16 November 2019

Rinea Letterpressed Christmas Card

Hello Rinea Friends!

We are making a beautiful and elegant Christmas Card today using Rinea foiled paper!
I used an older product in my stash to create this card - a letterpress pad for my Big Shot!  So it's not an embossing folder, it's literally the image pressed into the foiled!  Once I had made my impression, I cut the Emerald/Gold Glossy Foiled Paper down to the size I wanted and added a mat of Ruby/Glossy Foiled Paper!  
 

I used a green cardstock base and added a layer of glitter paper for some extra sparkle. The layers were all glued together.  I really wanted to keep the elegant and simple feel of this card, but it needed SOMETHING. AHA! I grabbed some of the cones that were leftover from my previous project (find that HERE) and created a BOW from the Silver Starstruck Cones!  I used some Ruby Starstruck to wrap the center of the bow and hot glued it down.
 
Here is the full supply list:
Jolly Foiled Variety Pack - I used the Emerald/Gold Glossy, Ruby/Gold Glossy, Silver Starstruck and Ruby Starstruck
Glitter Paper
Green Cardstock
Papertrimmer
Adhesive of Choice
Letterpress plate
Big Shot Machine and appropriate plates

Voila! That's all there is to it!
I hope you enjoy my Letterpressed Christmas card! See you again next time!


Jess

Saturday, 2 November 2019

Rinea Holiday Ornament

Hello crafty friends!


I have a brand new project to share with you today for Rinea!  As you can see, we are making this beautiful holiday ornament today!  Or you could use it was a bow for a present! Or...you could make it bigger and turn it into a wreath or wall decor!  The ideas are endless.  First up, here are the supplies you will need:
Jolly Foiled  Paper Variety Pack  - I used the Starstruck in Ruby, Silver and Emerald along with the Gloss in Silver/Gold and Ruby/Gold for this project.
Hot Glue Gun
Paper Trimmer
1 3/4" Punch (or die if you prefer)

Here is my video tutorial to show you how to make it:

Check out the blue version I created too using the Frosted Variety Pack:

Thanks for tuning in!  See you again next time!


Jess

Wednesday, 2 October 2019

Pumpkin Fun with Rinea

Hello friends!

Fall leaves, crisp air.....it can only mean one thing....EVERYTHING PUMPKIN!!!   My first  Rinea Project this month is all about the pumpkins!!

Today I'm sharing an adorable handmade Pumpkin Welcome Sign! This was a fun project I tell ya! I'm obsessed with all the fun thing my local Dollar Tree store has, and I recently picked up a wooden pumpkin sign base and metal fall words. This was a perfect time to use them!

Here are the products you will need for this project:
 Haunted Foiled Paper Variety Pack
(I used the followed from the pack)
Marigold Glossy 
Emerald Starstruck

Ghost Ink
Rubbing Alcohol
Adhesive of Choice
Scissors
Jute Twine
Sand Paper
I started by tracing my pumpkin onto a piece of Marigold Glossy Foiled Paper. I trimmed it out and glued it onto my pumpkin cutout with liquid adhesive. I used sandpaper to smooth the edges and add a bit of distressed look.


Next, I lightly traced out where I wanted my pumpkin lines to be - you know, the lines that make a pumpkin a pumpkin! Using a direct to paper method, I swiped my GHOST INK over my markings, light created swooshes and let dry.  I spritzed with rubbing alcohol and wiped off the color with a paper towel - MAGIC!!! LOVE the Ghost Ink!!!


I found some pumpkin leaf templates online, so I traced those onto my Emerald Starstruck Foiled paper and trimmed out. The were arranged and glued one along with my "Welcome" words. I tied some jute twine around the stem and voila!  Easy Peasy!


Love how this project came together!
Thanks for taking the time to stop by my blog!  I love to read your comments -
they are always an encouragement. I would love to see your projects if you create them too!

Have a great day!
Jess

Sunday, 2 June 2019

Party Drink Umbrellas with Rinea

Hello friends!


I'm so excited to be back with the Rinea team for the 2019-2020 term!  This term, I'm actually adding videos to my posts!  Yep - I'm taking the plunge and diving into the YouTube world.  For my first project, we are making Drink Umbrellas!  YES!  You can make custom creations to match any party theme!

I'm featuring the Patriotic Variety Pack for this project.  

You can shop all the amazing Rinea Products that I use in the video here:


Onto the video!


I hope you enjoyed it!  See you again soon and don't forget to subscribe & pick up your Rinea Foiled Paper Supplies!


Jess

Wednesday, 15 May 2019

Retro Fun with Rinea

Hello crafty friends!


I have 2 handmade cards to share with you today for Rinea!  

For this first card, I started by pulling the Glossy Copper/Gold Foiled Paper from the Metallics Foiled Paper Pack.  The background and chevrons (hand cut by me!) were both made with this color. 
I stamped the car image onto a piece of Glossy Mocha/Gold Foiled Paper using Ghost Ink, then used alcohol and a towel to gently remove the color, leaving the silver underneath!  I love the Ghost Ink Technique! If you would like more information on the Ghost Ink technique, you can check it out HERE.
The sentiment was stamped with Staz-On Ink onto the Glossy Silver/Gold Foiled Paper and matted with Turquoise Starstruck. So pretty!!  To finish, I added a few Gold Glitter Drops for dimension.

Here is a second card I created using the same Ghost Ink technique:

The only part I did differently with this card was I stamped the image with Versamark Ink onto a piece of patterned paper and fussy cut out before adhering to the card. You can see the stars that I stamped with Ghost Ink peeking out in the background!
Thanks for stopping by!  I hope you are inspired to be creative today!
Jess

Wednesday, 1 August 2018

Bookmark Fun with Rinea

Hello friends!


My first tutorial for Rinea this month is making BOOKMARKS!!!   I actually ended up making 3 different versions!!! We partnered with Joy Clair this month and I know the entire Design Team has come up with some amazing projects!


I used the following Supplies to create these bookmarks:

- Joy Clair Coffee Love Stamp Set

- Embossing Powder (assorted colors)

- Versamark Ink

- Coffee Cup Shaped Dies

- Embossing Folder

- scissors

- assorted cardstock


Let's get creating! 

Bookmark #1 - Traditional Style


The first bookmark is a pretty standard one. It's 6inches long and about 2.5 inches wide. I used the Glossy Mocha/Gold foiled paper to create the base layer along with the backing layer for the sentiment!  I stamped the super cute "Life Happens" sentiment with Versamark Ink and heat embossed with a brown embossing powder. I also stamped the coffee cup onto a light pink cardstock and fussy cut it out. From the Princess Variety Pack, I chose the pretty Glossy Lavender Light Purple/Gold .I used a chevron embossing folder to add some fun texture to the Foiled Paper. It really holds it's shape beautifully!  Simply add your layers together with adhesive of choice and add a fun ribbon!  I had this fun tinsel ribbon and used it for flare!


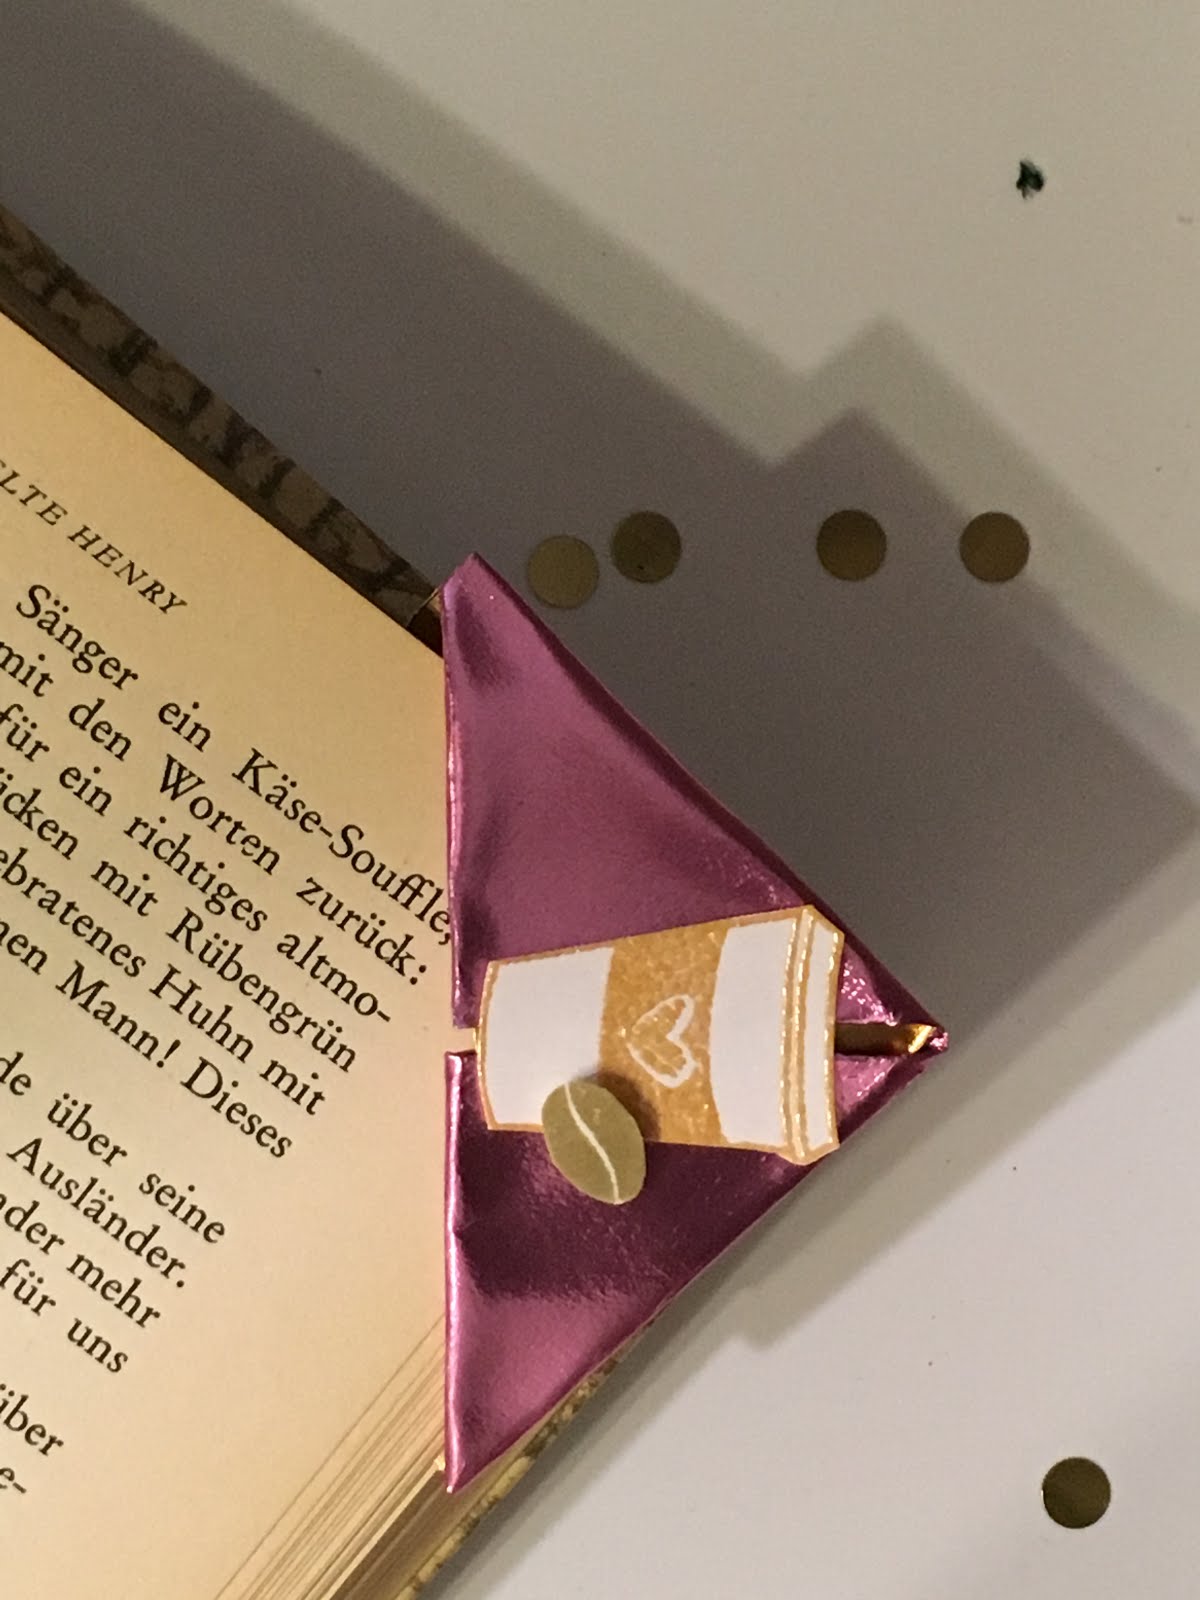
Bookmark #2 - Corner Bookmark


This bookmark comes together so quickly and easily - you could make some for "back to school" teacher gifts!!!  I used the Glossy Blush Pink/Gold from the Princess Variety pack to make this bookmark. I cut a 6" square of the foiled paper, then started foilding!  Fold the paper in half, bottom corner to top corner. Next, fold the bottom-left corner up to the top corner. Repeat with the right corner. Turn over, then fold the bottom corner – top layer only – up to the top corner. Unfold your last fold and fold back up, in the other direction, into the pocket.  Clear as mud?


Haha - it's really pretty easy!! The foiled paper holds the shape and bends very easily. I decorated this cute bookmark with the small coffee cup stamp from the Joy Clair Set. I embossed it with a butterscotch embossing pwoder and added the little coffee bean for decoration!  I did fussy cut the coffee cup.


Bookmark #3 - Coffee Cup


I loved this one the best I think!  I used a large coffee cup die to cut a piece of cardstock and a piece of the Glossy Copper/Gold Foiled Paper. I embossed the foiled paper using a fun embossing folder, then glued the 2 layers together. I stamped the sentiment with Versamark ink and heat embossed with a mocha embossing powder. The cute coffee beans were stamped randomly aroudn the sentiment and it was matted onto a piece of the Glossy Mocha/Gold foiled paper.  I also decorated the larger coffee cup stamp from the Joy Clair set with a mini cup and some scrap silver foiled paper. A little bit of ribbon topped with bookmark for flare!


I hope you enjoy these cute bookmarks! You will really love this Joy Clair stamp set as well - it's very versatile and I know I will make a lot of cards with it!


See you again soon!



 photo MHKDesigns_FreshByJess_Signature.png

Sunday, 22 July 2018

Rinea Christmas in July

Hello friends!


I was so excited when I opened my Rinea Designer Package and found this BEAUTIFUL Jade/Gold color of foiled paper!!!!!!  It's just amazing - and one of my favorite colors to boot!  
I am just in LOVE with the Jade/Gold Glossy Foiled Paper! I'm pretty sure that most of my Holiday cards this year are going to incorporate some of this beautiful foiled paper. I used the Crafter's Pack to create this card. I die cut the leaves for the flower using a thin die set (the foiled paper cuts beautifully with dies!). For the background, I cut a piece 4x5.25 inches and ran it through my Big Shot with a cool Tim Holtz embossing folder.  I just love how crisp and clean the foiled paper comes out with this technique - and it will retain the shape perfectly!!!
  

(You may remember seeing this foiled paper on a previous card I created HERE).
For my sentiment, I actually grabbed an Artist's Pack of our brand new MISFITS Variety Pack!  I love these little packs - they have an assortment of colors that are perfect to run through your diecutter - and you don't need to buy a full pack of one color! I layered the "joy" using the "Misfits" Mocha/Mocha Starstruck and the "Misfits" Silver/Silver Startstruck Foiled Paper.
I know you will love working with this amazing product! If you are looking at trying it, the Misfits are a perfect way to start, as it contains an assortment of colors and both glossy and startstruck versions.  I hope you enjoyed this card and I will see you next time!
Jess

 photo MHKDesigns_FreshByJess_Signature.png

Wednesday, 4 July 2018

Scrapy Land Challenge #93

Hello friends!


Welcome to Scrapy Land {Challenge #93}!  I had a lot of fun creating this bold card!  The flower was cut using the Memory Box Plush Narrow Succulent Dies. I used the dies to cut the Rinea Foiled Paper to create this card. For the sentiment, I used SparkleNSprinkle Dimensional Glue to handwrite onto a piece of acetate. I sprinkled on Rose Gold Glitter and let it dry overnight!  I basically created my own sentiment :) It's a very fun technique!


A little about the Scrapy Land Challenge......


The theme is always ANYTHING GOES using any brand of die that Scrapy Land sells.  In addition, we have TWO WINNERS for each challenge.  One will be a random winner and the other is chosen by the Design Team.  Each winner will receive a generous $10 gift certificate to Scrapy Land.  Did you know Scrapy Land carries over 55 brands of dies? Chances are you have a few of the brands in your stash!  

Please link back to this Scrapy Land Challenge and include the link to this challenge on your blog post.  It would also be extremely helpful if you would list the brands of dies used in your project.  (Sometimes we can't tell if an item is a die cut or chipboard.)

I can't wait to see what you create for this challenge.


Good luck!

 photo MHKDesigns_FreshByJess_Signature.png

Sunday, 1 July 2018

Summer Party Decorations with Rinea Foiled Paper

Happy Canada Day crafty friends!


I hope you are enjoying the day - whatever great country you live in!  Here in Canada we celebrate July 1 as our National Birthday! We may not be as patriotic as our neighbors to the south, but we are very proud of our Red & White Maple Leaf! :D

I have a super fun new Rinea project to share with you today!  While it is red, silver and blue - it can be used to celebrate any of your patriotic events!  I'm calling this a whimsical banner - or centerpiece!  It's truly up to you - a creative choice!

I used the Patriotic Foiled Paper Variety Pack  to create this fun summer party decor!  You could make a whole bunch of them and string them together for an banner or use them individually on tables!  Best part is - they reuse a common household item - toilet paper rolls!  Foiled Paper is just AWESOME to create fun party decor with. 

Let's get crafting!


You will need:
Patriotic Foiled Paper Variety Pack - I used the Artist's Pack
- toilet paper rolls
- double sided tape
- pencil or pen
- paper trimmer
- Fishing line or twine (optional)
- paper piercer (optional)

You are going to love how fast and easy this project comes together!  Start by cutting your 4x6 in half lengthwise.  Next you are going to cut 3/4 of the way through the piece, about 1/2" apart all along the length of the foiled paper. You don't want to cut all the way through - you are making a fringe!  You are also going to cut your toilet paper roll in half.


 Apply a strip of double sided tape along the solid part where you didn't cut. Then you are going to simply wrap each piece of foil around the toilet paper tube in layers. I lightly curled my ends up using a pen.  To make the curly top, I just revered the steps and adhered the foiled paper inside the top of the toilet paper roll, alternating the directions that I curled the foil. I chose to use the Glossy Silver/Gold Foiled Paper that is included in the variety pack for this step.


I felt I needed a band of some sort to finish it off - so I added a 1/2" strip of Starstruck Ruby Red Foiled Paper. I also punched a small hole using my paper piercer and tied some fishing line through it to hang.


There you have it!  The next shot shows the "hanging" version. If you wanted to string them on one long line, that would work fabulously too!  I chose to do individual ones. Would the be fantastic if you made some large ones with paper towel rolls too?  So many endless options!


I hope you enjoyed this tutorial using Rinea Foiled Paper I hope you will go out and create something fun with it!  You are going to love how it holds it's shape :)  See you next time!

 photo MHKDesigns_FreshByJess_Signature.png