Showing posts with label Halloween. Show all posts

Thursday, 24 October 2024

Gecko Galz Trick and Treats Blog Hop 2024

Hello Everyone!

We want to welcome everyone to the

Gecko Galz 14th Annual Blog Hop


This is our Tricks and Treats Blog Hop! 

We have 14 AMAZING blogs for you to visit this weekend, each with some gorgeous projects created using the Gecko Galz collage sheets that we are giving you for FREE on each site! Each blog you visit will have a exclusive free Gecko Galz Collage sheet for you to download, the one here is

"SPOOKY RETRO LADIES".

(Click Right on the image below to save)

 Here is what I created: 


Also make sure you leave a message on each blog site you visit, and follow that design team member if you do not already and on the last blog there will be a phrase that you will email to us to be entered in our drawing for a wonderful treat pack.  So sit back, relax, take your time and enjoy the hop!

We have FIVE amazing prizes up for grabs:

·        First is a Gecko Galz Kit Club for 2025!

·        Second prize is a subscription to the Gecko Galz 2025 Card Topper Kits!

·        Third prize is a subscription to the 2025 Tin Topper Kits for 2025!

Fourth prize is a $25 shopping Spree!

·        And our Grand Prize ONE FULL YEAR of Gecko Galz PRODUCTS!!! This includes the 6 new collage sheets each quarter, a new stamp set each quarter, a new Craft Kit each quarter, a ATC collections, 1 Paper Pack each quarter, one jewel it collection, Tin Toppers, and Card Toppers!


First of all, you will need to visit all 14

blogs and leave a comment on each blog :) **This is important so we know you have been to all the blogs **. Collect the phrase at the end of the hop on the Fripperies and Butterflies site there will be a link to email the phrase to Gecko Galz at geckogalz2019@gmail.com.

This enters you in the give Away. On October 28th we will randomly draw the 4 winners and email each of you, then we will post the winning names  in our Newsletter on November 1st.


For an extra chance to win make a purchase from the GECKO GALZ ETSY STORE between the 25th of October and the 27th of October and your name goes in again for a better chance of winning (each purchase you make that weekend gives you another chance to win) 


Now have fun visiting each Blog


Gecko Galz

Kim Rayko

Robin Francini

Julia Vasquez

Tanis Buckton

Susan Renshaw

Kelly Parker 

Suzanne Franin

Carole Jones

Mia


Gerri Herbst

Jessica Kaiser --------> you are HERE!

Walter Zemrock

Leanne Seed


Good Luck!

xoxo

Jess


Wednesday, 16 September 2020

Happy Haunting with Rinea

Hello friends!


It's time for another  Rinea Project .

Today I'm sharing a fun and easy Halloween Card idea.
Here are the products you will need for this project:
Arctic/Arctic Starstruck Foiled Paper
Adhesive
Cardstock
Halloween Sentiment Die (I used Happy Haunting by Tonic Studios)
Web Embossing Folder
Nuvo Drops in Black & White

I created a short YouTube Video to show you how to make them! Check it out here:


Love how this project came together! Here is another look:
 

Thanks for taking the time to stop by my blog!  I love to read your comments -
they are always an encouragement. I would love to see your projects if you create them too! Remember, you can save 10% on your Rinea order when you shop HERE.  I hope you are inspired to use your Rinea Foiled Paper to create something fun.

Have a great day!
Jess

Wednesday, 2 September 2020

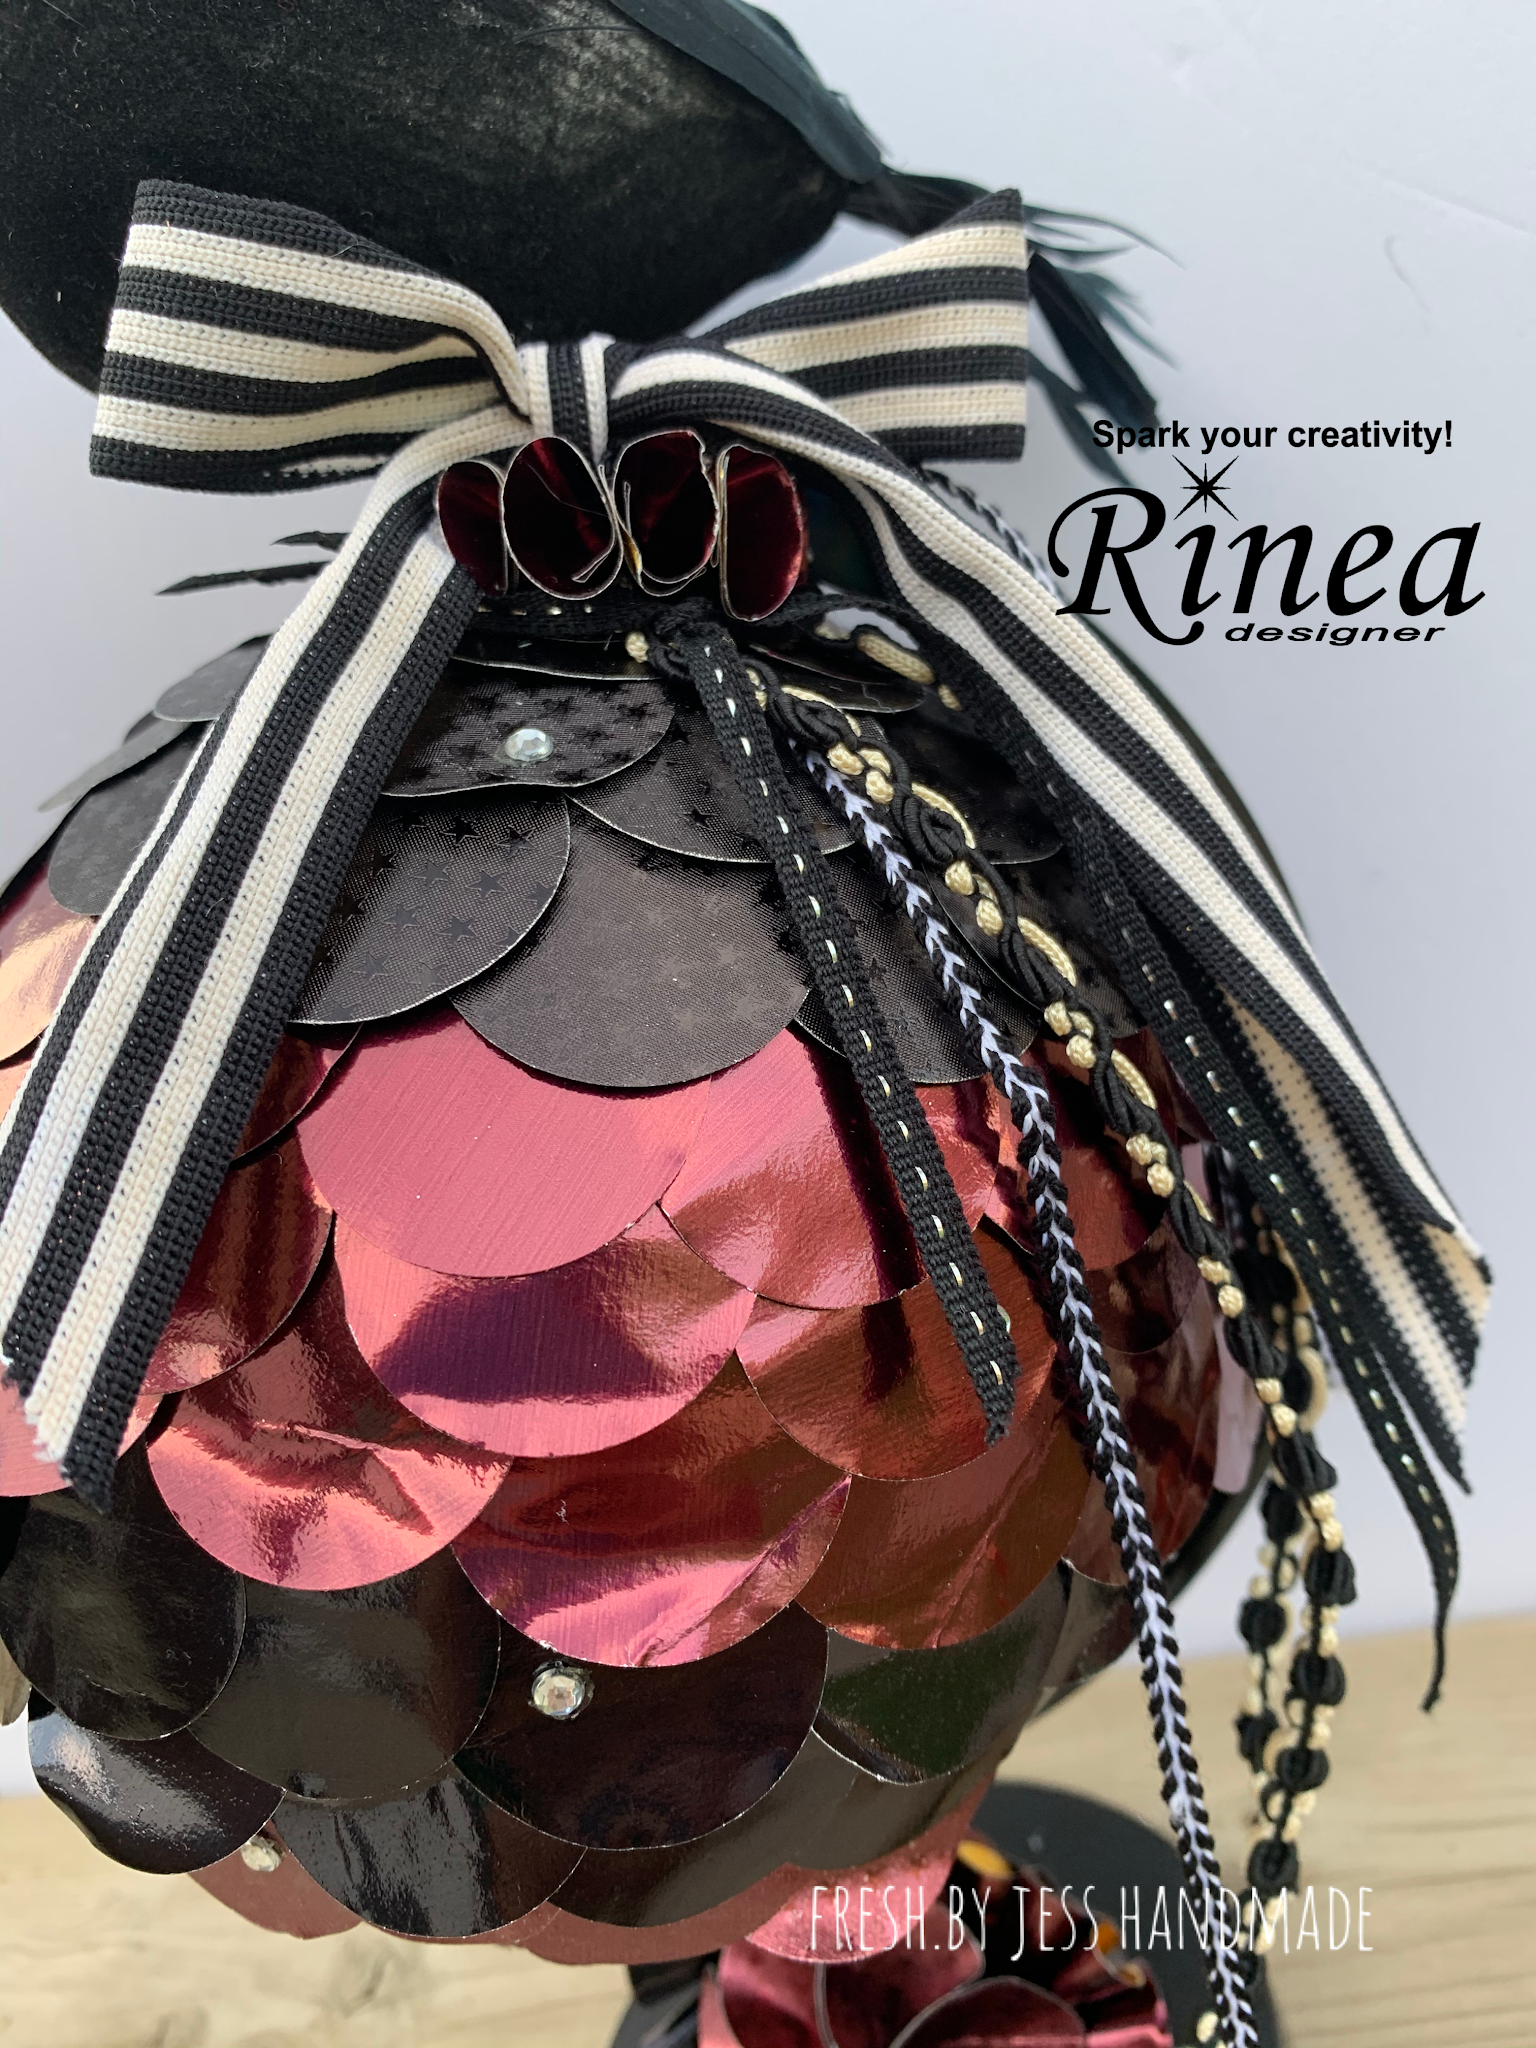
Altered Globe with Rinea Foiled Paper

Hello friends!


I have a really fun project to share with you today featuring Rinea Foiled Paper! 

I've had this idea in my head since seeing some papercraft version floating around on Pinterest, so I really wanted to create my own!  It turned out perfectly - just as I had envisioned it!  So grab a cheap dollar store globe, your Rinea Foiled Papers and let's get crafty!


I used the following supplies:

- Small Plastic Globe (I picked mine up at our local dollar store)
- 1.25" Circle Punch
- Adhesive of choice
- Ribbon/trims
- Small faux Crow
- Hot Glue Gun

First you are going to pop the globe part off it's stand (mine came off super easily!). Next, you are going to punch a ton of small circles of each of the four colors -  Merlot/Merlot Starstruck Foiled PaperMerlot/Gold Glossy Foiled Paper, Ebony/Gold Glossy Foiled Paper and Ebony/Ebony Starstruck Foiled Paper. I forgot to count how many I used! You are going to add a row of adhesive around the top of the globe and start adding your circles. I overlapped them slightly and continued down the globe, switching the colors as a I went. I did add a row of adhesive every time so the whole globe wasn't sticky at the same time.


Once the globe was completely covered in my Foiled Paper Circles, I set it back into it's base and started decorating. I used hot glue to add a small crow figurine  (again, a dollar store find!), some black and white ribbons & trims (from my stash!) and of course some rhinestones!


I had a few extra circles punched, so I just created some random flower shapes and glued them on.


There you have it!  A fabulous Halloween Home Decor piece to display. Thanks for stopping by today. 

Remember, you can save 10% on your Rinea order when you shop HERE.  I hope you are inspired to use your Rinea Foiled Paper to create something fun.

See you again next time!

Jess


Wednesday, 16 October 2019

Rosette Pumpkins with Rinea

Hello friends!

My EVERYTHING PUMPKIN tour continues!  UP next, another  Rinea Project .

Today I'm sharing these super cute (and versatile!) Rosette Pumpkins!  Make them big, or make them small! Use them as placecard settings or centerpieces. Mix & match colors!  Have fun with it!
Here are the products you will need for this project:
 Haunted Foiled Paper Variety Pack
(I used the followed from the pack)
Marigold Glossy 
Emerald Starstruck
Ebony Glossy
Hot Glue Gun
Cardstock
Tape Adhesive
Scissors

I created a short YouTube Video to show you how to make them! Check it out here:


Love how this project came together! Here are a few more quick photos:


Thanks for taking the time to stop by my blog!  I love to read your comments -
they are always an encouragement. I would love to see your projects if you create them too!

Have a great day!
Jess

Monday, 22 October 2018

Trick or Treat with Rinea

Hello crafty friends!


Of course I had to make a cute card for my second Rinea Project  of the month! I just love this cute little Fox Die from Tonic Studios, so I couldn't help but do a paper piecing card for this project!
For this project, I once again used  the Haunted Variety Pack.   The Starstruck Marigold/Gold Foiled Paper was the perfect tone for the fox!  I die cut white cardstock for some of the accents and also some  Glossy Ebony Black/Gold  Foiled Paper. The sentiment was also cut form the   Glossy Ebony Black/Gold .  All the pieces were glued together with Nuvo Deluxe adhesive. It's so much fun to create these piece creatures!


For the grass, I used the Emerald/Gold Glossy Foiled Paper. I simply cut a 4" strip and used scissors to randomly cut the grass stalks! Super easy!.


The background was a white cardstock that was embossed with a leaves embossing folder.  I also added a gold foiled paper oval in the background (I just used a scrap piece - and used the lovely GOLD side of the foiled paper!). 

I used a Tonic Studios Trick or Treat die cut from Glossy Ebony Black/Gold foiled paper for my sentiment. I was playing with some paper quilling techniques this month, so I decided to use a tiny quilled circle on her bow to decorate!  Isn't it cute?  Have fun making your own cute build-a-bear style cards! :)


Supply List:
Haunted Variety Pack
- White Cardstock
- Tonic Dies (Frankie Fox, Trick or Treat, Mixed Edge Ovals)
- Nuvo Deluxe Adhesive
- Scissors
- Quilling tool
- paper trimmer 

See you next time!


Jess

 photo MHKDesigns_FreshByJess_Signature.png

Monday, 1 October 2018

Halloween Treat Box with Rinea

Hello crafty friends!


Happy October!! It's time for a brand new Rinea Project ! Since it's October, I felt it was time to bring on the Halloween projects!  I keep my Halloween more "cutesy" than scary, so I hope I can inspire some fun craft projects for you!
For this project, I used the Haunted Variety Pack.   With Halloween parties coming up at school, I thought a treat box would fit the bill! I had this Matchbox Die sitting in my stash (it's an old Stampin' Up! one) and I was dying to use it - so it was a perfect win-win!
I love when you have dies that make projects quick and easy! I did use a rubber plate to ensure that the score lines showed up as well as the cut lines - it worked perfectly with the Rinea Foiled Papers!  The scoring was very easy! I just followed the directions on the die box and fold everything up!  I used my Big Shot to cut the foiled paper. For the box, I used the Glossy Marigold Orange/Gold Foiled paper. 


Of course I needed to decorate the box! Before I made this box, I was trying to create spider legs by curling 1/2" strips of Starstruck Ebony Black foiled paper around a pencil. The spider didn't turn out, but the coils became the PERFECT topper for the box!

I used a Tonic Studios halloween die to cut some spiders and webs from Glossy Ebony Black/Gold foiled paper (I just used the gold side for the webs) and glued them. Inside the matchbox is some shredded scrap foiled papers - kind of like Easter basket stuffing - so I can hide a little treat inside!
 

See you next time!


Jess

 photo MHKDesigns_FreshByJess_Signature.png

Tuesday, 25 September 2018

Atlantic Hearts Sketch Challenge #283

Hello crafty friends!

It's time for another great sketch from Atlantic Hearts Sketch Challenge #283!

Here it is:


The sketch was created by Michelle Stewart and digitized by Brandi Robinson


Here is what I created:


I dug into my hoarded stash of October Afternoon "Witch Hazel" line of goodies to make this fun card!


I hope you will come and play along with us!

See you next time!

Jess

 photo MHKDesigns_FreshByJess_Signature.png

Saturday, 15 September 2018

Ninabrook Dynamite Design Team - September 2018

Hello Ninabrook fans!


I'm so excited to be sharing my September Dynamite Design Team creations for www.ninabrook.com!  I used the Spellbound Kit by Fancy Pants - sooo much spooky fun! :) Along with this super cute canvas, check out the cards I created:


I just loved all the little accents in this kit. I created the cute little eyeballs using the Nuvo Crystal Drops in Ebony Black and Simply White.  Here are the supplies I used to make these creations:

Mini-Canvas
  • Spellbound Halloween Paper (Fancy Pants)
  • 6x6 Canvas
  • White Gesso
  • Sprinkler Spray Mist (October Afternoon) in Crepe Paper (from my stash)
  • Nuvo Crystal Drops – Ebony Black
  • Black Rhinestones
  • Tonic Studios Happy Haunting Mini Moments Die
  • Black & Orange Cardstock
  • Mini Banner Punch
  • Black twine
  • Circle Dies (Spellbinders)
  • Tombow Mono Adhesive

Cards
  • Spellbound Bundle by Fancy Pants
  • Black & Orange Cardstock
  • Stampin’ Up! Out on a Limb Stamp Set
  • Versafine Black Ink
  • Nuvo Marker Pens (for colored images)
  • Foam Squares (for pop up dimension)
  • Nuvo Crystal Drops – Ebony Black & Simply White (to make the eyeballs)
  • Tonic Studios Banner Dies – Beautiful Bunting
  • Tulle ribbon from stash
  • Orange Bakers Twine, Black & White Bakers Twine
  • Tonic Studios Happy Haunting Mini Moments Die
  • ATG Adhesive Tape
  • Pop Dots Adhesive

Thanks for stopping by! If you want to see more of my creations, feel free to find me on the following:


Make sure you run to www.ninabrook.com to check out all the amazing deals and goodies they have!!!

 photo MHKDesigns_FreshByJess_Signature.png

Friday, 14 September 2018

SparkleNSprinkle - Great Horned Owl Halloween

Hi Crafty Friends!
I am sooo excited to share this cool mash-up card I made featuring this month's SNS Great Horned Owl Stamp Set!  I actually used the Digital Version of the stamp along with a previous release, When Black Cats Prowl!  Even more fun?  It GLOWS in the dark! :) Perfectly spooky for Halloween!
Here is my SNS Supply List:

This is a great technique that you can use for a variety of backgrounds. I started by printing off my digital images. I simply created the scene I wanted in word. I did flip the bat so they were opposites. That is the best part about digital stamps - you can manipulate them and build a scene!


Once I had it all printed, I punched out a moon shaped piece of cardstock to use as a mask over the owl - I didn't want to cover him up with the Embellishment Mousse!  I then proceeded to simply add my layers of mousse - starting with my Orange Blush around the outside of the mask. I built my layers with a sponge from orange, to Coastal Surf, to Pacific Teal and finally the darkest, Seaspray Green! When I had all the blending where I wanted it, I removed my mask and finished off with the Lemon Sorbet to fill in the "moon" and behind the sentiment.

As I had covered up the bats somewhat with mousse, I wanted them to re-pop a bit, so I used my Sakura Glue Pen to adhere some Black Ice Glitter.

My final touch was the Glow in the Dark Embossing Powder which I added using the Sakura Glue pen. I added it to his eyes, and then made some "stars" in the sky.


Happy cardmaking! :)  See you next time!

 photo MHKDesigns_FreshByJess_Signature.png

Wednesday, 1 August 2018

Scrapy Land Challenge #95

Hello friends!


Welcome to Scrapy Land {Challenge #95}!


I used the following dies:

Tonic Studios Happy Haunting & Haunted House
(But you could use the following:)
Tutti Designs - Haunted House
Tutti Designs - Dies - Haunted House

Frantic Stamper - Spooky Happy Halloween
Frantic Stamper - Dies - Spooky Happy Halloween

Frantic Stamper Ghost Trio
Frantic Stamper - Dies - Ghost Trio

The cool thing about this card? It GLOWS IN THE DARK!  I used Glow in the Dark Embossing Powder on the background :)


OOOO - see how it glows? Soo cool! :)


A little about the Scrapy Land Challenge......


The theme is always ANYTHING GOES using any brand of die that Scrapy Land sells.  In addition, we have TWO WINNERS for each challenge.  One will be a random winner and the other is chosen by the Design Team.  Each winner will receive a generous $10 gift certificate to Scrapy Land.  Did you know Scrapy Land carries over 55 brands of dies? Chances are you have a few of the brands in your stash!  

Please link back to this Scrapy Land Challenge and include the link to this challenge on your blog post.  It would also be extremely helpful if you would list the brands of dies used in your project.  (Sometimes we can't tell if an item is a die cut or chipboard.)

I can't wait to see what you create for this challenge.


Good luck!


 photo MHKDesigns_FreshByJess_Signature.png