Showing posts with label Mixed Media. Show all posts

Saturday, 20 July 2019

Heir of God Bible Journaling with Joy Clair

Hello friends!


I have a bible journal page to share with you featuring a new release stamp set from Joy Clair called "Heir of God". This is really a versatile set, as the castle can totally be used in non-Color By Faith situations too (I thought of a princess castle as soon as I saw it!). 

Heir of God | Bible Journaling stamp set

I decided to do a simple bible Journal page with it. I started by turning by bible to Romans and started reading the word. Then I just let the creativity flow from there!  I grabbed some really old Stampin' Up! Pastels and played with them - it felt good to dive into an older stash of supplies!


Once I had things stamped and colored, I wanted to add texture - and there is nothing better than...texture paste and stencils!


I sprinkled on some Nuvo Shimmer Powders for more shimmer and shine - and it almost ended up looking like mountains or rocks beside my castle! Love it!  I also added some sparkly gems to my crown. 


I hope you will take some time to read your bible today and add a little extra to it!  I find that by having a bible for journaling, the passages really stick with me and it sinks in just a little deeper - and who doesn't love that?

Thanks for allowing me to share my "Color By Faith" journey with you! I am sure learning and growing in faith right along side of you.

Have a wonderful day and I hope to "see" you again soon.

xoxo
Jess

Sunday, 10 February 2019

SparkleNSprinkle - All About the Tulips

Hello friends!


I have a quick and easy project to share with you today for SparkleNSprinkle!  It's a beautiful mixed media wall art piece!


Supply List:
Stamps:
Brocade Backgrounds 398P4 Rubber Stamp Set

Embossing Powders:

Inks:

Tools:

Embellishments:

Other: 
12x12 Patterned Paper
White Cardstock

This piece actually came together quite quickly. I was just playing around with different inking and sponging techniques and voila!

I started by stamping the Brocade Backgrounds stamp across the left hand side of the page with Versamark Ink and heat embossed with Opaline Embossing Powder.


I used the DIGI stamp set in Microsoft Word to combine the wreath & sentiment. I printed off the wreath as large as I could on a piece of white cardstock. Once I cut the wreath out, I sponged on the lighted shade of ink from the Nuvo Hybrid Rose Garden Inks, then set aside to keep working on my background.


To add a little subtle background, I used the Butterfly Stencil along with the ink set in the 4 corners of my background paper. I really love how beautifully it turned out.


For more mixed media feeling, I sprinkled on both Super Thick Gold Embossing Powder and the brand new Berries & Cream Super Thick Embossing Powder and heat set from underneath until it was all melted. I did this randomly over the page, concentrating on the upper right hand side. I love how it turned out!


Using the Flourishes 2 stamp set, I added a little flair to the corners. I did some more sponging around my edges of the paper and attached a ribbon across the center, then added my fussy cut wreath with foam squares. 


Finally, accents with the Nuvo Glitter Drops were added to embellish the page.  I found a sweet little charm in my stash and added it at the end of the sentiment.  


I hope you enjoy this page!  You could easily turn it into a scrapbook page by added a photo box instead of the sentiment in the middle of the wreath!  I just love how versatile these sets are and how you can easily incorporate both digis & rubber stamps into the same project.

See you again soon!

Jess

Friday, 16 November 2018

SparkleNSprinkle - A Big Thanks

Hello crafty friends!


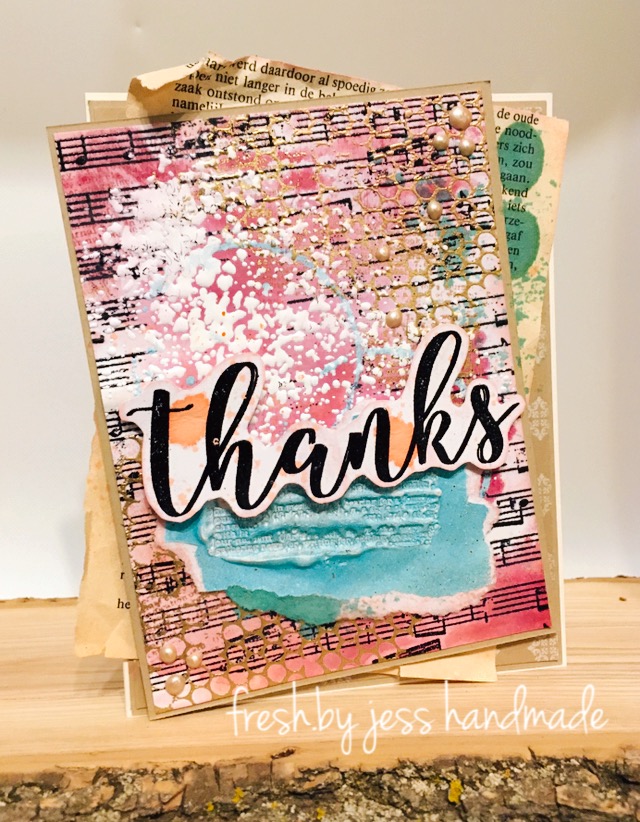
I really stepped out of my comfort zone on this card and did more of a mixed media feel! This is my second card for SparkleNSprinkle November Reveal!!  There are a lot of layers on this card along with tons of embossing powder and a couple extra stamp sets!  SOOO...let's get inky!

First up, here is my SNS Supply List:


Let's get crafting!


Step 1 - Layers of Embossing Powder and Creating the Background

So to start with, I stamped the Music Background stamp with Versamark Ink and heat embossed with Black Detail. I wanted it to be distressed, so I purposely didn't ink it evenly. 


 I continued on with my theme of "Ink Smooshing" and created the backgournd colors using Nuvo Aqua Flow Pens, my Tonic Glass Mat and some water spritzes! I just love all the different backgrounds you can create with this technique!


Step 2 - Add More Embossing Powder and STAMP 

The next few steps I used were fairly random (haha). I used the Journal Mixed Media stamp and Versamark Ink to add some random ink spots. I added both Gold Detail and Beach Cruiser Embossing Powders and heat set.


I just kept adding layers until it looked how I wanted!  I also grabbed the Nuvo Hybrid Diamond Inks and did direct to paper inking along with stamping randomly over the background.  Some Super Thick White Embossing Powder was sprinkled on and heat set from under the panel.  


I wanted a little something special, so I took a piece of white cardstock, inked up with Versamark Ink, sprinkled on Beach Cruiser Embossing Powder and heat set. I repeated this process in the same spot until I had about 4 layers of embossing powder. Working quickly, I used my Journal Mixed Media Stamp (which was inked up with Versamark) and stamped into the warm embossing powder, creating this really cool wax seal effect!  I distress it a bit and added it to my background.


Phew! That was a lot of background steps! (haha).

Step 3 - Sentiment and Put It Together

I stamped the sentiment with Versamark Ink and heat set with Black Detail Embossing Powder. I dripped a bit of Aqua Flow Ink onto it to distress, then fussy cut it out. I adhered it to my background with some Foam Squares.  I used a piece of patterned paper from the Kaisercraft Memory Lane Paperpack and added it to my card base background.


I had a piece of vintage German book paper in my stash, so I distressed it with the Hybrid Inks and Nuvo Aqua Flow Pens, then adhered to the card base with Tear-ific Tape. (oh how I took a ton of photos for this card! LOL)


All the layers were adhered with Tear-ific Tape and I added some Caramel Cream Crystal Drops to finish the card.


I had a ton of fun playing with Embossing Powders on this card - and stamps!!  Now go and have fun creating!

See you soon!

 photo MHKDesigns_FreshByJess_Signature.png

Wednesday, 19 September 2018

Feathered Wall Art

Hello friends!


I'm excited to share my final Southern Ridge Trading Company Design Team Project. It has been truly an honor to design for this amazing Canadian Company!  I've been blessed to be a member of the team, and I will truly miss it - BUT, I will keep on using these amazing chipboard pieces in my art and I can't wait to see what the next group of talented designers showcases!!

I used the following Southern Ridge Trading Company products on this project:

Tribal Feather Mix


So, I wanted to really think outside the box this time - do something NOT even PAPERCRAFT!  GASP!!!  I call it  "Feathered Wall Art" because it's truly not a dreamcatcher. PLUS, it's a fabulous project to use up all those bits and pieces of scrap ribbon and trims we all have kicking around the craft space!!  This is a really simple project.  Let's get crafting!

First, I covered an 8" Brass Dreamcatcher ring with a burlap ribbon. I used some Tear-ific Tape to keep it nice and adhered.


Next, I decorated my feathers!  I used my Nuvo Embellishment Mousses in Fresh Copper, Aquamarine, Toasted Almond and Coastal Surf. I just used a sponge to color both sides. I added a bit of Nuvo Glimmer Paste in Moonstone to one of the feathers as well, using a palette knife to apply.  I tried to use a stencil, but it really didn't leave an effect, so I didn't really include that in my instructions.


The ribbon trims were all tied onto the bottom of the dreamcatcher ring.  I used some embroidery floss to tie my feathers on and accented with some copper leaves, beads and wire.


Here are the supplies I used:

Tribal Feather Mix Chipboard
- Nuvo Embellishment Mousse Toasted Almond, Fresh Copper, Aquamarine, Coastal Surf
- Nuvo Glimmer Paste in Moonstone
- palette knife
- sponge
- ribbon trim
- burlap trim
- sequin trim
- Tear-ific Tape
- 8" DreamCatcher ring
- embroidery floss
- miscellaneous wire trims


Thanks for stopping by!  See you again really soon with some more handmade inspiration!!


Jess


 photo MHKDesigns_FreshByJess_Signature.png

Friday, 18 May 2018

Aster Garden - Light Version

Hello friends!


Today I'm sharing a May Reveal Card for SparkleNSprinkle!  As you recall, last week I shared my Dark Version of the Aster Garden Stamp Set. Well, this week I have the opposite! I created a "Light Version" as well!

First up (like always!)....my SparkleNSprinkle Supply List:


Onto the card tutorial!


So, this was another "Mixed Media" project for me...and it started with PHOTO PAPER!  Yes, shiny, glossy photo paper. I used a 4.25x11 sheet of paper to start with (I knew I was going to make multiple cards from this background!  I grabbed my brand new Nuvo Shimmer Powder in Atlantis Burst and started to play! First, I misted the photo paper with water and then I sprinkled on my Shimmer Powder!  Look at how it reacts with the water!  You don't need much - it is highly concentrated!  You can grab an Aqua Painter brush and move the powder around too (like watercolor!). 


You can see in these photos how I moved the color around! 


This was the dried effect:


I also sprayed on some Nuvo Mica Mist in Turkish Rose! SOoo pretty!


Next, I used my Nuvo Masking Fluid!  This stuff is pretty cool. You literally drop it wherever you want the color to remain underneath (hence, the MASK!). Set it aside to let it dry, then you can layer whatever you want on top. You will then peel off the mask (it's a latex type product so it will just pull off when dry). Pretty cool!


Dripping the Masking Fluid on! 


This is the dried Masking Fluid - you can see how it turned more clear and rubber looking!

I took my Fresh Pear Mica Mist and sprayed that over top of everything.


Then I simply peeled off the "masks" :) 


PHEW!  That was a lot of photos - but I really wanted to showcase the background!  It was so much fun to make!

The rest of the card came together quite quickly. I embossed the Asters using Versamark Ink and Gold Detail Embossing Powder. I took another piece of white cardstock and embossed the Aster one more time with Versamark Ink and Magic Speckle Embossing Powder! SOO pretty! The sentiment was stamped with Versamark Ink and Gold Detail Embossing Powder.  I randomly sprinkled on more Magic Speckle Embossing Powder and heat from underneath - giving a more random look and feel. A light wash of the Atlantis Burst Shimmer Powder was added on the seniment as well!  I used Black Cardstock to back all the white layers and 1/4" Tear-ific Tape to hold everything together.


Finally, Nuvo Glitter Drops in Sunlit Meadow and Blue Lagoon were added to accent everything. Prepare yourself for more photos! :)


SOOO - I hope you like this photo loaded tutorial!  Remember to comment both HERE and on the main SNS Blog Post too to be entered in our monthly contest! 

Thanks for stopping by!  I appreciate all of your comments!
See you soon, 

Jess