Pages

Monday, 31 October 2016

SparkleNSprinkle - November Reveal


Welcome to Sparkle N Sprinkle's
November 1 New Reveal Blog Hop!


We have seven new stamp sets to share with you today. These new sets are 20% off until the 3rd of the month. So once you finish the blog hop, head on over to the store and start shopping. All of the new sets are available on cling mounted rubber or as a digital image.  


The sets are:


Winter Birdhouse 803 (digi version DIGI803)
Stella - Dear Santa 804 (digi version DIGI804)
Christmas Tags #2 806 (digi version DIGI806)
Festive Lantern 808 (digi version DIGI808)
Winter Blue Jay 809 (digi version DIGI809)
Grumpy Goose 823 (digi version DIGI823)
Mr. Snowflake DIGI3127 (digi only)


On Nov 3rd, ONE GRAND PRIZE WINNER will be selected from the comments left on the Designers' blogs listed below. Please leave a comment with each Designer in order to be eligible for the Grand Prize. You never know who the Mystery Designer will be that has the winning comment.

The Grand Prize Winner, which will be announced on the SNS Facebook page and on the SNS Blog, will receive ALL of the new stamp sets released this month (or the digi versions, if preferred).


The Blog Hop order this month is:


(*Tip: if you have difficulty with a particular link, try clicking on the Designer's blog title to send you to their Home page.)


We hope you enjoy the New Reveal Blog Hop as much as we do. Thanks for joining us and remember to comment on each of the Designers' blogs to be eligible for the Grand Prize. 
Wonder who the Mystery Host will be this month????


The Sparkle N Sprinkle Creative Challenge also begins today.  There are lots of prizes and recognition badges.  Come check out how you can become a SNS Featured Artist as well.  The theme is always Anything Goes using Loose Glitter, Embossing Powder, and/or Flock.


Have you checked out the SNS YouTube Channel featuring Demo Donna?  If not, then you are in for a real treat.  Subscribe today to get all the latest Demo Donna tips and techniques!


Supply List:

Christmas Tags #2 806 (digi version DIGI806)


So this card was super fun to make! I started by applying a row of 2.5" Tear-ific Tape across a piece of white cardstock. I used my Big Shot and Sizzix Inksheets Transfer Pad to run the Ribbons & Bows Die through the machine and only cut the top layer of the Tear-ific Tape (protective backing). 


Next, I removed the backing from the main bow portion and applied Blue Haze Glitter to the exposed adhesive. Rub it in well with your finger tool! I removed the inner pieces of the bow backing and applied the Denim Glitter. Oh, is so soft and shiny! :)

Finally, I removed the rest of the backing and applied the Cloud Nine Glitter to the rest of the exposed adhesive. Isn't it a gorgeous technique? Love the results!


I had embossed a piece of blue cardstock with an embossing folder and used a sanding block to distress is slightly. I adhered the bow piece to the background with Tear-ific Tape.

I stamped the Tag using Versamark Ink and embossed with Mediterranean Star Embossing Powder. I punched it out using a circle punch and adhered in the center of the bow using Foam Squares.

I tied a piece of White Mon Ami Gabby Pull Ribbon around the panel and pulled it to make the pretty bow - LOVE these ribbons!


The entire card was adhered to a white A2 card base using Tear-ific Tape. Voila! A pretty, elegant Christmas Card - just for you!


The next stop on our blog hop is the amazing Shona and you can find her blog HERE.

See you next time!

 photo MHKDesigns_FreshByJess_Signature.png

Friday, 28 October 2016

SparkleNSprinkle - Autumn Girlfriends


Hello friends!


I have a few extra creations for SparkleNSprinkle this month - so expect a few more posts this week! 

Today I'm sharing a card I made featuring the Autumn Girlfriends Stamp Set #810.  I used the Digital Version - it prints off a pre-colored image - making it so easy to make your cards!

Here is the SNS Supply List:


Step 1

Print your digital image onto white cardstock (easy, right?).  After I printed it off, I cut it down to the size I wanted and then applied Orange Surprise Glitter to some of the leaves using the Nuvo Small Glue Pen. 

I printed off some of the basket images and applied the Orange Surprise Glitter to them using the Glue Pen as well.  To make the baskets stand out a little more, I used the Nuvo Small Glue Pen to apply the Pebbled Copper Embossing Powder, then heat set.  It just added some cool dimension.


To enhance the lovely ladies on the card, I added some Elephant Gray Flocking to their hair, some Christmas Fire Embossing Powder to the red sweater and some Ballerina Microfine Glitter to the pink sweater (all adhered with the amazing Nuvo Small Glue Pen). 

The sentiment was printed off onto white cardstock and then trimmed to size.  I covered the entire piece of paper with Versamark Ink, then sprinkled on the Clear Detail Embossing Powder, heat setting.  Finally, I carefully sprinkled on some Orange Surprise Glitter and the re-heated the Embossing powder to adhere the glitter!


Step 2

I applied a row of 1/4" Tear-ific Tape around the outside edge of my image.  After you remove the backing tape, gently apply your Copper Gilding Flakes and rub into the adhesive, brushing off the extra.  Don't sneeze or else you will end up with gilding flakes EVERYWHERE! LOL

Step 3

I did some layering for the background with orange cardstock and some patterned paper, then adhered the front panel - all secured with Tear-ific Tape of course!  A piece of orange ribbon was tied around the panel, then I added the sentiment & baskets using dimensional foam tape. The entire panel was adhered to the card base using Tear-ific Tape. 


Finally, I added some embellishment dots using Nuvo Crystal Drops in Ripened Pumpkin and Dandelion Yellow.


I hope you enjoy this card and are inspired to make some wonderful fall creations!


 photo MHKDesigns_FreshByJess_Signature.png

Wednesday, 26 October 2016

SparkleNSprinkle - Christmas Candles Pop Up Card


Hello friends!


I'm here today with some more Christmas Card inspiration for you, featuring the amazing SparkleNSprinkle product line up!  Today, I have a pop-up card featuring the new Stamp Release, "Christmas Candles"


Supply List:


Create your Pop-Up!


I used a die from Lawn Fawn to create my "steps" on my insert.  I just used a simple white cardstock for this step.  I also printed off the digital stamp version (already colored!) of the flowers and the candles. Super easy, right?

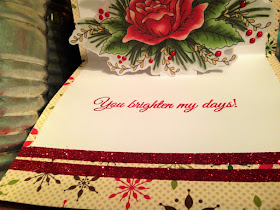
Next, I set about embellishing my images.  I took the Silver Moondust Glitter Drops and added thm to the melting wax portion of the candle (it really looks like wax!).  I  used my Nuvo Small Glue Pen to add some Daisy Microfine Glitter to make the candles "glow" and some Tiger Orange Glitter to add to the flame!  I used the Red Berry Crystal Drops on the berries too.  Finally, I used the Nuvo Small Glue pen to trace some of the flower and added Sparkle Embossing Powder (heat setting of course!) to make the flower pop!

Once everything was dry, I added the candles and flower to the "pop ups" using small bits of 1/4" Tear-ific Tape.  Then I adhered the entire "pop-up panel" to a 5X6 Cardbase made from pretty patterned paper!


I added 2 strips of 1/4" Tear-ific Tape along the bottom and sprinkled on Fire Engine Red Glitter to embellish the inside. Finally, I stamped the greeting using Versamark Ink and adding Christmas Fire Embossing Powder, heat setting to finish.


I decided to leave the outside plain, but tied the entire card up with a pretty bow - just like a present! 


I will definitely be making a few more of these for my Christmas Card stash! :)

Thanks for stopping by! Until next time,


 photo MHKDesigns_FreshByJess_Signature.png

Tuesday, 25 October 2016

SparkleNSprinkle - Christmas Tag Card


Hello friends!


I'm here today with a gorgeous Christmas Card inspiration for you, featuring the amazing SparkleNSprinkle product line up!


Supply List:


Step 1 - Create your background
First of all, I took a large strip of 2.5" Tear-ific Tape and adhered it along the middle of my card.  I then took a piece of the 1/4" Tear-ific Tape and adhered it on the top and bottom of the 2.5" Tape.  I trimmed my card panel to resemble a large Christmas tag.

I ran the Silver Mirror Cardstock through my Big Shot machine using the Christmas Strips - Ribbons & Bows die and cut out the gorgeous bow pattern.  I then removed the backing of the 2.5" Tear-ific Tape and attached the bow. I made sure it was well burnished and attached.  I took my Denim Glitter and sprinkled it all over the remaining exposed adhesive, burnishing well, then removing the excess.


Next, I removed the backing from the 2 strips of 1/4" Tear-ific Tape and added the Blue Haze Glitter - again, burnishing well and brushing off the excess.  Voila!  Background completed!

Step 2 - Complete your image
I took the Ornament tag image and stamped it onto a piece of white cardstock using Versamark Ink. I embossed it with Black Detail Embossing Powder and then colored the image with my Twin Touch Markers.  I used a large circle punch to cut out the image.


After it was colored, I used the Small Nuvo Glue Pen to add some Mediterranean Star Embossing Powder to the center of the ornament (making it look like an old-fashioned Mercury Ornament).  Next, I used the Large Glue Pen and ran it around the edges of the ornament tag, then sprinkled on the Blue Haze Glitter for some extra sparkle!


Step 3 - Assemble!
So, for the final step, I popped up the image using 3D Foam Tape and added a bit of White/Silver Pull ribbon for a "tag" effect.  


Such a simple card, yet it turned out sooo gorgeous!


Until next time,

 photo MHKDesigns_FreshByJess_Signature.png

Saturday, 22 October 2016

MHKDesigns Designer Inspiration - October

Hello friends!


It's time for another Designer Inspiration for MHKDesigns!

This month I chose to work with "Pumpkin Jack"

After printing my image, I colored the pumpkin with markers. I used some fun ribbon & Halloween Papers to complete the card. Here is the inside:


Sooo adorable!  Happy Halloween :)


I hope you enjoy this card and I can't wait to see you next time!


Friday, 21 October 2016

MHKDesigns October/November Monthly Challenge

Hello friends!


It's time for another fun Monthly Challenge at MHKDesigns!  

Here is our Challenge Prompt:


Here is what I created:


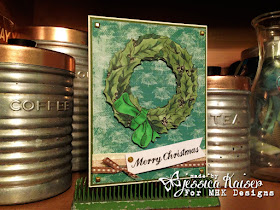
I used the "Wonderful Wreath" stamp set along with the the sentiment from "Perfect Poinsettia" to create this card.  I also made my background using the Digital Paper Pack "Deck the Halls". 

I hope you like the card and will come play along with us this month.

Until next time,


Creative Corner Challenges - Black & White ONLY


Hello friends!


Welcome to another week at Creative Corner Challenges!  Our theme this week is Black & White Only.  We did not have a sponsor, so we had complete creative freedom!


Here is what I created:


I used my Close to My Heart Artfully Sent Cartridge to make this card.  I added some glitter to the flowers.  The sentiment was embossed using Black Embossing Powder and some Magic Speckle for detail.


I hope you will come along and play with us this week!

Until next time,


Thursday, 20 October 2016

MHKDesigns - October Release Day 5 - New Year Greetings

Hello friends!

I am SUPER excited to welcome you to the October 2016 MHKDesigns release!  We have some really fun sets for you to check out, as well as chances to win either one of the sets OR all of them!  More about the giveaways a bit later on, but right now, let's check out today's release set...


Here is what I created:

And now, let's talk about how to get this new set OR the entire release for FREE!  Here's what you'll need to do...
  1. Comment on the MHKDesigns blog.
  2. Comment on each DT member's blog.
  3. Join our MHKDesigners and Friends Facebook group and comment there.
Mynn will be choosing comments randomly from all these places after the release is over, and the authors of those comments will be our winners!  So, the best way to win is to comment every day!  We LOVE the feedback you give us! :)  Here's the list of blogs for you to visit today...

Asha | Donna | Katie | Judy | Jerrie | Jessica | Julie | Lilian
Lorie | Mynn | NanaConnie | Rocky | Sathya | Shawna

Thanks for stopping by today!  This was our last release, but don't forget to check out the MHKDesigns Etsy shop for some amazing stamp sets!  Don't forget to get all your commenting in for your chance to WIN, and please do join our monthly challenge, as well!  

See you tomorrow for our NEW Monthly Challenge Release!